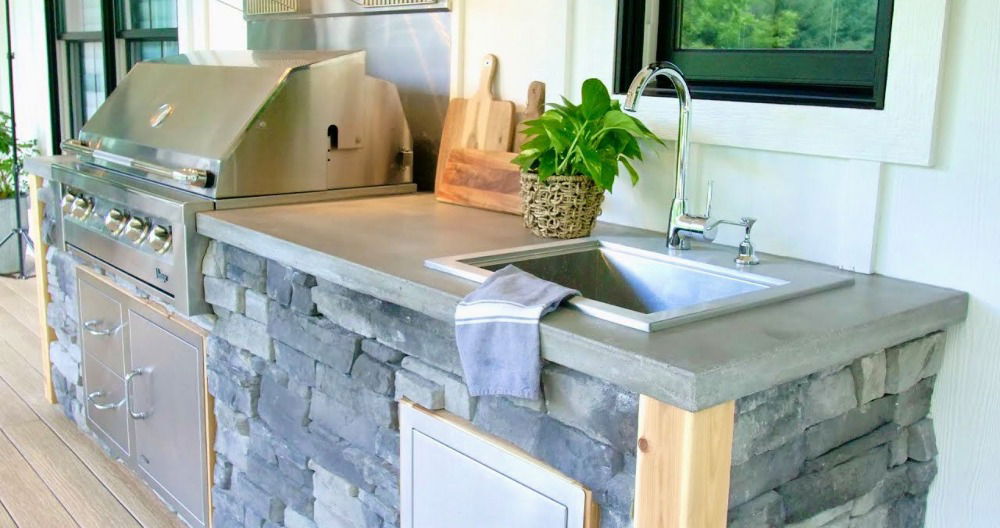
Building my own DIY outdoor sink was one of the best projects I've ever done. It started with a need for a space to wash my hands and vegetables outside after gardening. With some simple materials and tools, I managed to build a functional and stylish outdoor sink station that has made my gardening routine so much easier.
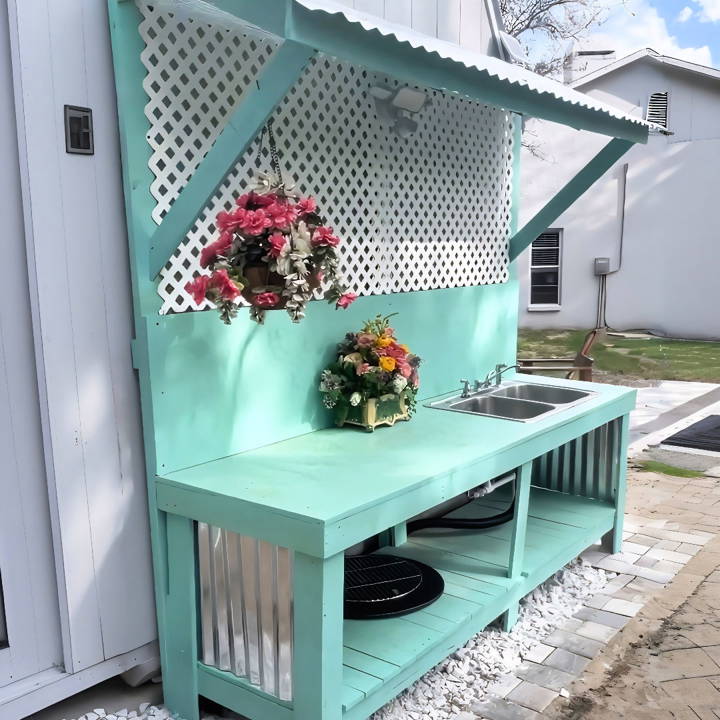
Constructing the DIY outdoor sink wasn't just practical but also a fun and engaging experience. The sense of accomplishment I felt after completing the project was priceless.
I'm excited to share my experience with you, and I believe this guide will be extremely helpful. This might inspire you to start your own DIY adventure.
Getting Started: Understanding the Need and Planning
The idea dawned on me while I was decluttering my art studio, which doubles as a she-shed. The constant back and forth to clean my hands or gardening tools was becoming tiresome. An outdoor sink seemed like a perfect solution. This project was not only about utility but also about enhancing my outdoor space aesthetically.
Materials You'll Need and Why
- Pressure-treated 1x4s: The backbone of the structure, chosen for their durability and resistance to outdoor elements.
- Primer, Exterior Paint, and Polyurethane: To protect the wood and give it a finished, pleasing look. The primer ensures better paint adhesion, while the polyurethane adds an extra layer of protection against weather.
- Galvanized Metal for Roof and Sides: Selected for its rust-resistant properties, ensuring longevity.
- Lattice Paneling: Added for decorative purposes, bringing an element of design to the utility structure.
- Motion Sensor Light: For functionality and safety, allowing use during nighttime.
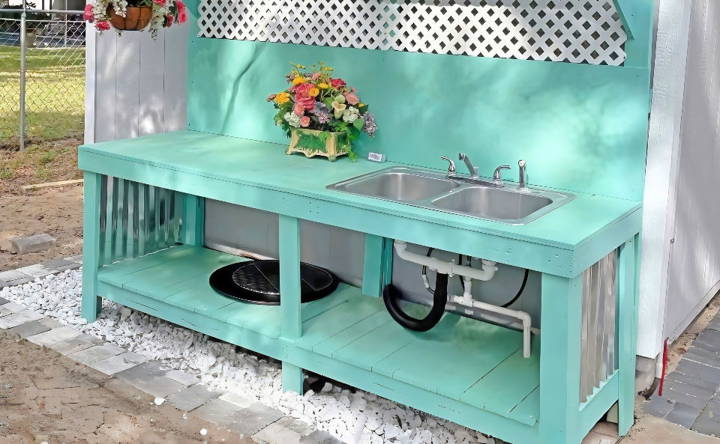
- Sink and Plumbing Supplies: Depending on the type of sink and installation preferences, these could vary.
Step by Step Instructions
Discover how to build your own DIY outdoor sink with these easy step-by-step instructions from planning and measurements to finishing touches.
Planning and Measurements
Firstly, measure the intended area for your outdoor sink. In my case, it needed to be 8' wide x 8' tall x 28” deep to fit comfortably next to my she-shed. Planning is crucial; envision the finished product, considering the sink's placement and how it blends with the surroundings.
Building the Frame
Using the pressure-treated 1x4s, I constructed the frame according to my measurements. Remember, accuracy in this step saves a lot of trouble later. The frame serves as the skeleton of the sink, so ensure it's sturdy and well-constructed.
Priming and Painting
After assembling the frame, I applied a coat of primer, followed by two coats of exterior paint in a color that complemented my outdoor space. Once dry, I sealed it with an exterior polyurethane coat for extra durability.
Adding the Roof and Sides
Cutting the galvanized metal to size, I attached it to the top and sides. This process required careful handling and the right tools to avoid sharp edges. The metal not only adds a rustic charm but is also practical for outdoor conditions.
Installing the Lattice and Sink
The lattice panel was added for design and to allow climbing plants to beautify the structure over time. Installing the sink was somewhat challenging but manageable with basic plumbing knowledge. Ensure the sink is level and securely attached.
Finishing Touches: Motion Sensor Light
The final step involved mounting a motion sensor light above the sink, providing convenience and safety for nighttime use. This small addition made a significant difference in functionality.
Personal Insights and Advice
Building this outdoor garden sink was a rewarding experience that combined functionality with aesthetics. The process, while demanding patience and some craftsmanship, is achievable with proper planning and a bit of creativity. Here are some personal tips:
- Take Your Time: Don't rush the process. Enjoy the building experience and ensure each step is done correctly.
- Customize: Feel free to adapt the design to better suit your needs or aesthetic preferences.
- Maintenance: Regularly check the structure and paint for any wear and reapply protective coatings as needed.
Design Customization Ideas for Your DIY Outdoor Sink
Building a DIY outdoor sink that reflects your personal style and meets your functional needs can be a rewarding project. Here are some design customization ideas to help you tailor your outdoor sink to your preferences and lifestyle:
Choose Your Style
Think about the overall look you want for your outdoor sink. Do you prefer a sleek and modern design, or are you more inclined towards a rustic, country feel? Maybe a classic farmhouse style appeals to you. Decide on a theme that complements your outdoor space and stick to it throughout the project.
Select Materials
The materials you choose will greatly influence the appearance and durability of your outdoor sink. Stainless steel is a popular choice for its modern look and rust resistance. For a more natural or rustic appearance, consider using stone, concrete, or repurposed wood. Ensure that all materials are suitable for outdoor use and can withstand the elements.
Incorporate Color
Color can add personality to your outdoor sink. Paint the base or frame in a color that matches your outdoor decor. Neutral colors like beige, gray, or white can blend seamlessly with your surroundings, while bold colors like blue, green, or red can make a statement.
Functional Features
Think about the features that will make your outdoor sink more functional. A deep basin is useful for washing larger items, while multiple basins can help with multitasking. Consider adding a built-in cutting board or a drainboard for added convenience.
Faucet Selection
The faucet is not just a functional element; it's also a design feature. Choose a faucet that matches the style of your sink and offers the functionality you need. A high-arched faucet can make filling pots easier, while a sprayer attachment can be handy for rinsing off garden tools.
Lighting and Accessories
Good lighting can enhance the usability of your outdoor sink at night. Install LED lights under the cabinets or above the sink area. Add accessories like a soap dispenser or hooks for hanging towels or utensils to keep everything within reach.
Personal Touches
Finally, add personal touches that make the space uniquely yours. Decorate with plants, hang artwork, or display decorative items that reflect your personality and interests.
Design your outdoor sink to be both functional and stylish. Keep it simple, prioritize your needs, and enjoy enhancing your outdoor space.
Troubleshooting Common Issues with DIY Outdoor Sinks
When you've put effort into building a DIY outdoor sink, encountering issues can be frustrating. Here's a guide to troubleshooting some common problems in a straightforward and easy-to-understand way.
Dealing with Clogs
Clogs are the most frequent issue with outdoor sinks. If water isn't draining properly:
- Check the strainer basket—remove and clean it.
- Use a plunger—it can dislodge minor clogs.
- Try a plumber's snake for stubborn blockages.
Fixing Leaks
Leaks can occur at the faucet or pipes:
- Tighten connections with a wrench if they're loose.
- Replace worn washers inside the faucet to stop drips.
- Apply sealant to pipe threads if they're leaking.
Addressing Low Water Pressure
If water pressure is low:
- Clean the aerator—mineral buildup can block water flow.
- Inspect the supply line for kinks or blockages.
- Check the water valve—ensure it's fully open.
Rust and Corrosion
Outdoor sinks can rust over time:
- Use rust remover and a scrubbing pad for small spots.
- Repaint metal parts with rust-inhibiting paint.
- Consider stainless steel or plastic components for replacements.
Winterizing Your Sink
To prevent damage in cold weather:
- Drain all water from the pipes and faucet.
- Disconnect and store hoses indoors.
- Insulate pipes to protect against freezing temperatures.
Follow these tips to maintain your outdoor sink. Regular maintenance prevents issues. Consult a professional if problems persist.
Maintenance Tips for Your DIY Outdoor Sink
Keeping your DIY outdoor sink in top condition doesn't have to be complicated. Here are some straightforward maintenance tips to ensure it remains clean, functional, and beautiful for years to come.
Regular Cleaning
- Wipe down the sink after each use to prevent stains and buildup.
- Use gentle cleaners like dish soap and water for daily cleaning.
- Avoid abrasive materials that can scratch the surface.
Seasonal Care
- In spring, check for any winter damage and make necessary repairs.
- During summer, shield your sink from excessive sun to prevent fading.
- In autumn, clear leaves and debris to prevent clogs.
- Before winter, drain the sink to avoid freezing and cracking.
Protecting the Surface
- Apply a sealant to wood or stone sinks annually to repel water and stains.
- Cover the sink when not in use to protect it from weather and debris.
Checking for Wear and Tear
- Inspect faucets and fittings regularly for signs of corrosion or leaks.
- Tighten loose parts and replace any that are worn out or damaged.
Ensuring Proper Drainage
- Keep the drain clear of food particles and other objects.
- Use a strainer basket to catch debris before it causes blockages.
Simple maintenance will keep your outdoor sink looking and working well. Regular care saves time and money and enhances your outdoor space.
FAQs About DIY Outdoor Sink
Find answers to frequently asked questions about DIY outdoor sinks and learn tips on installation, materials, and maintenance for your backyard project.
The simplest way to supply water to your outdoor sink is by connecting it to a garden hose using appropriate adapters and connectors. Ensure that the hose is attached to a water source with a shut-off valve. For a more permanent solution, you can connect the sink to your home’s water lines, but this may require professional plumbing assistance.
Yes, you can build a self-contained outdoor sink system that doesn't require traditional plumbing. This can be done by using a large water jug or barrel as a water reservoir and a waste bucket beneath the sink to collect greywater. Remember to regularly empty and clean the waste bucket to maintain hygiene.
Outdoor sinks require regular cleaning to prevent the buildup of dirt and grime. Use natural cleaning agents to avoid contaminating your garden. Additionally, during colder months, it's important to drain the water lines to prevent freezing and cracking. Inspect the sink and fixtures periodically for leaks or wear and repair as needed.
To make your outdoor sink eco-friendly, consider using recycled materials for construction, install a water-saving faucet, and use the greywater for watering plants. You can also collect rainwater as a water source to further reduce your environmental impact.
To ensure your DIY outdoor sink is stable and secure, start by choosing a level and firm location for installation. Use a sturdy frame made of weather-resistant materials like treated wood or metal. Anchor the frame to the ground with concrete footings or heavy-duty bolts if necessary. Make sure the sink basin is securely attached to the frame and the plumbing is properly fitted to prevent leaks and wobbles. Regularly check all connections and supports for signs of wear or damage, and tighten or replace as needed to maintain stability.
Conclusion
Now that you have an idea of how satisfying and practical building your own DIY outdoor sink can be, I encourage you to get started. This guide will help you through each step and make the process enjoyable.


