Building a DIY outdoor TV enclosure was one of the best projects I did during the summer. I always wanted to watch sports and movies outside without worrying about rain or dust. I started by measuring the TV and buying all the necessary materials, like wood, screws, and plexiglass. My goal was to build something strong and weatherproof.
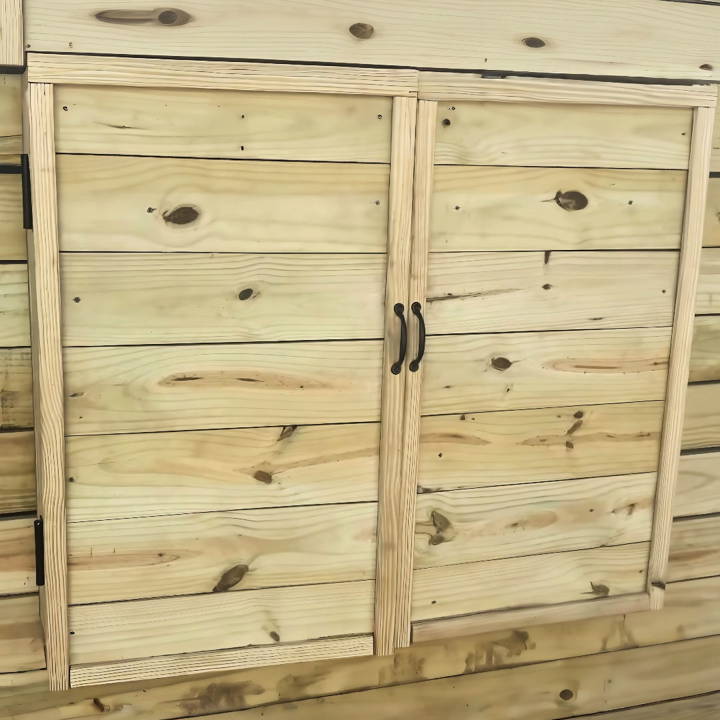
Making the DIY outdoor TV cabinet took me a weekend. I followed simple plans and made sure to seal every edge to keep the weather out. Now, we enjoy movies under the stars, comfortably, on our patio.
You can do this too, and I'm helping with the steps below. You will find it helpful to build your own outdoor TV space.
Materials Needed
To ensure the cabinet would withstand weather conditions, I carefully selected the following materials:
- Two pieces of pressure-treated plywood: These serve as the front door and the back panel of the cabinet. Pressure-treated wood is crucial for its resistance to moisture and decay.
- 2x6 and 1x6 boards: Used for constructing the frame and the decorative front of the cabinet.
- Hinges and screws: Essential for attaching the door to the cabinet.
- Caulk and waterproof sealant: To seal gaps and make the cabinet water-resistant.
- Peel-and-stick roofing material: For covering the top edges where water might seep in.
- Window seal and wood glue: Additional protection against water intrusion.
- Outdoor-rated handles and latch: For easy opening and closing of the cabinet doors.
Step by Step Instructions
Learn how to make a DIY outdoor TV enclosure with our step-by-step guide. Protect your TV effortlessly. Ideal for outdoor entertainment!
Step 1: Constructing the Frame
First, I secured the back panel of pressure-treated plywood to the wall where I wanted the TV to be. Then, I built a frame around it using 2x6 boards, ensuring it was firmly attached and could support the weight of the cabinet and TV.
Step 2: Building the Door
I took the second piece of pressure-treated plywood and attached hinges meant for outdoor use. It's important to pre-attach the hinges to test the door swing and make any necessary adjustments before moving on to decoration.
Step 3: Designing the Front
On the front piece, I laid out a pattern with 1x6 boards to add some aesthetic appeal. After finalizing the design, I cut the door down the middle to build two opening doors. I then secured my design with screws, making sure everything was tight and aligned.
Step 4: Weatherproofing
To make the cabinet water-resistant, I outlined the door with chalk when closed to identify where to place trim inside the cabinet for additional protection. After attaching the trim, I caulked around the top edges where the door meets the cabinet to prevent water from entering.
I then applied the peel-and-stick roofing material over the joints and added window seal at the top edge to ward off direct rainfall. I also pitched the 'roof' of the cabinet slightly by placing shims under a horizontal board running across the top, ensuring water drains backwards and away from the cabinet.
Step 5: Sealing and Finishing Touches
Every hole drilled into the top for screws or other attachments was sealed with caulk to prevent water from leaking through. For electrical components, like the outlet for the TV, I ensured they were encased in waterproof boxes and used expanding foam sealant to block any entry points for moisture or pests.
Lastly, I added outdoor-rated handles and a latch to the doors for easy access. The finishing touch involved applying an outdoor-grade stain to protect the wood and enhance its appearance.
Customization Ideas
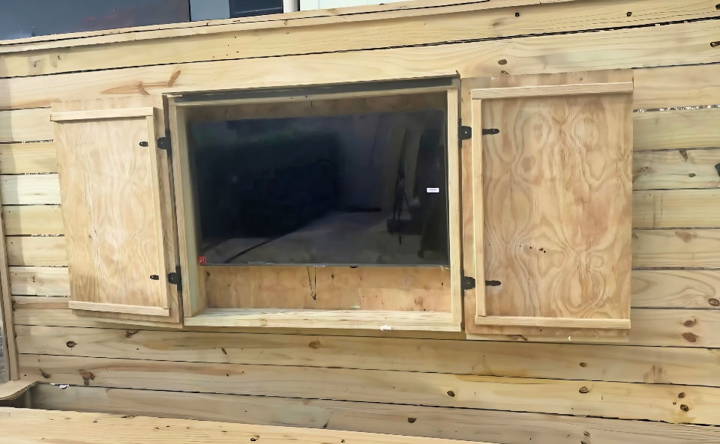
Building a DIY outdoor TV enclosure doesn’t just end with functionality; it’s also an opportunity to add a personal touch to your outdoor space. Here are some ideas to customize your enclosure that are practical, easy to understand, and can make your project truly unique.
- Choose Your Style: Think about the overall look you want to achieve. Do you want your enclosure to blend in with the natural surroundings or stand out as a focal point? Select materials and finishes that reflect your personal style. For a natural look, consider staining wood to match your decking or garden furniture. For a modern twist, sleek metal or painted finishes can give your enclosure a contemporary edge.
- Add Decorative Elements: Incorporate elements that reflect your personality or interests. This could be anything from themed handles, such as nautical rope knots for a beach house vibe, to decorative metalwork for a more industrial aesthetic. Even small details like the color of screws or the design of ventilation grates can make a big difference.
- Functional Add-Ons: Consider practical additions that enhance the viewing experience. Mounting a soundbar shelf below the TV or integrating speakers into the enclosure can significantly improve audio quality. Adding a small cabinet or drawers can provide handy storage for remote controls and other accessories.
- Light It Up: Installing LED strip lights around the enclosure can build ambiance and improve visibility at night. Choose lights with adjustable brightness and color to set the mood for different occasions.
- Weather-Ready Features: For those living in areas with unpredictable weather, adding a retractable waterproof cover or a built-in heater can protect your TV and make it usable year-round. Think about the direction of prevailing winds and the path of the sun when designing these features to ensure they’re effective.
- Tech-Savvy Solutions: If you’re comfortable with technology, integrating smart home features can take your enclosure to the next level. Consider options for remote control access, automated opening mechanisms, or even solar panels to power your setup sustainably.
By considering these customization ideas, you can build an outdoor TV enclosure that is not only functional but also a reflection of your style and needs.
Advanced Features
Incorporating advanced features into your DIY outdoor TV enclosure can significantly enhance your entertainment experience. Here’s how you can integrate modern technology and innovative solutions to build a smart and user-friendly setup.
- Smart Home Integration: Connect your outdoor TV to your home’s smart system. This allows you to control the TV, lighting, and other connected devices with voice commands or through a smartphone app. Imagine adjusting the volume, changing channels, or even ordering pizza during your movie night, all without leaving your seat.
- Automated Systems: Consider installing automated systems for convenience. Motorized lifts can hide your TV when not in use, protecting it from the elements. Automated covers can unfold to shield your screen from the midday glare or unexpected rain showers.
- Solar Power Options: For the eco-conscious, solar panels can be a great addition. They can power your TV and accessories, reducing energy costs and your carbon footprint. Ensure the panels are positioned to receive maximum sunlight, and consider battery storage for nighttime use.
- Enhanced Connectivity: Ensure your enclosure has a strong Wi-Fi signal or a wired internet connection for seamless streaming. A dedicated outdoor router or a Wi-Fi extender can help eliminate connectivity issues, providing uninterrupted entertainment.
- Security Features: Security is important, especially for outdoor electronics. Install locks on the enclosure and consider adding surveillance cameras or motion sensors that integrate with your home security system to keep your investment safe.
- Weather Data Display: A built-in weather station can provide real-time data on temperature, humidity, and precipitation. This feature can help you plan your outdoor viewing sessions and protect your equipment from adverse weather conditions.
- Lighting and Sound: Incorporate ambient lighting that adjusts automatically based on the time of day or the content on the screen. High-quality outdoor speakers can also be built into the enclosure, providing immersive sound without the need for additional equipment.
These advanced features turn your outdoor TV enclosure into a luxury entertainment hub, offering convenience, security, and protection.
Maintenance and Care
Taking care of your DIY outdoor TV enclosure is essential to ensure it continues to protect your television and looks good for years to come. Here’s a straightforward guide to maintaining your enclosure, keeping it simple and jargon-free.
- Regular Cleaning: Dust and dirt can accumulate on your enclosure, so regular cleaning is important. Use a soft cloth and a mild detergent to wipe down the surfaces gently. For glass or acrylic panels, use a non-abrasive cleaner to avoid scratches.
- Inspect for Damage: Every few months, inspect your enclosure for any signs of wear or damage. Look for cracks, warping, or discoloration, especially after extreme weather events. Early detection can prevent bigger issues down the line.
- Check Seals and Weather Stripping: The seals around your enclosure keep moisture out and help regulate temperature. Check them periodically to ensure they’re intact and replace them if they show signs of deterioration.
- Monitor Ventilation: Proper ventilation prevents overheating. Make sure the vents are clear of obstructions and that air can flow freely to keep your TV cool during use.
- Touch-Up Paint and Stain: If your enclosure is made of wood and is painted or stained, it may need a touch-up to maintain its appearance and protection. This is usually needed every couple of years, depending on your climate and the enclosure’s exposure to the elements.
- Secure Hardware: Check all screws, hinges, and mounts to ensure they’re tight and secure. Loose hardware can lead to instability or gaps that allow moisture and insects inside.
- Winter Care: If you live in an area with harsh winters, consider storing your TV indoors during the coldest months. If that’s not possible, make sure your enclosure provides adequate insulation and protection from snow and ice.
- Professional Help: If you encounter any electrical issues or structural problems beyond your expertise, don’t hesitate to seek professional help. It’s better to be safe and maintain the integrity of your enclosure than to risk further damage.
Follow these tips to extend the life of your outdoor TV enclosure and keep it looking good. Regular maintenance ensures worry-free outdoor entertainment.
FAQs About DIY Outdoor TV Enclosure
Discover essential FAQs about DIY outdoor TV enclosures, covering installation, protection, and weatherproofing to enhance your outdoor entertainment setup.
To weatherproof your outdoor TV enclosure, use a rubberized coating like Rust-Oleum Leak Seal on the exterior surfaces to make it water-tight. Additionally, install a rubber weather strip inside the cover to seal it against moisture. Regularly check the enclosure for any signs of damage or wear that could compromise its weatherproofing.
Yes, you can build an outdoor TV enclosure for any size TV. However, you will need to adjust the dimensions of your materials accordingly. Most DIY plans cater to common TV sizes, and you can find instructions for enclosures that fit up to a 55" TV. Always measure your TV before starting the project to ensure a proper fit.
You can customize your outdoor TV enclosure by choosing materials that match your outdoor decor or painting it in a color that complements your space. Some DIY plans offer customizable options for the design, allowing you to add features like doors or mounts that suit your specific needs.
To maintain the clarity of the TV screen, ensure that the front panel of your enclosure is made of a transparent, non-reflective material that allows for clear viewing while protecting the screen from the elements. Regularly clean the panel with a soft, non-abrasive cloth and a cleaner suitable for the material to prevent dust and smudges from obstructing the view.
The best way to manage cables and connections is to use cable glands and weatherproof junction boxes to ensure all connections are secure and protected from moisture and pests. Additionally, consider using wireless devices and Bluetooth connections to minimize the number of cables needed. Always use outdoor-rated cables and connectors to withstand the environmental conditions.
Conclusion
Wrapping up, making your own DIY outdoor TV enclosure is a great way to enjoy your favorite shows or movies in an outdoor setting. This weatherproof solution ensures that your TV is protected from the elements. By following these steps, you can have an outdoor entertainment setup that's both functional and stylish. Enjoy your new space!


