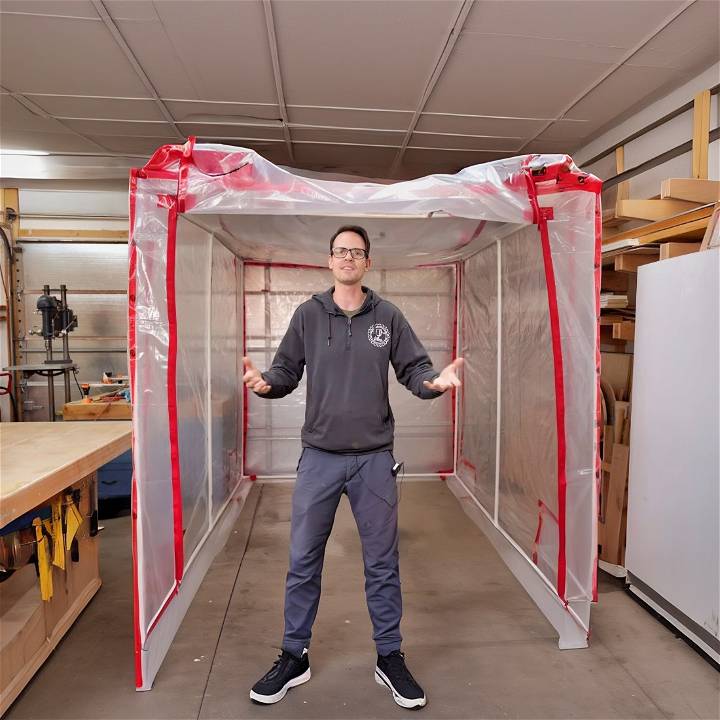
Making a homemade DIY paint booth is an exciting project that can significantly enhance your spray painting experience, ensuring a cleaner environment and better results. This guide covers everything from gathering the right materials and tools to assembling the frame and ensuring proper ventilation. It is tailored to help you build a spray booth that is both efficient and cost-effective without compromising on quality.
Beginners and seasoned DIY enthusiasts will find step-by-step instructions that make the process straightforward and manageable. From setting up the frame to adding the doors and optional ventilation, every step is designed to make your painting projects more professional and enjoyable. We also include maintenance tips and safety precautions to keep your booth in top shape and ensure your well-being during use. Get ready to elevate your painting projects with your very own spray booth!
Continue reading to delve into the specifics of constructing your spray booth, including cost and time estimates to help you plan your project effectively.
Materials Needed
- PVC Pipes
- PVC Corner Brackets
- T-joints for PVC
- Plastic Sheeting
- Painters Tape and Red Tuck Tape
- Zipper Door System
- Box Fan (optional for air extraction)
- Air Filters (optional for cleaner air intake)
Tools Required
- PVC Cutter or Saw
- Measuring Tape
Step by Step Instructions
Learn how to build a spray booth with our homemade DIY paint booth guide below:
Frame Assembly
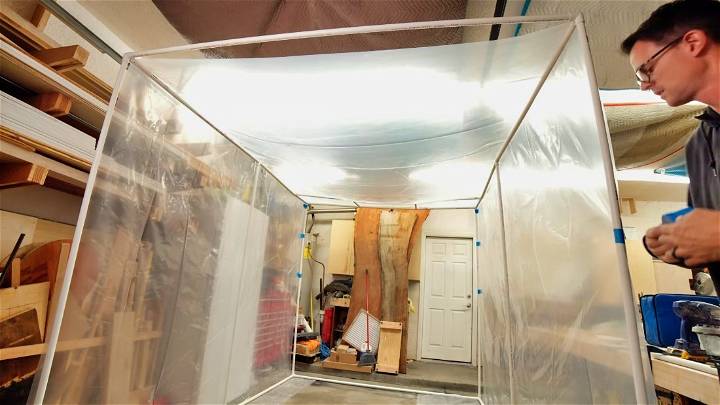
- Cutting PVC Pipes: Measure and cut your PVC pipes. You'll need 13 pieces to build a frame sized 10 feet long, 7 feet wide, and 7 feet tall.
- Assembly: Start by making the base of the frame using the PVC pipes and corner brackets. Continue by adding vertical supports and connecting them on top with horizontal pipes. Ensure that pipes are inserted half an inch into the adapters for a secure fit.
Covering with Plastic Sheeting
- Drape Plastic Over: Once the frame is up, cover it with plastic sheeting. Leave enough overhang to tuck under the frame. Center the plastic sheet over the frame.
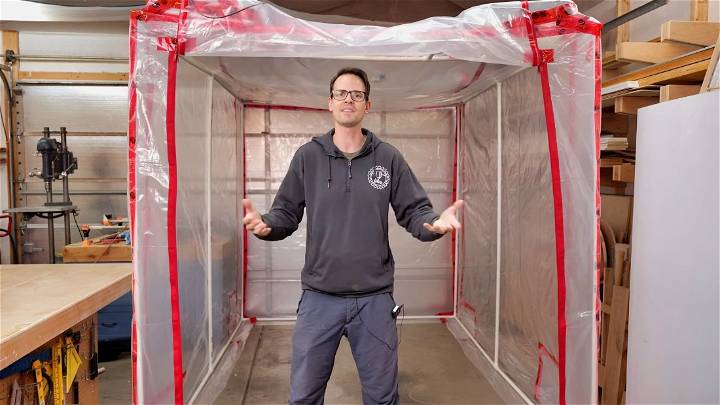
- Securing Edges: Use painter's tape to pull the plastic taut and secure it to the frame. This keeps the sheet in place and prevents it from flapping.
Adding The Door
- Door Installation: Choose a suitable position for your zipper door, ideally one side of the booth. Follow the instructions on your zipper door system to install it properly.
- Cutting Plastic Door Opening: After attaching the zipper, cut along the inside to make an opening. This allows you direct access into your spray booth.
Ventilation (Optional)
- Exhaust Setup: To control overspray and dust, set up an exhaust system using a box fan and air filter. Attach the fan and filter to one end of the booth, ensuring it's secure.
- Positive Airflow: For even better results, consider using another fan to make positive pressure inside the booth. This setup pushes clean air in, forcing dusty air out through the exhaust setup, minimizing dust inside the booth.
Collapsing The Booth
- Disassembly: Once your project is complete, the spray booth can easily be disassembled. Remove the plastic sheeting carefully, then detach the PVC frame.
- Storage: The lightweight and collapsible nature of the PVC frame makes it easy to store away for future use.
Maintenance Tips
- Regularly check the plastic sheeting for tears or holes.
- Replace the air filters as needed to ensure efficient dust control.
Video Tutorial
For a step-by-step video tutorial on constructing this DIY collapsible spray booth, watch this helpful YouTube video.
It pairs well with this written guide, providing a visual walkthrough of the techniques discussed in a manner that complements our text explanation seamlessly.
By following these steps, you'll have a functional and collapsible spray booth perfect for all your painting needs. Happy painting, and remember, a clean workspace is a happy workspace!
Cost and Time Estimates
When planning a DIY paint booth project, it's important to have a clear understanding of the potential costs and time involved. Here's a guide to help you estimate these factors:
Cost Estimates
The cost of setting up a DIY paint booth can vary greatly depending on the materials used, the size of the booth, and whether you already have some of the necessary tools. Here are some factors to consider:
- Materials: The cost of materials such as plastic sheeting, PVC pipes, duct tape, and fans can add up. Try to source materials economically without compromising on quality.
- Tools: If you need to purchase new tools for the project, this will add to the cost. Consider borrowing tools or buying second-hand to save money.
- Paint: The cost of paint can vary widely depending on the type and quality. Factor this into your budget.
Time Estimates
The time it takes to set up a DIY paint booth can also vary. Here are some factors that can affect the time required:
- Preparation: Gathering materials and preparing your workspace can take time. Don't rush this step as good preparation can save time later.
- Assembly: The time it takes to assemble your paint booth will depend on the complexity of your design. A simple design can be assembled in a few hours, while a more complex design might take a day or two.
- Painting and Drying: The painting process itself, as well as drying time, should be factored into your time estimates.
These are just estimates. Your actual costs and time may vary. It's always a good idea to allow for extra time and budget for unexpected expenses.
Safety Precautions
When setting up and using a DIY paint booth, safety should be your top priority. Here are some key safety measures to consider:
Ventilation
Proper ventilation is crucial when painting. Fumes from paint can be harmful if inhaled in large quantities. Ensure your paint booth is in a well-ventilated area, preferably outdoors. If you're painting indoors, open windows and doors for air circulation. Consider using a fan to help disperse the fumes.
Fire Safety
Paint and many of its components are flammable. Keep your paint booth away from open flames or sparks. Have a fire extinguisher nearby and know how to use it.
Personal Protective Equipment
Always wear appropriate Personal Protective Equipment (PPE). This includes a mask or respirator to protect against inhaling fumes, goggles to protect your eyes, and gloves to protect your skin.
Safe Disposal
Dispose of any used paint or solvents properly. Many of these materials can be harmful to the environment if not disposed of correctly. Check with your local waste disposal facility to find out the correct way to dispose of these materials.
Your health and well-being are more important than any project. Always take the necessary precautions to protect yourself and those around you.
Troubleshooting Guide
When working on a DIY paint booth, you may encounter some challenges. Here's a guide to help you troubleshoot common issues:
Paint Not Adhering Properly
If you find that the paint is not sticking to the surface as it should, it could be due to a few reasons:
- Surface Preparation: Ensure the surface is clean, dry, and free from dust or oil. A poorly prepared surface can lead to poor paint adhesion.
- Paint Quality: Check the quality of your paint. Old or low-quality paint may not adhere well.
Uneven Paint Application
If your paint application is uneven or streaky, consider the following:
- Spray Technique: Make sure you're holding the spray gun at the correct distance and angle. Practice your technique to get a feel for it.
- Paint Consistency: If the paint is too thick or thin, it can lead to uneven application. Adjust the consistency as needed.
Overspray
Overspray is when paint goes beyond the intended area. To minimize overspray:
- Controlled Environment: Ensure your paint booth is enclosed and free from drafts that can carry paint particles.
- Spray Gun Control: Use controlled, steady movements when spraying.
Paint Drying Too Slowly
If your paint is taking too long to dry, it could be due to:
- Temperature and Humidity: Paint dries slower in cold, humid conditions. Try to paint in a warm, dry environment.
- Paint Type: Some types of paint naturally take longer to dry. Check the manufacturer's instructions.
Patience and practice are key when working on a DIY project. Don't be discouraged if things don't go perfectly the first time.
FAQs About DIY Paint Booth
In this section, we address some common queries that readers might have about setting up and using a DIY paint booth.
What type of paint can I use in a DIY paint booth?
You can use any type of paint in your DIY paint booth, including acrylic, enamel, and lacquer. However, it's important to note that different types of paint may require different safety precautions and cleanup methods.
How can I reduce overspray in my DIY paint booth?
Overspray can be reduced by controlling the pressure on your spray gun and maintaining a consistent distance between the gun and the surface you're painting. Using a smaller spray pattern can also help.
Can I use a DIY paint booth indoors?
Yes, you can use a DIY paint booth indoors, but it's crucial to ensure proper ventilation to avoid inhaling harmful paint fumes. Always wear a mask or respirator when painting indoors.
How often should I clean my DIY paint booth?
The frequency of cleaning your DIY paint booth depends on how often you use it. As a general rule, it's best to clean the booth after each use to prevent paint buildup and ensure optimal performance.
Can I use a DIY paint booth for large projects?
Yes, but the size of your DIY paint booth will need to be sufficient for the size of the project. You may need to modify your booth or build a larger one for bigger projects.
Remember, every DIY project is a learning experience. Don't hesitate to experiment and make adjustments as needed.
Can a heated paint booth cause condensation?
Yes, a heated paint booth can cause condensation if the temperature differences inside and outside the booth are significant. This can be mitigated by properly insulating the booth and maintaining a consistent temperature.
Do I need to protect the floor in a paint booth?
Yes, protecting the floor of your paint booth is important. This can be done using drop cloths or other protective materials. It helps in easy cleanup and prevents any damage to the floor from paint spills.
Do I need to have a paint booth for priming?
While it's not absolutely necessary, having a paint booth for priming can provide a controlled environment that can lead to better results. It can help in controlling overspray and maintaining a clean workspace.
Can I sand in my paint booth?
Yes, you can sand in your paint booth. However, it's important to clean the booth thoroughly after sanding to remove any dust that could interfere with the painting process.
Does the temperature affect debris in a paint booth?
Yes, temperature can affect debris in a paint booth. High temperatures can cause the paint to dry quickly and make dry spray or dust. It's important to maintain a moderate temperature in the booth for optimal painting conditions.
Every DIY project is a learning experience. Don't hesitate to experiment and make adjustments as needed.
Conclusion:
In conclusion, constructing a homemade DIY paint booth is a rewarding project that enhances your painting projects by providing a controlled environment for better results. By following the steps outlined, from frame assembly to adding a door and optional ventilation, you make a functional space tailored to your needs.
It's important to remember safety precautions, including proper ventilation and the use of personal protective equipment, to ensure a safe and effective workspace. With the right materials, tools, and a bit of patience, your DIY paint booth will elevate your painting projects to the next level. Keep this guide handy for maintenance tips and troubleshooting advice to keep your booth in top condition. Happy painting!


