Starting a DIY pallet fence project was one of the best decisions I made for my backyard. First, I went to a local store and got some old pallets for free. I wanted to improve my backyard without spending too much money. I learned that with a little creativity, I could make a strong, good-looking fence out of pallets.
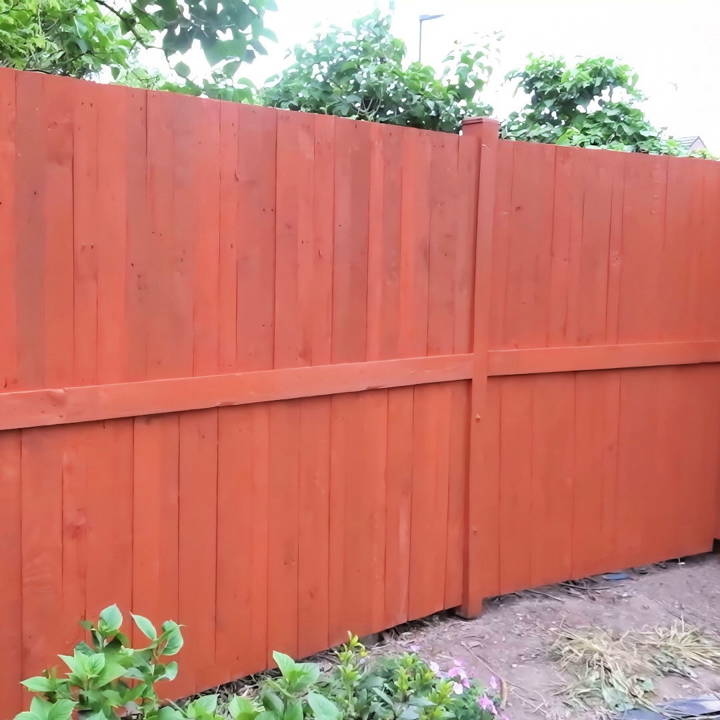
Putting the modern DIY pallet fence together took about a week. I measured the space and sawed the pallets to fit. Then, I used nails and a hammer to secure everything. I felt proud seeing my hard work transform the yard. This guide will help you get started on your fence, saving money and boosting your outdoor space. Trust me, you can do it, and it will be worth every effort!
Doing a DIY project like this is fun and inspires confidence. Give it a try; you won’t regret it! Use the steps below to build your own amazing DIY pallet fence.
Gathering Materials
Why each material was chosen:
- Pallet Wood: Pallets are often discarded by businesses but are sturdy and versatile for outdoor projects. Their wooden slats can be dismantled and reused, making them an excellent choice for fencing material.
- Scrap Wood: Useful for structural supports and framing. I found posts on the side of the road, perfect for our needs without spending extra.
- Eight Mil Bolts with Nuts and Washers: These provided a strong, yet easy-to-work-with method of securing the wood to existing concrete posts.
- Threaded Rod: Offered an effective way to attach the wooden posts to the concrete ones while allowing for slight adjustments as needed.
- Decking Screws and Random Screws: Essential for fastening the pallet slats and structural pieces together securely.
- Red Cedar Stain: This was a lucky find; thrown out and unopened, it was perfect for protecting and beautifying the finished fence.
Step by Step Instructions
Learn how to build a DIY pallet fence with our step-by-step guide. From preparing posts to cladding with pallet wood, create your fence easily today!
Preparing the Fence Posts
I began by cutting the posts to the necessary length, ensuring they would fit perfectly between the garden's existing concrete posts. After cutting, I attached fence post toppers to protect the end grain from weather damage, using a couple of screws for each topper.
Installing the Posts
Using a long drill bit, I marked where I would need to drill holes for the bolts, aiming for a snug fit against the concrete posts. With the holes drilled, I fed the threaded rod through, securing the wooden posts with nuts and washers. This step required some precision to ensure everything was level and aligned properly.
Constructing the Frame
The framework came together by attaching cross members between the installed posts. I employed half-lap joints for added strength and stability, using screws and a bit of wood glue for extra durability. This step was crucial in creating a solid foundation for the pallet wood cladding.
Cladding with Pallet Wood
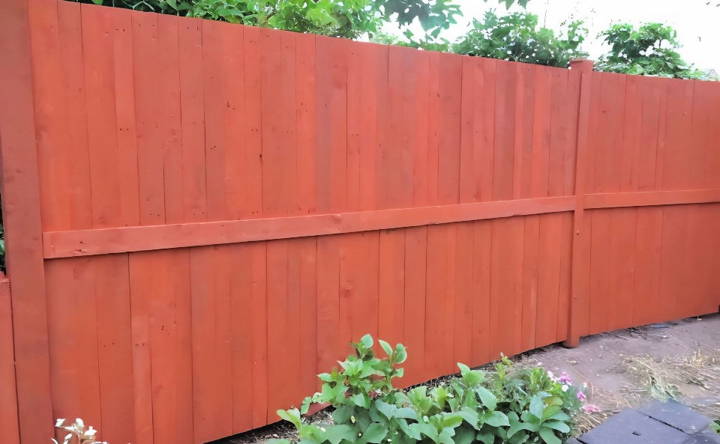
The most visually transforming step was adding the pallet wood. First, I dismantled the pallets — a task in itself — then cut the slats to length. Arranging them artistically, I attached each slat with screws, pre-drilling the holes to prevent splitting. Each piece added character to the fence, telling its unique story through its worn textures and varied colors.
Final Touches
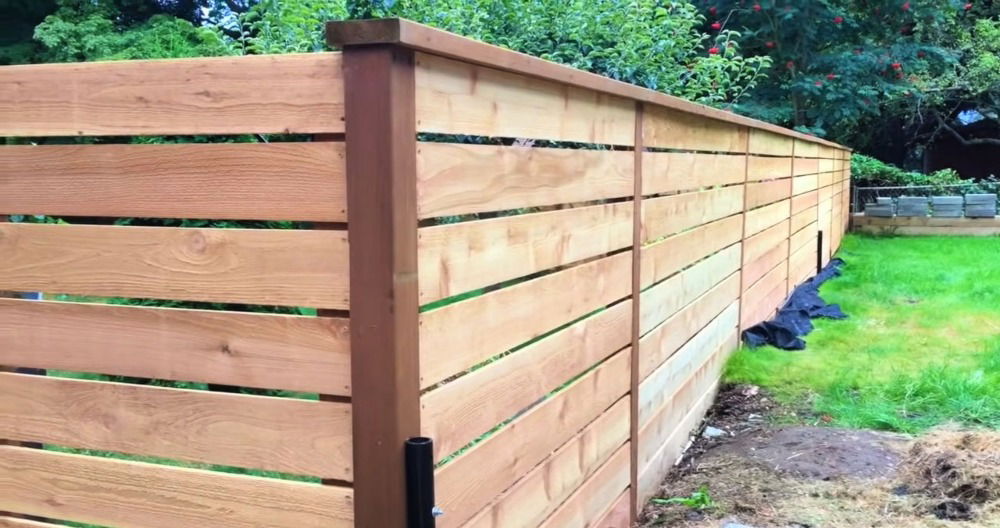
To finish, I added a trim piece along the top and bottom edges of the fence to cover any uneven ends of the pallet wood, giving the fence a polished look. Lastly, I applied several coats of the red cedar stain, enhancing the wood's natural beauty and ensuring its longevity against the elements.
Design Customization Ideas
When it comes to personalizing your DIY pallet fence, the possibilities are as vast as your imagination. Here, we’ll explore some creative and stylish ideas to make your pallet fence not just a boundary but a highlight of your outdoor space.
Built-In Planters
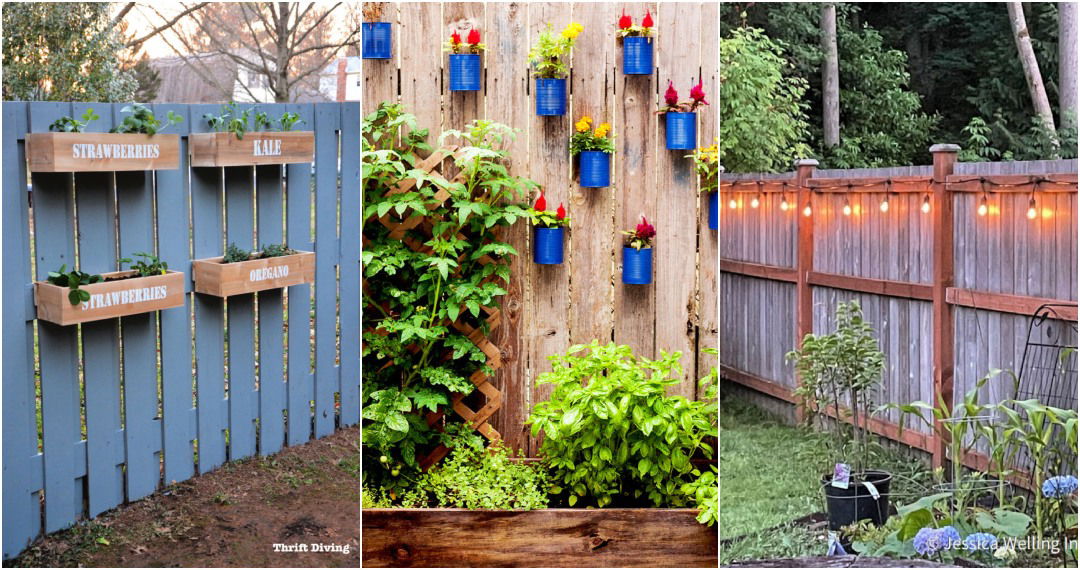
Why not add some greenery directly to your fence? You can create built-in planters at intervals along the top of your pallet fence. This not only adds a decorative touch but also allows you to grow small flowers or herbs, bringing life and color to your fence.
Paint and Color
Give your pallet fence a splash of color. Painting your fence can transform the look from rustic to modern, depending on the hues you choose. For a fun, eclectic look, consider a multicolored pattern. Or, for something more classic, a simple white or pastel shade can brighten up your garden space.
Decorative Accents
Attach decorative elements to your fence for a personal touch. This could be anything from vintage tools for a rustic feel to colorful wire planters for a more whimsical look. These small additions can make a big impact on the overall aesthetic of your fence.
Stenciling for Effect
Create a unique pattern on your fence using stencils. A chevron or geometric pattern can add a contemporary edge to your design. You can also stencil on a faux wood grain or pallet markings for an authentic, upcycled look.
Vertical Garden
Turn your fence into a living wall by attaching vertical planters. This not only enhances privacy but also allows you to cultivate a variety of plants, from flowers to edible herbs. It’s a practical and beautiful way to maximize your space.
Seating and Social Areas
Consider integrating a seating area into your fence design. A pallet bench or daybed can create a cozy corner for relaxation and socializing. Add cushions and throws to make it inviting and comfortable.
Lighting
Incorporate lighting into your fence design for ambiance and functionality. String lights or solar-powered lamps can provide a warm glow in the evenings, making your outdoor space usable at any time of day.
Using these design ideas, you'll make a pallet fence that’s functional and reflects your style.
Sustainability and Upcycling
Creating a fence from pallets is not just about building a barrier; it’s about making a positive impact on the environment. This section will guide you through the sustainable practice of upcycling pallets and how it benefits both your garden and the planet.
Why Upcycle Pallets?
Pallets are often discarded after their initial use, but they have so much more to give. Upcycling them into a fence reduces waste and minimizes the demand for new lumber, which helps to preserve forests and the wildlife that calls them home.
Finding Pallets
Look for pallets at local stores or warehouses. Many businesses are happy to give away pallets for free, which can save you money and help them reduce disposal costs. Always choose pallets that are clean and free from chemicals to ensure they’re safe for use in your garden.
Preparing Pallets
Before building your fence, prepare the pallets properly. Sand them down to remove splinters and apply a natural, non-toxic sealant to protect the wood from the elements. This step ensures your fence will last longer and remain safe for your family and pets.
Building with Care
As you construct your fence, think about the local ecosystem. Avoid using harmful chemicals or treatments. Instead, opt for eco-friendly alternatives that won’t harm the soil or local waterways.
The Bigger Picture
By choosing to upcycle pallets, you’re part of a larger movement towards sustainable living. Share your project with friends and neighbors to inspire them to think about how they can repurpose materials and reduce their environmental footprint.
Every pallet fence shows care for our planet. It's a step towards sustainability and a reminder of what creativity with resources can achieve.
Troubleshooting Common Pallet Fence Issues
Building a DIY pallet fence can be a rewarding project, but like any DIY endeavor, you might run into a few hiccups along the way. Here’s a helpful guide to troubleshooting common issues so you can keep your project on track.
Loose or Wobbly Panels
If your fence panels are loose or wobbly, it’s often due to insufficient support. Make sure each pallet is securely attached to at least two stakes or posts driven deep into the ground. For added stability, use L-brackets or corner braces at the joints where pallets meet.
Wood Splitting
When working with pallets, wood splitting can occur, especially when driving in nails or screws. To prevent this, pre-drill holes before inserting any fasteners. Opt for screws rather than nails for a stronger hold, and consider using wood glue for extra reinforcement.
Weather Damage
Pallet wood can suffer from weather damage over time. To protect your fence, apply a weather-resistant stain or sealant. Reapply it every few years to maintain the wood’s integrity and appearance.
Pests and Rot
Wooden pallets can attract pests or start to rot if not properly treated. Use pallets that have been heat-treated (marked with ‘HT’) rather than chemically treated. Additionally, keep the base of your fence clear of soil and vegetation to prevent moisture buildup, which can lead to rot.
Uneven Ground
Building on uneven ground can make your fence look crooked. Level the ground as much as possible before installation. If leveling isn’t an option, cut the pallets to fit the contour of the land for a more natural look.
Missing Boards or Gaps
Sometimes, pallets come with missing boards or create gaps when aligned. You can fill these gaps by repurposing boards from other pallets. Measure the gap, cut a board to size, and secure it in place.
Aesthetic Inconsistencies
Pallets can vary in color and condition, leading to an inconsistent look. If uniformity is important to you, consider painting the entire fence in a single color. Alternatively, embrace the varied look for a more rustic charm.
Keep these troubleshooting tips handy to handle challenges in your pallet fence project.
FAQs About DIY Pallet Fence
Discover everything you need to know about DIY pallet fences in our faqs, covering materials, installation tips, and maintenance essentials.
Building a DIY pallet fence is a sustainable and cost-effective choice. It’s eco-friendly as it repurposes materials that might otherwise be discarded, reducing waste. Pallets are often available for free or at a minimal cost, making this a budget-friendly project. Additionally, pallet fences can be easily customized to suit your space and personal style.
Absolutely! You can paint or stain the pallets to match your outdoor decor. Adding planters or decorative elements can also spruce up the appearance of your fence. For a more rustic look, leave the wood natural to age gracefully over time.
To keep your pallet fence in good condition:
Inspect regularly: Check for loose nails or boards.
Repair promptly: Fix any damage to prevent further deterioration.
Treat the wood: If you haven’t painted or stained the pallets, consider a wood preservative to protect against weather and pests.
To ensure your pallet fence is stable:
Use sturdy pallets: Select pallets in good condition without rot or damage.
Reinforce connections: Use long screws or bolts to secure the pallets together for added strength.
Install posts: If possible, anchor your fence to the ground with metal or wooden posts.
Cross-bracing: Add horizontal or diagonal braces between the pallets to prevent wobbling.
Yes, it’s important to:
Check local regulations: Some areas have height restrictions or require permits for fences.
Inform your neighbors: It’s courteous to let them know about your project, especially if the fence will affect their property.
Consider visibility: Ensure your fence doesn’t obstruct sightlines for traffic or pedestrians.
Conclusion
In conclusion, building a DIY pallet fence on a budget is a smart and affordable project. Using simple techniques and readily available materials, you can create a sturdy and attractive fence out of pallets. This approach not only saves money but also promotes recycling. Start your DIY pallet fence project today and enjoy the benefits of a beautiful and cost-effective solution for your outdoor space.


