Making your own DIY palm tree is a fun and simple project. In this guide, you will find step-by-step instructions that make the process easy and enjoyable. Gather all necessary materials and follow clear directions to assemble your palm tree. The steps are laid out clearly to ensure anyone can follow along successfully.
This guide is perfect for making a realistic palm tree that can enhance any space. With straightforward steps and helpful tips, you'll be able to make a beautiful decoration.
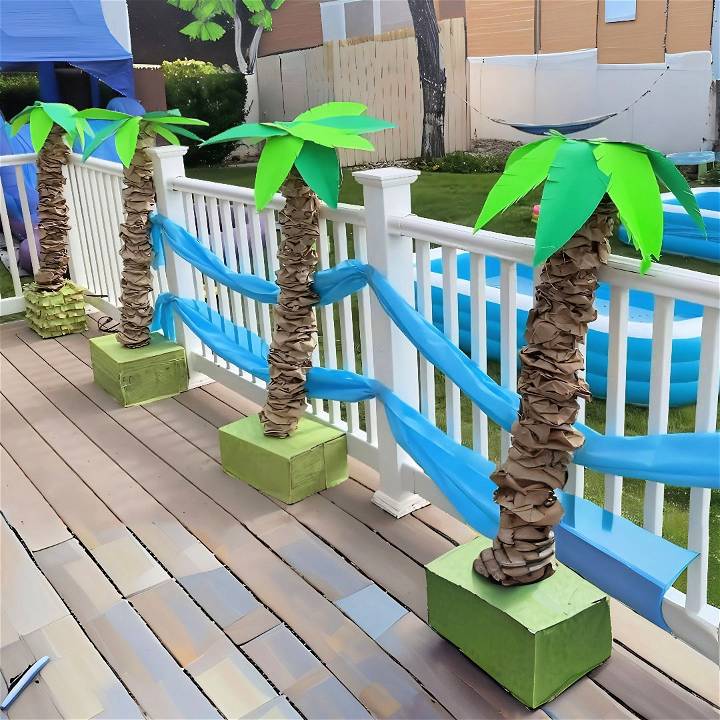
Make your own DIY palm tree with our easy guide! Transform any space with this fun, tropical craft project, perfect for home decor or events.
Materials Needed
- Light Green and Dark Green Poster Boards: These are used to make the palm fronds. The variations in color will give the leaves a more realistic and vibrant look.
- Hot Glue Gun (with a cool setting): Essential for assembling the palm fronds. If your glue gun doesn't have a cool setting, simply let the glue come out in a slow strand.
- Box (as the base): A sturdy base is crucial for stability. Shallow boxes don't work as well.
- Four-foot, three-quarter inch PVC Pipe: This provides stability to the pool noodle.
- Pool Noodle: Acts as the trunk of the palm tree.
- Paper Bags: Used to cover the pool noodle to mimic the texture of a palm tree trunk. The number of bags depends on how tightly you squish them.
- Rock: To weigh down the base.
- Fish Line: Optional, but useful for securing the palm tree.
- Wood Skewers or Dowels: Necessary for stabilizing the top portion of the tree.
- Tissue Paper: For decorating and covering the base.
- Raffia: Optional for adding a more complete look to the palm tree.
Step by Step Instructions
Learn how to make a DIY palm tree step-by-step. From making and assembling fronds to decorating the base, follow our easy guide.
Step 1: Make Palm Fronds
- Fold Poster Boards: Start by folding your light green and dark green poster boards in half. This will make it easier to cut symmetrical shapes.
- Cut Rectangles: Cut out eight rectangles from one of the poster boards. Each rectangle will be a palm frond.
- Shape the Fronds: Take one rectangle, fold it in half again, then cut a curved edge with a point on one end. For a realistic look, ensure your curve is smooth.
- Add Texture: Cut serrated edges towards the end without the point. Don't cut too close to the folded edge to maintain the integrity of the frond.
Step 2: Assemble Palm Fronds
- Alternate Colors: Use your hot glue gun to alternately glue light green and dark green fronds. This alternating pattern will enhance the visual appeal of your palm tree.
- Glue Carefully: If your glue gun has a cool setting, use it to prevent melting the poster board. Hold each frond in place for a minute to ensure it sticks well.
Step 3: Prepare the Base
- Choose a Sturdy Box: Select a box that will serve as the base. It should be deep enough to hold the tree steady.
- Cut an 'X': Cut an 'X' shape in the center of the box top, just wide enough to snugly fit the pool noodle.
- Insert a PVC Pipe: Insert a four-foot PVC pipe into the pool noodle. This pipe will provide extra stability.
- Weigh Down the Box: Place a rock in the bottom of the box to add weight and prevent tipping. Alternatively, plan on tying the palm tree to something stable using a fish line.
Step 4: Make the Trunk
- Cover the Noodle: Open the paper bags and make a slit at the bottom of each. Slide the bags onto the pool noodle. Adjust the tightness depending on how many paper bags you use (16 to 24).
- Secure the Trunk: Glue the paper bags to the pool noodle if they feel loose.
Step 5: Attach Palm Fronds to Trunk
- Cool Glue Application: Put a substantial amount of glue on top of the pool noodle. Carefully place the palm fronds on top and hold them in place for a minute.
- Secure with Skewers: For added stability, use wood skewers to attach the top securely to the trunk. Push the skewers through the box, into the noodle, and back out the other side. Repeat on all four sides to ensure stability.
Step 6: Decorate the Base
- Cover the Box: Fold tissue paper accordion style into strips about two inches wide. Cut slits into the strip edges to make fringes.
- Attach Fringes: Use a glue stick to attach the fringes to the box, covering it completely. For extra flair, you can alternate colors like green and gold.
- Simple Option: If you're short on time, you can simply cover the box with one layer of tissue paper.
Tips and Final Touches
- Raffia Enhancement: Adding raffia at the base of the fronds can give a fuller, more authentic look to your palm tree.
- Make in Bulk: It's most cost-effective to make at least two palm trees at a time. Depending on your base's details, you'll spend around $4 to $4.50 per tree.
- Reusability: These palm trees are durable party decorations that you can reuse for future events.
Customization Ideas for Your DIY Palm Tree
Making a DIY palm tree is a fun and creative way to add a tropical flair to your space. Here are some customization ideas to make your palm tree uniquely yours:
Choose the Right Size
Think about where you want to place your palm tree. If it's for a tabletop, consider a smaller size. For outdoor or floor decor, go bigger. Measure the space to ensure a good fit.
Selecting Materials
You can use various materials like paper, fabric, or natural fronds. Consider the texture and color that best suit your theme.
Color Customization
Go beyond green! Feel free to paint your palm tree in any color that matches your decor. Metallics can add a festive touch, while pastels can soften the look.
Adding Decorations
String lights can give your palm tree a magical glow. Ornaments like mini birds or flowers can add charm. For a holiday twist, use small baubles or tinsel.
Themed Decor
Tailor your palm tree to different themes:
- Beach Party: Add a string of mini seashells or a tiny hammock.
- Hawaiian Luau: Hang leis or small ukuleles from the fronds.
- Christmas: Decorate with tiny lights and miniature Santa hats.
Interactive Elements
Make your palm tree interactive by adding hooks for hats or sunglasses—perfect for a party!
Seasonal Updates
Change up the decorations to match the season—bright flowers for spring or spooky accents for Halloween.
A great DIY project should reflect your creativity. Experiment and have fun! Your DIY palm tree will wow your guests.
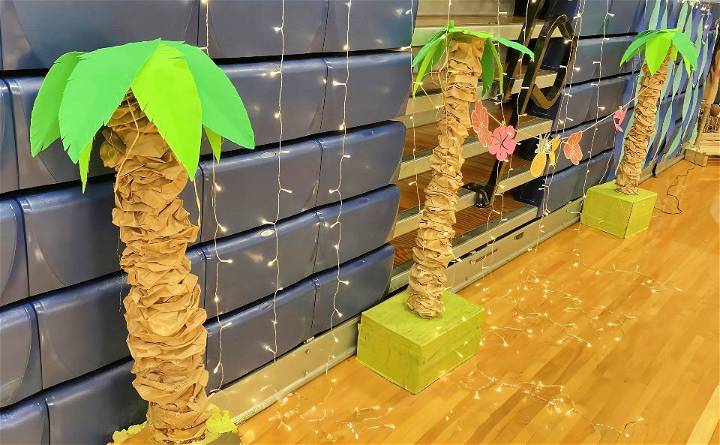
Advanced Techniques for Crafting Your DIY Palm Tree
For those who are ready to take their DIY palm tree to the next level, here are some advanced techniques that will add complexity and authenticity to your creation:
Working with Natural Materials
If you're feeling adventurous, consider using real palm fronds or dried leaves. You can source these from florists or online shops that specialize in natural decor. When working with these materials, be sure to treat them with a sealant to preserve their color and prevent decay.
Incorporating Lighting
Integrating LED lights within the trunk or fronds can make a stunning effect, especially in dim lighting. Use battery-operated LED strips for ease of installation and to avoid visible wires.
Building a Sturdy Base
For a larger palm tree, construct a solid base using a weighted pot or container. This will ensure stability and allow your palm tree to stand tall. You can cover the base with natural materials like moss or bark for a realistic touch.
Adding Texture
To give your palm tree a more lifelike texture, use materials like rope or textured paper for the trunk. Experiment with painting techniques such as sponging or dry brushing to add depth and dimension.
Crafting Realistic Fronds
For the fronds, use wire-reinforced ribbon or flexible plastic strips that you can shape and bend to mimic the natural curvature of palm leaves. Paint them in varying shades of green, and add details like leaf veins for realism.
Making Coconuts or Fruit
Modeling clay or papier-mâché can be used to make coconuts or fruit for your palm tree. Paint and attach them to the tree for an extra tropical feel.
Using these advanced techniques, your DIY palm tree will be an art piece showcasing your skills. Enjoy the process, take your time, and be proud of your creation!
Troubleshooting Common Issues
When crafting your DIY palm tree, you might encounter a few hiccups along the way. Here's how to solve some common problems with simple, clear solutions:
Problem: Fronds Keep Falling Off
- Solution: Make sure the base of each frond is securely attached. Use a stronger adhesive or consider reinforcing the attachment with wire or tape.
Problem: Tree Won't Stand Up Straight
- Solution: Check the weight distribution of your base. It may need to be heavier or wider. You can add weight with stones or sandbags.
Problem: Materials Look Unnatural
- Solution: Experiment with different textures and shades of green. Layering materials can add depth and realism to your palm tree.
Problem: Decorations Look Cluttered
- Solution: Less is often more. Choose a few key decorations and place them strategically. Balance is key to a harmonious look.
Problem: Tree Isn't Durable
- Solution: Apply a sealant to protect against wear and tear. For outdoor trees, use weather-resistant materials.
By anticipating and addressing these issues, you'll ensure your DIY palm tree is both beautiful and resilient.
FAQs About DIY Paper Palm Tree
Explore faqs about DIY paper palm tree projects. Get tips, materials, and step-by-step instructions for making your own eco-friendly decor.
Absolutely! Feel free to paint your tree for a more vibrant look or add decorations like beads, feathers, or glitter for a festive touch. You can also make paper coconuts or flowers to attach to your tree for added detail.
Yes, crafting a paper palm tree is a fun and safe activity for children. It encourages creativity and can be a great way for them to practice their cutting and assembly skills. Just ensure that younger children are supervised when using scissors.
To ensure your paper palm tree stands upright, fill a container with sand or pebbles and insert the base of the trunk into it. This will provide stability and keep your tree standing. For added support, you can glue the bottom of the trunk to a piece of cardboard that fits inside the container.
Your paper palm tree can be a great addition to themed parties, classroom decorations or as a creative touch to your home decor. You can also use it as a centerpiece for tropical-themed events or as a fun prop for photo booths at parties.
To adapt the size of your paper palm tree to fit different spaces, you can adjust the length of the trunk and the size of the fronds. For a smaller tree, use shorter cardboard tubes or cut them to your desired height. For the fronds, simply reduce the size of the green paper strips. Conversely, for a larger tree, use multiple cardboard tubes attached end-to-end to increase the height, and use larger sheets of green paper for bigger fronds. This way, you can customize the tree to be a perfect fit for any room or event.
Conclusion
In conclusion, making your own easy DIY palm tree can be a rewarding and enjoyable project. By following these step-by-step instructions, you'll be able to bring a touch of the tropics into your home or garden with ease. Remember, the key to a successful DIY palm tree is patience and attention to detail. Have fun with your project, and soon you'll have a beautiful, handmade addition to your space.


