My journey began on a lazy Sunday afternoon. I was in the middle of baking a batch of cupcakes for a friend's birthday, aiming to add that professional touch with a chocolate drizzle. To my dismay, I realized my piping bag was nowhere to be found. Panic ensued until I stumbled upon a helpful tip from Cupcake Jemma, which promised a quick and easy solution.
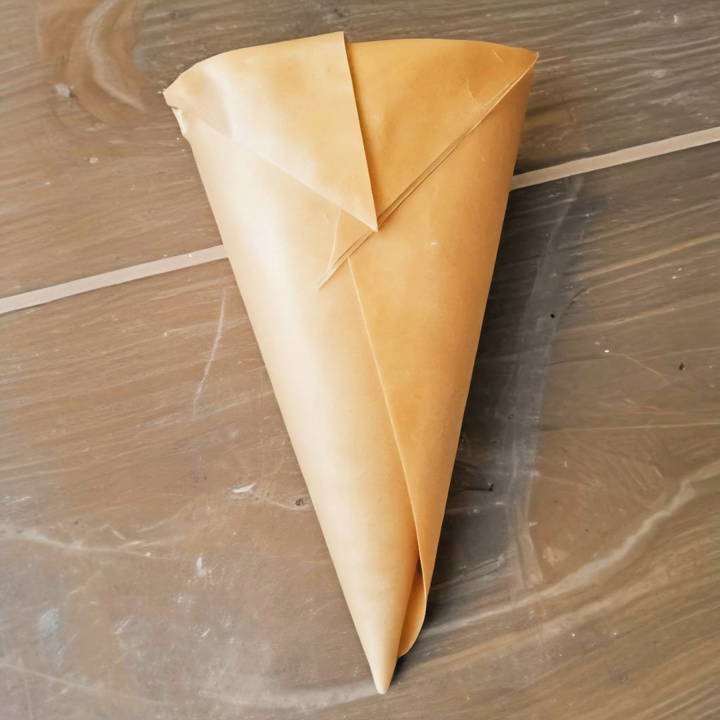
Here's how I mastered making my DIY piping bag, step by step, ensuring I'd never be caught off guard again.
Materials You'll Need and Why
Before diving into the process, let's talk about materials:
- Crease-proof paper: This is the star of the show. Crease-proof paper is durable and flexible, ideal for molding into a piping bag.
- Scissors: You'll need these to cut the paper into the correct shape.
- Filling of choice (chocolate, cream, icing): What's a piping bag without something delicious to pipe?
Step by Step Instructions
Learn how to make a DIY piping bag at home with our step-by-step instructions. Perfect for decorating cakes and pastries with ease.
Step 1: Cutting Your Crease-proof Paper
Start by laying out a sheet of crease-proof paper. Fold one corner over to the opposite edge to form a triangle, then cut along the edge. You’ll end up with a square folded into a triangle. Cut along the fold, and voila, you have two triangles, which means two potential piping bags.
Step 2: Forming the Piping Bag
Take one triangle with the longest side facing you; this will be the base of your bag. Imagine the tip of your piping bag in the middle of this long edge. Now, let's get rolling:
- Hold one corner of the triangle and roll it towards the center. This begins to form the cone shape of your piping bag.
- Secure this first side and bring the other corner around to meet it, continuing the cone shape. Now you have the basic shape of your piping bag.
- Adjust the cone by pulling the corners, ensuring the tip is tight and secure. This will prevent any filling from escaping.
Step 3: Securing Your DIY Piping Bag
To prevent your creation from unraveling mid-use:
- Fold the loose corners at the open end of the cone inward twice. This locks everything in place.
- Trim the tip with scissors for a smaller opening or leave as is for a larger one, depending on your decorating needs.
Why This DIY Trick Is a Game-Changer
Discover why this DIY trick is a game-changer: flexible, convenient, cost-effective, eco-friendly, and perfect for emergency-proofing your baking.
Flexibility and Convenience
The beauty of this method lies in its simplicity and adaptability. You can customize the size and tip of the piping bag based on your specific project needs. Plus, it's a fantastic way to repurpose materials you already have at home, reducing waste.
Cost-Effective and Eco-friendly
Investing in reusable piping bags and tips can get expensive and require maintenance. This DIY approach not only saves money but also aligns with eco-friendly baking practices, as you can use biodegradable paper instead of plastic.
Emergency-Proof Your Baking
Never again will you have to pause your baking frenzy to run to the store for supplies. This trick has saved my cupcakes more times than I can count, and I'm sure it will do the same for you.
Advanced Decorating Techniques
Once you've got the basics of using a DIY piping bag down, you can try advanced decorating techniques. These will help make any cake or pastry look amazing. Let's look at some methods to boost your skills.
Creating Textured Patterns
With a DIY piping bag, you can create a variety of textured patterns. Try using different cuts at the tip of your bag to make stars, rosettes, or zigzags. For instance, cutting a small “V” shape will give you a leaf-like pattern, while a straight cut can create ribbons or bows.
Writing with Icing
Writing on cakes is a skill that requires a steady hand and practice. To write with icing, cut a tiny hole at the tip of your piping bag for fine lines. Practice writing on parchment paper before moving to the cake. Keep the pressure consistent for uniform lettering.
Making Flowers
Flowers are a classic cake decoration. To create flowers like roses, you’ll need to cut a larger opening and use a twisting motion as you squeeze the bag. Start from the center and work your way outwards, layering petals as you go.
Working with Royal Icing
Royal icing is ideal for intricate designs due to its fine texture and quick-drying properties. It’s perfect for detailed work like lace patterns or filigree. Mix royal icing to a stiff consistency, and use a small round tip for precision.
Using Stencils
Stencils can help you achieve consistent and complex designs. Place the stencil over your cake and spread a thin layer of icing over it with a spatula. Carefully lift the stencil to reveal the design.
Layering Colors
For a multi-colored effect, fill separate piping bags with different colored icings. Pipe one color first, let it set slightly, then pipe another color alongside or on top for a layered look.
Practice is crucial for advanced decorating. Experiment with techniques to find what suits you. With patience and creativity, you'll create impressive designs.
Troubleshooting Common Issues
When working with DIY piping bags, you might encounter a few hiccups along the way. Here’s a helpful guide to troubleshooting common issues, ensuring your decorating experience is smooth and enjoyable.
The Icing is Too Stiff or Too Runny
Consistency is key for the perfect icing. If it’s too stiff, it can strain your hands and make intricate designs difficult. Add a teaspoon of milk or water to soften it. Conversely, if the icing is too runny, it won’t hold its shape. Gradually mix in small amounts of powdered sugar until you reach the desired consistency.
The Piping Bag is Leaking
Leaks can be messy and frustrating. To prevent this, ensure you don’t overfill the bag. Fill it only halfway to maintain control and prevent icing from oozing out of the top. If there’s a hole in the bag, you can patch it up with some tape or transfer the icing to a new bag.
Uneven Frosting
For even frosting, apply consistent pressure as you squeeze the bag. Practice makes perfect, so try piping on parchment paper before moving to your cake. Keep the bag at a 45-degree angle for uniform lines.
The Tip Keeps Clogging
Clogging can interrupt your flow. To avoid this, use a toothpick to remove any solid bits from the tip before you start. Also, strain your icing to remove lumps that could block the tip.
Difficulty in Making Intricate Designs
Intricate designs require a steady hand and the right tip. If you’re struggling, slow down and give yourself time to practice. Remember, simple designs can be just as beautiful. Start with basic shapes and patterns before attempting more complex decorations.
Colors are Bleeding Together
To prevent colors from bleeding, let each color set for a few minutes before adding another. Use gel-based food coloring as it’s less likely to run than liquid dyes.
Fix these common issues to create flawless decorations using your DIY piping bag.
FAQs About DIY Piping Bag
Learn all the faqs about DIY piping bags: how to make them, materials needed, tips for usage, and troubleshooting common issues. Perfect for home bakers!
A DIY piping bag is a homemade version of a traditional pastry bag, typically made from common household materials like plastic bags or parchment paper. It’s used for decorating cakes, cookies, or filling pastries with icing, frosting, or other fillings. People use DIY piping bags because they are cost-effective, accessible, and easy to make.
Yes, you can create a makeshift nozzle by cutting a flexible strip of material like matboard or aluminum foil, shaping it into a cone, and placing it inside the corner of the bag before cutting the opening. This can help control the shape of the icing or sauce as it comes out.
The size of your DIY piping bag should be based on the amount of frosting or sauce you plan to use. A quart-sized bag is usually sufficient for most home baking needs. If you’re working with a larger volume, a gallon-sized bag may be more appropriate.
When using a DIY piping bag, ensure to push out any excess air before sealing and cutting the bag. This helps prevent messes and gives you better control over the flow of icing. If you’re using a nozzle, make sure it’s securely in place to avoid leaks.
After using your DIY piping bag, it’s important to clean it thoroughly to prevent any residue from hardening and becoming difficult to remove. If you use a plastic bag, you can turn it inside out and wash it with warm, soapy water. Let it dry completely before storing. For parchment bags, since they are less durable, it’s best to dispose of them after use. If you plan to reuse your DIY nozzle, wash it with warm, soapy water, rinse well, and let it air dry. Store your clean and dry piping bag and nozzle in a dry place for your next baking adventure.
Final Thoughts
Wrapping up, mastering how to make a DIY piping bag can truly elevate your baking game. With just a few simple materials, you can create a versatile and reusable tool that will help you achieve professional decorating results. Remember, DIY piping bag techniques are easy to follow and customize to your needs. Give it a try and enjoy the process of enhancing your baked creations.


