Building a DIY pitching mound may sound tough, but it's pretty simple with the right steps. I remember the first time I built one. I wanted to help my son improve his pitching skills. He was eager to practice more, and the nearest field was too far away, so we decided to make our own pitching mound at home.
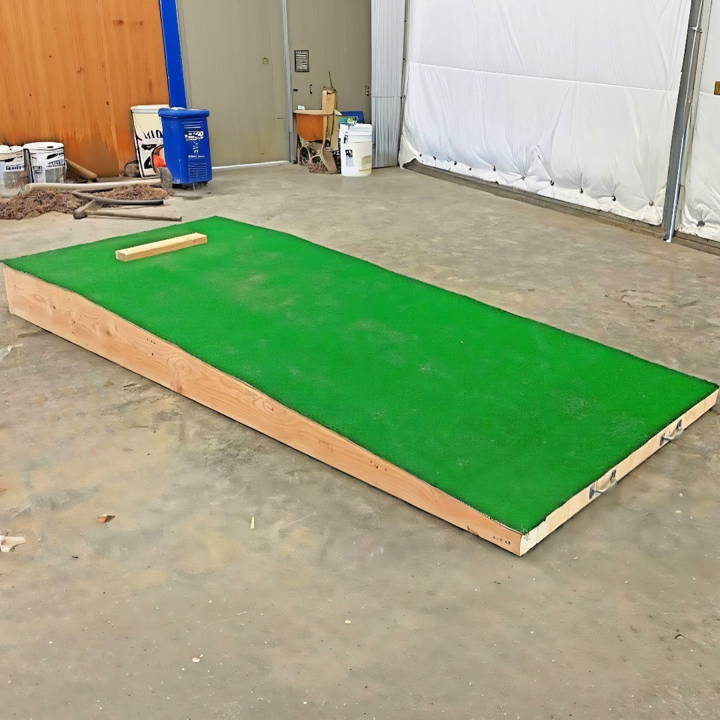
We gathered our materials: wood for the frame, dirt, and a measuring tape. Following a simple guide, we built a sturdy mound in just a weekend. It was amazing to see how such a small project made a big difference in my son's playing.
Materials Needed and Their Purpose
- 2x10 by 10 foot & 2x4 by 8 foot lumber: These provide the structural frame for the mound, offering stability and support.
- 4x8 sheets of 1/2 inch thick plywood: Used to build a smooth and even surface over the constructed frame.
- Artificial turf: For the pitching mound's top layer, offering a realistic and durable surface.
- Saw, screws, and tools: Essential for cutting wood to the correct dimensions and assembling the structure.
Step by Step Instructions
Learn how to build a DIY pitching mound with our step-by-step instructions. Perfect guide for baseball enthusiasts looking to build their own mound.
Step 1: Planning and Cutting the Wood
Firstly, I determined the slope for the mound, going for the standard 1:12 pitch (for every one foot, the slope ascends one inch). Using a saw (preferably a table saw for precision cuts), I cut the 2x10s to match this slope. This step is crucial as it defines the mound's usability and adherence to standard pitching practices.
Why the Slope is Important
The slope, specifically the 1:12 pitch, ensures that the mound mimics the conditions pitchers would face in an actual game, helping in practice accuracy.
Step 2: Assembling the Frame
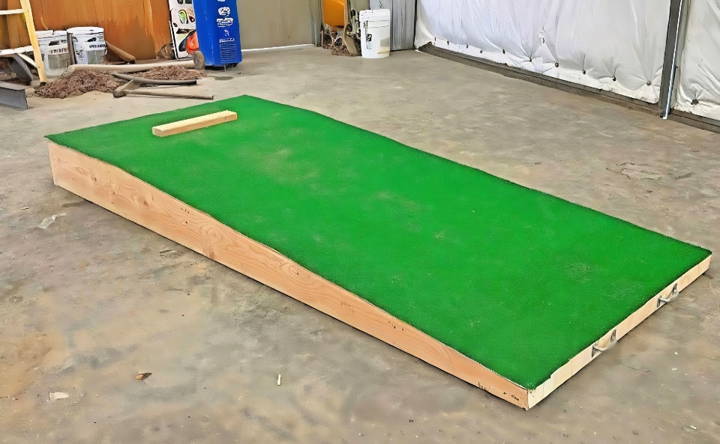
After cutting the wood to the desired slope, I assembled the structure, ensuring the platform at the top was 4 feet wide by 2 feet long, offering sufficient space for a pitcher to stand and maneuver. By securing the wood with screws and ensuring stability with cross-beams, the frame took shape, becoming the skeleton of our pitching mound.
Importance of a Stable Frame
A stable frame ensures safety during use and provides the necessary foundation for the mound's longevity.
Step 3: Applying The Plywood
With the frame ready, I moved on to covering it with the 4x8 sheets of plywood, ensuring to measure and cut them carefully to build a smooth, even surface over the frame. This step required patience and precision to avoid gaps or misalignments that could affect the mound's usability.
Attention to Details Matters
Ensuring that the plywood fits perfectly over the frame prevents potential injuries and improves the mound's overall aesthetic and functionality.
Step 4: Laying the Turf
Laying the artificial turf was the final step. It had to be measured, cut, and secured precisely, ensuring it covered the mound smoothly without any wrinkles or loose ends. This synthetic turf layer was not only for aesthetics but also to simulate a real pitching experience.
Why Use Artificial Turf
Artificial turf is durable, weather-resistant, and offers a realistic experience akin to that of pitching on an actual baseball field.
Additional Tips
- Double-Check Measurements: Always measure twice before cutting. Wood and materials are not only expensive, but incorrect cuts can set back the project significantly.
- Use Quality Materials: Opt for high-quality wood, screws, and artificial turf to ensure the mound lasts for many seasons.
- Consider Mobility: Adding handles and wheels (as I did upon reflection) can make the mound easier to move and store.
Advanced Techniques for DIY Pitching Mounds
When you're ready to take your DIY pitching mound to the next level, advanced techniques can help you build a more professional and versatile practice area. These methods are designed for those who have a good grasp of basic construction and are looking to add features that enhance the functionality and durability of their mound.
- Adjustable Height Mechanism: One of the most beneficial upgrades is an adjustable height feature. This allows the mound to be modified for different age groups and pitching styles. You can achieve this by constructing a layered base with removable sections. Use sturdy materials like reinforced plywood and ensure each layer fits snugly to maintain stability.
- Collapsible Design for Portability: If you need to move your mound frequently, consider a collapsible design. This involves making a mound that can be disassembled into flat sections. Hinges and locking pins can be used to secure the pieces together when in use. Always use rust-resistant hardware for longevity.
- Durable Pitching Rubber: The pitching rubber is the spot where the pitcher's foot lands and it undergoes a lot of wear and tear. Invest in a high-quality, heavy-duty rubber that can withstand repeated use. Secure it firmly to the mound with bolts rather than nails for easy replacement if needed.
- Integrated Drainage System: Proper drainage is crucial to prevent water accumulation and erosion. Incorporate a drainage system beneath the mound using perforated pipes and gravel. This will help to quickly divert water away, keeping the mound dry and in good condition.
- Synthetic Turf Covering: For a low-maintenance surface that mimics the feel of a professional mound, consider covering your mound with synthetic turf. It's durable, weather-resistant, and provides consistent footing. Make sure to choose turf designed for sports use and install it with proper adhesive and seaming techniques.
- Pitching Mound Tarp: Protect your mound from the elements with a custom-fitted tarp. Use a heavy-duty, waterproof material with grommets to secure it. This will help to preserve the mound when not in use, especially during off-season periods.
Upgrade your DIY pitching mound with advanced techniques for adaptability, durability, and a professional feel.
Maintenance Tips for Your DIY Pitching Mound
Keeping your DIY pitching mound in top shape is crucial for ensuring it provides a consistent surface for practice. Regular maintenance not only extends the life of your mound but also ensures safety for the pitchers. Here are some straightforward tips to help you maintain your mound effectively:
- Regular Inspection: Before and after use, inspect the mound for any signs of wear or damage. Look for holes, cracks, or loose materials, especially around the pitching rubber and landing areas.
- Proper Watering: If your mound is made of clay, it's important to keep it properly moisturized. Too dry, and it will crack; too wet, and it will become slippery. Use a fine mist to lightly water the mound before covering it with a tarp.
- Tamping Down: After watering, use a tamp to compact the clay. This helps maintain the mound's shape and firmness. Pay special attention to the pitcher's plate and landing areas, as they receive the most stress.
- Raking: Regularly rake the mound to even out the surface. Remove any debris, such as rocks or leaves, that could interfere with the pitcher's footing.
- Replenishing Materials: Over time, the materials on your mound will wear down. Be prepared to add fresh clay, sand, or dirt as needed. This is especially important for the landing area, which can become uneven with repeated use.
- Covering the Mound: When not in use, cover your mound with a durable, waterproof tarp. This protects it from weather elements and helps maintain the moisture level of the clay.
- Off-Season Care: During the off-season, take the time to do a thorough maintenance check. Repair any significant damage and consider adding a new layer of clay to refresh the mound for the upcoming season.
Follow these maintenance tips to keep your DIY pitching mound safe and reliable.
Legal and Safety Compliance for DIY Pitching Mounds
When constructing a DIY pitching mound, it's essential to adhere to legal and safety standards to ensure a safe environment for all users. Compliance with these standards not only protects the players but also aligns with local regulations and league requirements.
- Understanding Local Regulations: Before starting your project, check with your local authorities to determine if you need a permit to build a pitching mound. Regulations can vary greatly depending on your location, and it's important to be aware of any restrictions or requirements.
- League Standards: Ensure that your mound meets the specific dimensions and specifications set by the baseball league for which it is intended. For example, in professional baseball, the mound must be 10 inches high, while in high school and college, it is typically 6 inches. Adhering to these standards is crucial for fair play and player safety.
- Quality Materials: Use high-quality materials that are durable and safe. This includes selecting the right type of clay, sand, and other components that will withstand wear and tear and provide a stable surface for pitchers.
- Safe Construction Practices: Follow safe construction practices to prevent accidents during the building process. Use the proper tools and equipment, and ensure that the construction site is secure and free from hazards.
- Regular Maintenance: Once your mound is built, regular maintenance is key to keeping it safe for use. This includes inspecting the mound for any damage, ensuring the pitching rubber is securely fastened, and maintaining the proper moisture level of the clay to prevent cracking.
- Player Safety: Design the mound with player safety in mind. The surface should be even and free of obstacles that could cause tripping or injuries. The slope of the mound should be gradual to reduce the risk of strain on the pitcher's arm.
- Environmental Considerations: Consider the environmental impact of your mound. Use materials that are environmentally friendly and implement practices that minimize waste and pollution.
Follow these tips to build a DIY pitching mound that's fun, useful, and meets safety standards, ensuring a positive experience for all.
FAQs About DIY Pitching Mound
Get answers to common questions about DIY pitching mounds, including materials, dimensions, and construction tips to build your own mound.
Select a flat, stable area to reduce injury risks and ensure a level playing surface. The location should have a 26-foot diameter circular area around home plate to accommodate the batter’s boxes and catcher’s stance. Always consider league regulations and player safety when choosing the location.
Portable pitching mounds are low maintenance and can be tailored to specific heights or tapers. They’re ideal for accommodating different age groups and skill levels, and they can be easily moved for practice or games.
The need for permits varies by location. Some areas may require a permit for structural changes, while others may not. It’s important to check your local regulations before starting your project.
To ensure your pitching mound aligns with league standards, you must consider the height, slope, and dimensions of the mound. The standard height for a Little League mound is 6 inches, while for Major League, it’s 10 inches. Use a mound slope gauge to measure the slope, which should be 1 inch per foot from the pitching rubber towards home plate. Always refer to your specific league’s regulations for precise measurements.
Regular maintenance is essential to preserve the quality and safety of your pitching mound. This includes applying infield conditioner to maintain moisture levels, covering the mound with a tarp to protect it from weather, and conducting routine inspections for any wear and tear. Additionally, repairing the pitcher's landing area and rebuilding the mound's clay as needed will keep the mound in top condition for gameplay.
Conclusion
Wrapping up, building a DIY pitching mound can significantly enhance your baseball or softball practice sessions. By following the steps and tips outlined in this guide, you'll build a reliable mound that meets your needs and helps you win games. With the right materials and dedication, a DIY pitching mound offers great benefits for players of all levels. Get started today and improve your pitching game!


