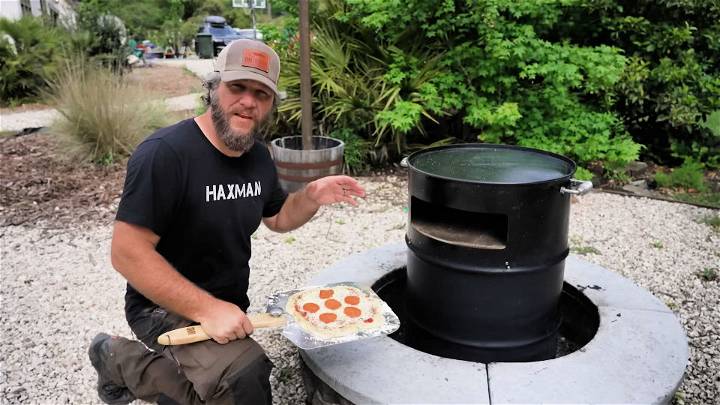
As a DIY enthusiast, I recently embarked on a journey to create my perfect backyard setup by merging a smokeless fire pit with a pizza oven. Following inspiration from various sources, I decided to transform a 55-gallon drum into a functional pizza oven that sits atop my fire pit. I'm excited to share my step-by-step process, highlighting the materials used, the rationale behind each step, and tips to ensure your success in this project.

Materials and Their Purpose
- 55-Gallon Drum: The core structure of the pizza oven. Ensure it's clean and free from any hazardous materials.
- High-Temperature Paint: To coat the exterior of the drum, offering protection and a clean finish.
- Refractory Cement: For creating a durable, heat-resistant base inside the drum where the pizza will cook.
- Metal Cutting Tools: For modifying the drum to create openings and vents.
- Angle Grinder and Jigsaw: Crucial for cutting the drum and smoothing edges.
- Step Drill Bit and Hole Saw: For creating precise holes for ventilation.
- Silicone Caulk: To seal joints and prevent heat escape.
- L Brackets: To secure internal structures.
- Expandable Metal and MDF Board: For constructing the internal base where the refractory cement will be poured.
- High Heat Grill Paint: To protect and finish the exterior.
Step-by-Step Guide
Learn how to build your own DIY pizza oven with our step-by-step guide. From preparing the drum to assembly and testing, we've got you covered!
Preparing the Drum
- Initial Cleaning: Start by burning a high-heat fire within the drum to remove any residues and paint. This step ensures a safe cooking environment. Post-burn, clean the drum thoroughly and dispose of the ashes properly.
- Cutting Openings: Determine the height and size of your pizza oven opening. For ease of use and functionality, cut a large access point for the fire below and a separate, smaller opening for sliding pizzas in and out. I aimed for an opening size similar to a standard pizza stone for consistency.
Making the Base
- Measuring and Cutting: Decide on the height of the internal base. Using an MDF board and refractory cement, map out a circular base slightly smaller than the drum's diameter. This will ensure a snug fit.
- Assembling the Mold: Using the cut-out MDF as a base, create a mold for the refractory cement using expandable metal or a similar material. Secure the mold with tape and caulking to prevent leaks.
- Mixing and Pouring Cement: Follow the refractory cement's instructions for mixing. Pour the mixture into the mold, ensuring an even distribution. Allow adequate time for curing, as rushing this process can lead to cracks or structural weaknesses.
Assembly and Painting
- Installing the Base: Once cured, carefully insert the cement base into the drum. Use L brackets to secure it in place, ensuring stability during use.
- Final Touches: Apply high-temperature paint to the drum's exterior, choosing a color that matches your aesthetic preference. Allow it to dry completely.
- Ventilation and Handles: Drill holes for ventilation to ensure proper airflow, crucial for maintaining the fire and heat distribution. Attach handles to the drum for easier manipulation.
Testing and Usage
- Initial Firing: Before cooking your first pizza, conduct a test fire. This helps to identify any structural weaknesses and ensures the oven heats up effectively.
- Cooking Pizza: Once satisfied, it's time to cook. The drum should reach an optimum temperature of around 650 degrees Fahrenheit. Slide your pizza in and monitor the cooking process.
- Enjoy Your Creation: With a successful test, your DIY pizza oven is ready for entertaining. Enjoy homemade pizzas with a unique wood-fired flavor.
Design Variations for DIY Pizza Ovens
When it comes to building your own pizza oven, the design you choose can greatly influence not only the aesthetics but also the functionality of your oven. Here are some of the most popular and practical design variations that you can consider for your DIY pizza oven project:
Traditional Brick Ovens
Brick ovens are the quintessential choice for many DIY enthusiasts. They are known for their durability and excellent heat retention. Building a brick oven involves creating a dome-shaped structure with a chimney, which is ideal for an even heat distribution. The materials needed for this type of oven are generally accessible, including firebricks, mortar, and insulation materials.
Portable Pizza Ovens
For those with limited space or who enjoy the flexibility of moving their oven, portable pizza ovens are a perfect match. These ovens are typically smaller and made with lightweight materials like stainless steel. They can be set up on a table or a stand and stored away when not in use.
Modern Minimalist Styles
If you're looking for a sleek, contemporary look, modern minimalist pizza ovens might be your style. These ovens often feature clean lines and simple shapes, with a focus on functionality. Materials like polished concrete or sculpted metal can give your oven a modern edge while still providing excellent cooking capabilities.
Adobe and Cob Ovens
For a more natural and sustainable option, adobe and cob ovens are made from earthy materials like clay, sand, and straw. These ovens are often hand-sculpted and can be a beautiful addition to any garden. They're also an excellent choice for those interested in traditional building techniques.
Barrel Vault Ovens
Barrel vault ovens have a distinctive elongated shape, resembling a barrel cut in half. This design allows for a larger cooking surface, making it ideal for baking multiple pizzas at once or other large dishes. They can be constructed using bricks or refractory cement.
Kit Ovens
For those who want a more straightforward building process, kit ovens come with all the necessary components pre-measured and ready to assemble. These kits can range from basic to premium, with various customization options available.
Customized Designs
Lastly, don't be afraid to get creative and customize your own design. Incorporating elements from different styles to suit your needs and preferences can result in a truly unique pizza oven. Whether it's a combination of brick and metal or adding artistic tiles, your oven can reflect your personal touch.
Consider the space you have available, the amount of use you anticipate, and your level of expertise in DIY projects before deciding on a design.
Cooking Techniques for Your DIY Pizza Oven
A DIY pizza oven is not just for pizza; it's a versatile cooking tool that can enhance the flavor of many dishes. Here's how to make the most out of your pizza oven with various cooking techniques:
Understanding Your Oven's Heat
The key to mastering your pizza oven is understanding how it distributes heat. Pizza ovens are designed to reach high temperatures, typically between 450-500°F (230-260°C). The dome shape of traditional ovens reflects heat evenly, creating a perfect environment for cooking pizza quickly and efficiently.
Preheating Is Essential
Always preheat your oven to ensure it reaches the optimal temperature for cooking. This might take at least 30 minutes, especially if you're using a pizza stone, which requires more time to heat up.
Baking Beyond Pizza
Your pizza oven can bake bread with a beautiful crust and a soft interior. Try roasting vegetables for a charred, smoky flavor, or slow-cook meats for a tender and juicy result. The high heat and wood smoke add a unique taste that can't be replicated in a regular oven.
Temperature Control
Learn to control the temperature by managing the fire. For a hotter oven, add more wood; for less heat, let the fire die down a bit. Use a thermometer to monitor the temperature and adjust accordingly.
Wood Types for Flavor
Different types of wood can impart different flavors. Hardwoods like oak, maple, and ash burn hot and long, ideal for pizza. Fruitwoods like apple and cherry offer a sweeter smoke, perfect for meats and vegetables.
Rotating for Even Cooking
When cooking pizza, rotate it during baking to ensure an even cook. The area closer to the fire will cook faster, so keep an eye on it and turn the pizza as needed.
Experiment with Recipes
Don't be afraid to experiment with different recipes in your pizza oven. From classic Neapolitan pizzas to artisanal bread and roasted mains, the possibilities are endless. Use your oven to explore new culinary horizons and delight your taste buds.
FAQs About DIY Pizza Ovens
Building a DIY pizza oven can be a rewarding project that brings the authentic taste of wood-fired pizza to your backyard. Here are some frequently asked questions to help you get started on your pizza oven journey:
What materials do I need for a DIY pizza oven?
To build a basic pizza oven, you will need firebricks for the cooking floor and dome, refractory mortar to hold the bricks together, insulation materials like ceramic fiber blanket or vermiculite, and a chimney to vent smoke. Additionally, you may need concrete and rebar for the foundation, and stucco or tiles for the finishing touch.
How do I insulate my pizza oven?
Proper insulation is crucial for retaining heat. You can insulate your oven using a ceramic fiber blanket wrapped around the dome, followed by a layer of vermiculite or perlite mixed with cement. This helps to keep the heat inside the oven and ensures efficient cooking.
How thick should the walls of my pizza oven be?
The walls of your pizza oven, including the dome and cooking floor, should be at least 4 inches thick. This thickness provides optimal heat retention and thermal mass, allowing the oven to stay hot for longer periods and cook pizza evenly.
Can I use my pizza oven to cook other things?
Absolutely! Your pizza oven can be used to cook a variety of dishes. It's great for baking bread, roasting vegetables, and slow-cooking meats. The high heat and smoky flavor from the wood can enhance many recipes.
What is the best design for a DIY pizza oven?
The best design for a DIY pizza oven depends on your space, budget, and cooking needs. The traditional dome design is popular for its efficient heat distribution. However, barrel vault ovens offer more cooking space. Consider portable designs if you have limited space or want to move your oven easily.
Final Thoughts
This project, blending a fire pit and pizza oven, was not just a DIY endeavor but a labor of love and creativity. The satisfaction of building something functional and unique for my backyard was unparalleled. I encourage fellow DIY enthusiasts to embark on this project, adapting steps and materials as necessary to fit personal preferences and existing setups.
Remember, the key to a successful DIY project lies in patience, precision, and adaptability. Enjoy the process and the delicious outcomes.


