Gardening is such a fulfilling hobby, but keeping track of what's growing can sometimes be a bit of a challenge. That's where plant markers come in. They help you remember what you've planted where and add a personal touch to your garden. The best part is that you don't have to spend a fortune to make them!
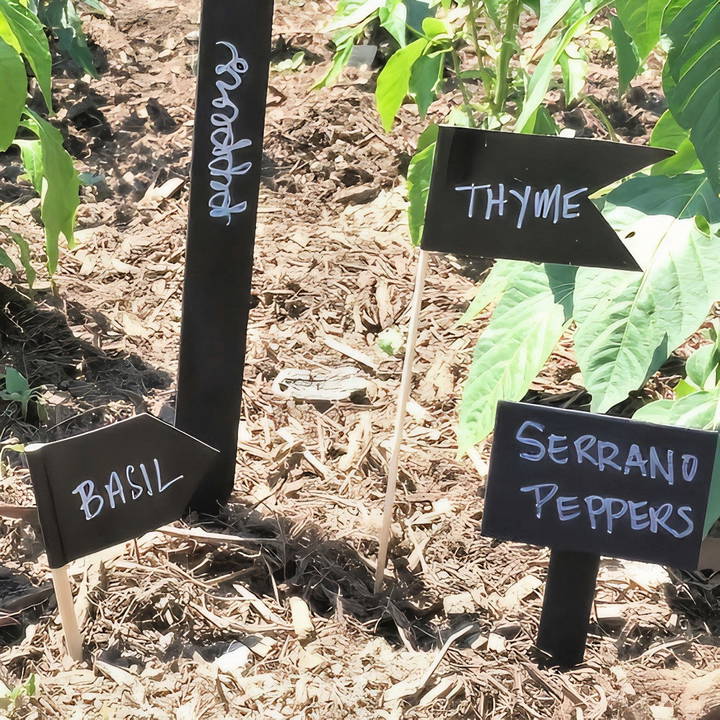
I'm excited to share five affordable and easy DIY plant markers that you can make with just a few materials. Let's dive into these ideas, step by step.
Step by Step Instructions
Make charming garden markers with our step by step instructions on DIY plant markers. Easy chalkboard sticks, duct tape flags & more!
1. Chalkboard Painted Stir Sticks
One of the easiest plant markers you can make involves using stir sticks, which you can get from any hardware store. Many places even give them out for free if you're buying paint. They're perfect for labeling plants, and you can customize them to your liking.
Materials Needed:
- Stir sticks (from Home Depot or any hardware store)
- Chalkboard paint or acrylic paint
- Brushes (foam or regular)
- Sharpie paint pens or regular chalk
Steps:
- Start by painting the stir sticks with the chalkboard paint or acrylic paint. You only need to paint one side first and let it dry before flipping to paint the other side.
- I recommend using parchment paper while painting to avoid the sticks from sticking to the surface. It also makes cleanup a breeze.
- Once the paint is dry, you can write the names of your plants using chalk or a paint pen. If you plan to use these markers outside, avoid using chalk, as rain can wash it away.
- Stick the labeled markers in your garden and admire your handiwork!
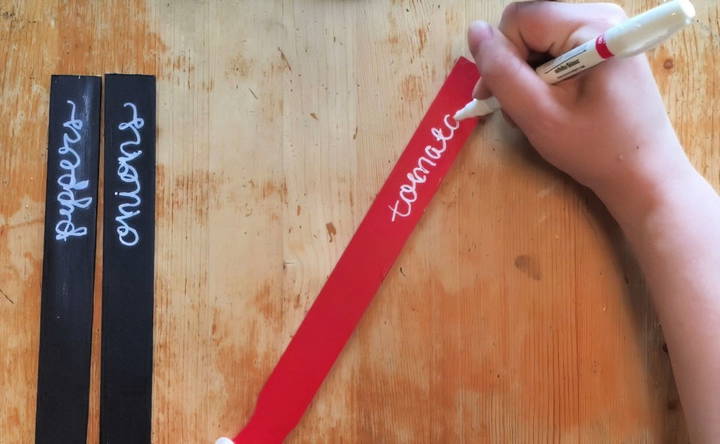
I found that the chalkboard paint gave the sticks a nice matte finish, which works beautifully with a Sharpie paint pen. These markers look great, are easy to read, and add a rustic charm to any garden.
2. Duct Tape Flags on Skewers
For something a bit different, you can use skewers or even small party sticks paired with duct tape to make waterproof plant markers. It's a simple but effective solution.
Materials Needed:
- Wooden skewers or party sticks
- Duct tape (I love using Gorilla brand for this)
Steps:
- Tear off a strip of duct tape and place the skewer in the middle of the tape. Fold the tape over, making sure the edges meet.
- Use scissors to trim the ends into a flag shape.
- Write the plant's name on the tape using a Sharpie paint marker.
- Stick the skewer into the soil next to your plant.
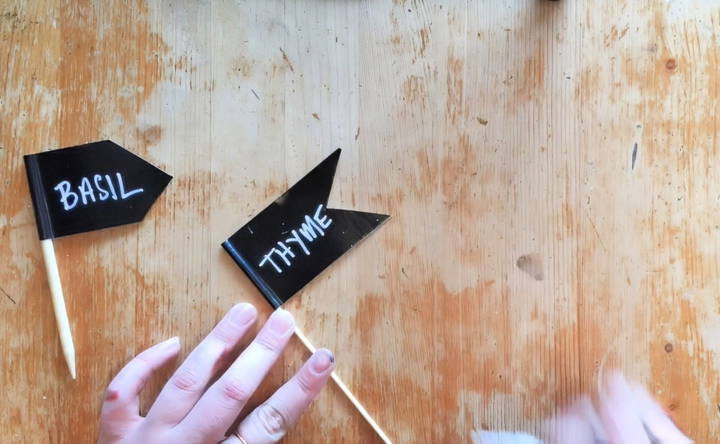
These are great for outdoor gardens because they're waterproof and durable. Plus, you can make them in any color to match your garden's vibe.
3. Wooden Shapes with Popsicle Sticks
If you want something a little more creative, try using small wooden shapes glued to popsicle sticks. I found these adorable wooden rectangles at a craft store, but there are tons of other shapes available.
Materials Needed:
- Wooden shapes (like rectangles or ovals)
- Popsicle sticks (I used black ones for contrast)
- E6000 glue or any strong adhesive
- Paint (chalkboard or acrylic)
- Sharpie paint pen or chalk
Steps:
- Start by painting the wooden shapes and letting them dry.
- Once dry, use the glue to attach the wooden shapes to the popsicle sticks.
- Write the names of your plants on the painted shapes with a Sharpie paint pen or chalk.
- Once everything is dry and secure, place the markers in your garden.
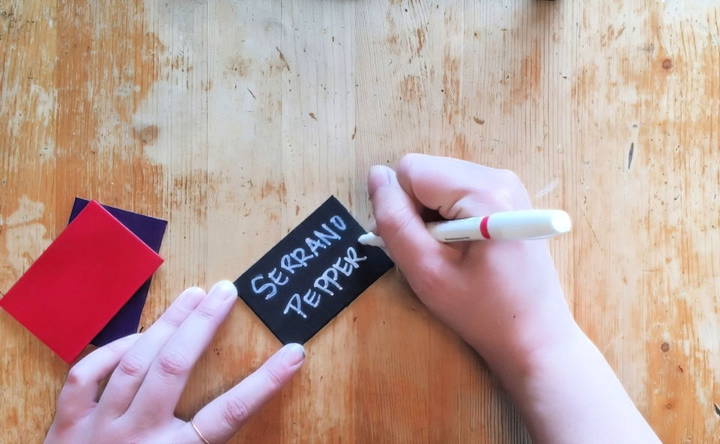
These markers add a whimsical touch and are a fun project to do with kids. You can mix and match shapes, colors, and designs to give your garden some personality.
4. Wood-Burned Door Shims
For a more rustic and permanent option, try wood-burning on door shims. This project requires a little more effort and some practice, but the result is worth it.
Materials Needed:
- Wooden door shims (from the hardware store)
- Wood-burning tool
- Paint (optional)
Steps:
- Start by carefully burning the plant names into the shims using the wood-burning tool. Practice on a scrap piece of wood first if you're new to wood-burning.
- You can choose to leave the wood natural or paint it before writing on it.
- Once the wood has cooled down and any paint is dry, stick the shims into your garden next to your plants.
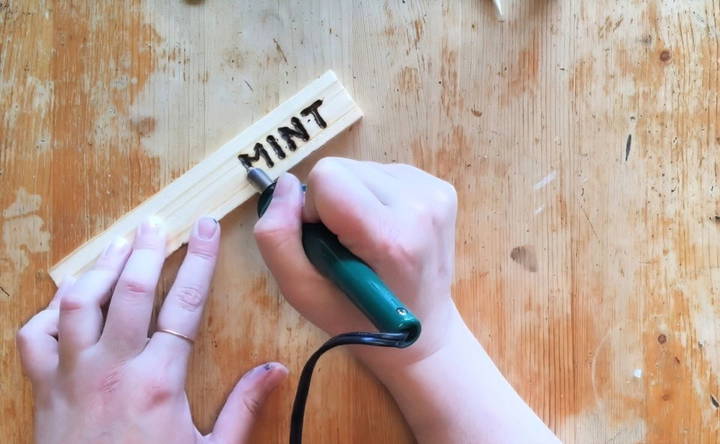
This method gives your garden a natural, earthy feel. Just be sure to handle the wood-burning tool carefully to avoid burns or mistakes.
5. Vintage Label Maker on Popsicle Sticks
One of my favorite ways to make plant markers is by using a vintage Dymo label maker. You can usually find one at a thrift store, and they're so fun to use! The labels come out embossed, adding a chic and polished look to your garden.
Materials Needed:
- Vintage Dymo label maker
- Label tape
- Black popsicle sticks (or regular ones painted black)
- E6000 glue
Steps:
- Use the Dymo label maker to print the names of your plants.
- Attach the labels to the popsicle sticks using strong glue.
- Once the glue is dry, stick the markers into your garden.
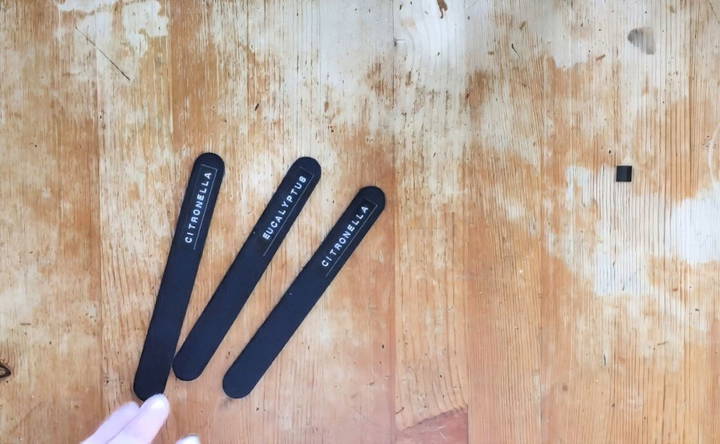
This method makes durable, weather-resistant markers that stand out in any garden. The black background with the white text looks sleek and professional, adding a modern touch to your outdoor space.
Personalization Tips
Personalizing your plant markers can add a unique touch to your garden. Here are some easy and practical tips to help you make custom plant markers that are both functional and beautiful.
Custom Designs
- Use Bright Colors: Choose vibrant colors for your plant markers to make them stand out. You can use acrylic paints, permanent markers, or even nail polish. Bright colors not only look attractive but also make it easier to identify plants from a distance.
- Add Plant Names: Clearly write the names of the plants on the markers. Use a waterproof marker to ensure the names don't fade over time. You can also use stencils or stamps for a more polished look.
- Include Plant Details: Add extra information like planting dates, watering needs, or sunlight requirements. This can be especially helpful for new gardeners or when sharing your garden with others.
Weatherproofing
- Seal with Varnish: To protect your plant markers from the elements, apply a coat of clear varnish or sealant. This will help prevent the colors from fading and the material from deteriorating.
- Use Durable Materials: Choose materials that can withstand outdoor conditions. Metal, stone, and treated wood are good options. Avoid materials that can easily break or degrade, like untreated wood or paper.
- Laminate Paper Markers: If you prefer using paper for your plant markers, consider laminating them. This will make them waterproof and more durable.
Creative Ideas
- Painted Stones: Collect smooth stones and paint them with plant names and designs. This is a fun and eco-friendly way to make unique plant markers.
- Stamped Metal: Use metal stamping kits to make elegant and long-lasting plant markers. You can stamp the plant names and any other details onto metal tags.
- Upcycled Materials: Get creative with upcycled materials like old spoons, corks, or broken tiles. These can be turned into charming and personalized plant markers.
Personal Touches
- Handwritten Notes: Adding handwritten notes or drawings can make your plant markers feel more personal. This is a great way to involve kids in gardening projects.
- Themed Designs: Make themed plant markers based on your garden's style or your personal interests. For example, you can have a fairy-tale theme with whimsical designs or a rustic theme with natural materials.
- Seasonal Updates: Change your plant markers with the seasons. Use different colors or designs to reflect the time of year, such as bright flowers for spring or warm tones for autumn.
By following these tips, you can make personalized plant markers that not only help you keep track of your plants but also add a unique and decorative element to your garden.
Troubleshooting
Making DIY plant markers can be a fun and rewarding project, but sometimes issues arise. Here are some common problems and practical solutions to ensure your plant markers are effective and long-lasting.
Fading Labels
Problem: The writing on your plant markers fades over time, making it hard to read.
Solution:
- Use Waterproof Markers: Choose permanent, waterproof markers to write on your plant markers. These are less likely to fade in the sun or wash away in the rain.
- Seal with Clear Coat: Apply a clear varnish or sealant over the writing to protect it from the elements. This adds an extra layer of protection against fading.
Weather Damage
Problem: Plant markers deteriorate due to exposure to weather conditions.
Solution:
- Select Durable Materials: Use materials like metal, treated wood, or plastic that can withstand outdoor conditions. Avoid materials that easily break down, such as untreated wood or paper.
- Weatherproofing: Apply a weatherproof sealant to your plant markers. This helps protect them from moisture, UV rays, and temperature changes.
Displacement
Problem: Plant markers get displaced by wind, animals, or gardening activities.
Solution:
- Secure Placement: Ensure your plant markers are firmly placed in the ground. For lightweight markers, consider using stakes or anchors to keep them in place.
- Heavy Materials: Use heavier materials like stones or metal tags that are less likely to be moved by wind or animals.
Illegible Writing
Problem: The writing on your plant markers becomes illegible over time.
Solution:
- Clear and Bold Writing: Write clearly and boldly on your plant markers. Use large letters and avoid intricate fonts that can be hard to read from a distance.
- Frequent Updates: Regularly check and update your plant markers to ensure the information remains legible. Replace any markers that have become difficult to read.
Rust and Corrosion
Problem: Metal plant markers rust or corrode over time.
Solution:
- Rust-Resistant Materials: Use rust-resistant metals like stainless steel or aluminum for your plant markers.
- Protective Coating: Apply a protective coating to metal markers to prevent rust and corrosion. Clear enamel spray can be effective for this purpose.
Inconsistent Information
Problem: Plant markers provide inconsistent or incorrect information.
Solution:
- Standardize Information: Decide on a standard format for the information on your plant markers. Include essential details like plant name, planting date, and care instructions.
- Double-Check Details: Before placing your markers, double-check the information to ensure accuracy. This helps avoid confusion and ensures your garden is well-organized.
By addressing these common issues, you can make durable and reliable plant markers that enhance your gardening experience.
FAQs About DIY Plant Markers
Discover everything you need to know about DIY plant markers with our comprehensive FAQs. Tips, materials, and creative ideas included!
Using plant markers helps you keep track of what you’ve planted and where. This is especially useful if you have a large garden or are growing multiple varieties of plants. Markers can prevent you from accidentally pulling up seedlings, mistaking them for weeds. They also help guests and other gardeners identify plants easily.
To make your plant markers weatherproof, use materials that can withstand the elements. For example:
Seal wooden markers with outdoor varnish.
Use acrylic paint on rocks and seal with a clear coat.
Engrave metal markers to prevent fading.
To make your plant markers more visually appealing, consider these tips:
Use colorful paints or markers.
Add decorative elements like stickers or small drawings.
Choose unique shapes or materials that complement your garden's aesthetic.
Here are a few creative ideas for making DIY plant markers:
Wine corks on skewers: Write the plant names on wine corks and stick them on wooden skewers.
Painted rocks: Use colorful paints to decorate rocks and write the plant names.
Chalkboard paint: Apply chalkboard paint to wooden stakes and write the names with chalk for easy updates.
Yes, technology can help you make professional-looking plant markers. You can:
Print labels: Use a label maker or print labels from your computer and attach them to stakes.
Engrave with a Cricut: Use a Cricut machine to engrave names on metal or plastic markers.
QR codes: Generate QR codes that link to plant care information and attach them to your markers.
Final Thoughts
Making your own DIY plant markers doesn't have to be expensive or complicated. With just a few affordable materials and a little creativity, you can make markers that not only help you identify your plants but also add a personal touch to your garden. Whether you prefer the rustic look of wood-burned shims, the practicality of duct tape flags, or the sleekness of vintage labels, there's a method here for everyone. So grab your supplies and start crafting!
These projects were not only fun to make but also really helped me organize my garden. I hope they inspire you to get creative with your own plant markers.


