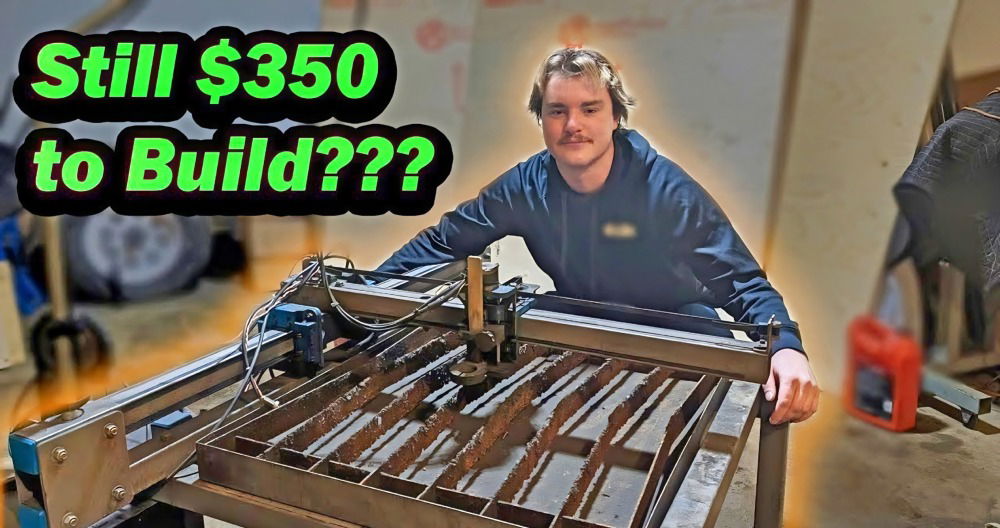
Making things with my hands has always brought me joy. One day, I decided to build a powerful DIY plasma cutter. It seemed like a daunting task at first, but I was so eager to see what I could do with it. I gathered all the materials, read some instructions, and began assembling the plasma cutter step by step.
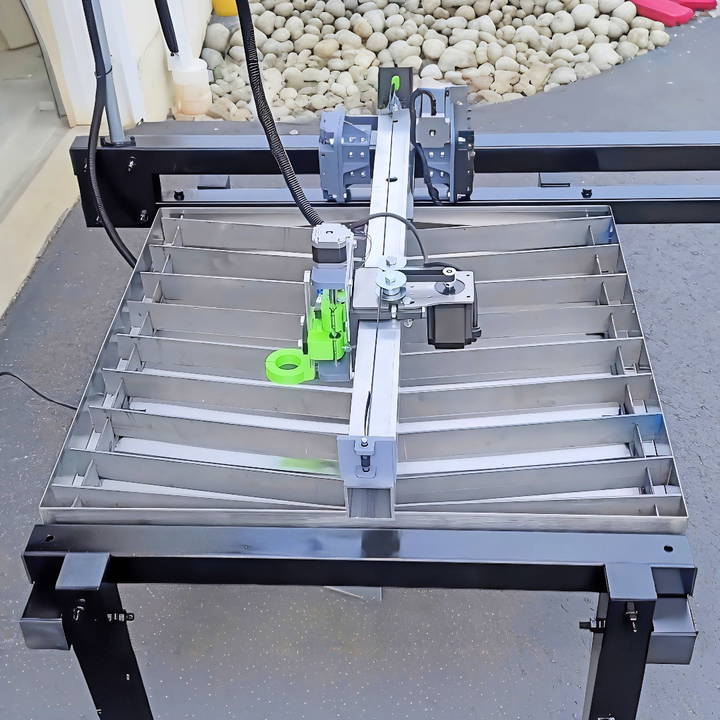
What a rewarding challenge it turned out to be! Each piece fit perfectly, and soon, my plasma cutter was ready to go. I couldn't wait to test it on some scrap metal. The cutter sliced through with ease, proving that all my hard work paid off.
I'm here to share this journey with you, and I'm confident these steps will help you build an efficient plasma cutter.
Introduction to Plasma Cutting Technology
Plasma cutting is a process that uses a jet of ionized gas at high temperatures to cut through different types of materials. This technology is widely used in manufacturing and metalworking industries due to its precision and efficiency. Here's a simple breakdown of how it works and why it's beneficial:
How Plasma Cutting Works:
- A plasma cutter channels electrical energy through a gas that is blown through a focused nozzle at high speed.
- The gas, often air or nitrogen, is heated to an extremely high temperature and ionized so that it becomes electrically conductive.
- The electrical arc formed between an electrode and the metal being cut builds plasma, which in turn cuts through the metal.
Benefits of Plasma Cutting:
- Versatility: It can cut various types of metals, including steel, aluminum, brass, and copper.
- Precision: Plasma cutters can achieve very precise cuts and can be used for intricate shapes and angles.
- Speed: It is much faster than traditional cutting methods, especially for cutting medium-thickness metal sheets.
- Cost-Effective: Plasma cutting is less expensive than other cutting methods because it requires less energy and consumables.
Considerations for DIY Enthusiasts:
- Safety First: Always prioritize safety by wearing protective gear and following proper procedures.
- Quality Equipment: Invest in a good-quality plasma cutter for better performance and durability.
- Practice: Before starting on any project, practice on scrap metal to get a feel for the process.
Grasping plasma cutting basics helps you appreciate its role in fabrication and tackle DIY projects confidently. The key is proper equipment, safety, and practice.
Step by Step Instructions
Learn how to build a DIY plasma cutter with our step-by-step guide. From materials to final assembly, we cover everything you need for success.
Step 1: Gathering Materials and Prep Work
Discover essential tips for Step 1: Gathering Materials and Prep Work & understand why each material is crucial for your project's success.
Why Each Material is Crucial:
- 3D Printed Parts & Plans: Essential for the physical structure and operation. JD's Garage provided a comprehensive list and 3D models, making this daunting task manageable.
- Metal for Frame and Gantry: The skeleton of the machine. It holds everything together and ensures stability.
- Electronic Components: The brain of the operation. These control the movements and function of the plasma cutter.
- Plasma Cutter: The heart of the machine. In my case, the YesWelder CT 2050 was my choice due to its compatibility and efficiency.
I meticulously read through the plans, ensuring I understood every detail. My journey began with printing all necessary 3D parts—a process that required patience but was crucial for the subsequent steps.
Step 2: Building the Gantry
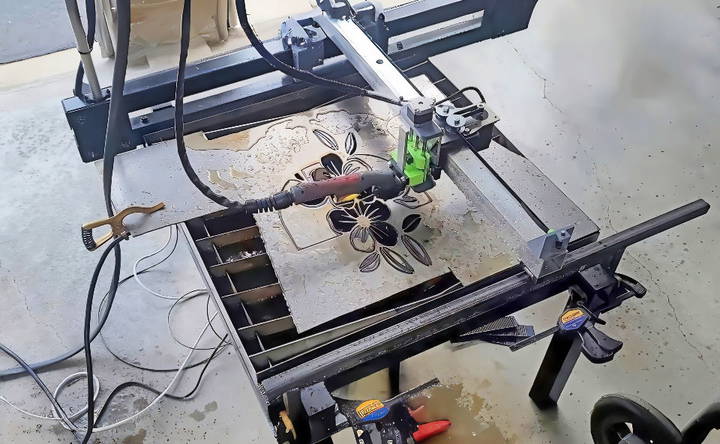
The gantry acts as a crucial axis for movement. Cutting the metal according to specifications and attaching 3D printed flanges required precise measurements and a steady hand. The welding process further solidified the structure, setting a robust foundation for the entire project.
Step 3: Assembling the Frame
The frame's construction was an exercise in precision. Cutting, grinding, and drilling the metal not only tested my skills but also emphasized the importance of accuracy in making a functional CNC table. Following JD's Garage's templates for the y-axis and ensuring all parts aligned perfectly was both challenging and immensely satisfying.
Step 4: Dealing with Back Orders and Improvisations
Some parts were on back order, so improvisation became necessary, particularly for the x-axis. The substitution of aluminum tubes, intended to keep the axis light to prevent sagging, was a decision fraught with uncertainty but ultimately proved successful with some adjustments.
Step 5: Electronics and Final Assembly
Admittedly, the electronics part was intimidating. However, the detailed guidance provided in the plans turned this fear into a fun and educational experience. Assembling the electronics, cutting the slats for the plasma bed, and ensuring all connections were secure and functional took both time and focus.
The Importance of Each Step:
- Precision in Measurements: Essential for alignment and smooth operation.
- Patience with 3D Printing: Crucial for obtaining the necessary parts without incurring additional costs.
- Adaptability: The ability to improvise with materials and components ensured progress despite delays or issues.
- Understanding Electronics: Vital for the machine's functionality, requiring careful study and application.
Advanced Techniques and Tips
When you've mastered the basics of plasma cutting, you can explore advanced techniques to enhance your projects. Here are some tips and methods that can help you achieve cleaner cuts and more intricate designs:
Fine-Tuning for Precision:
- Adjust the Airflow: Control the airflow rate to match the thickness of the metal. Too much airflow can cause the arc to spread out, reducing precision.
- Optimize Cutting Speed: Find the right balance in speed; too fast can lead to incomplete cuts, while too slow can cause excessive dross (metal slag).
Building Intricate Designs:
- Use Templates: For complex shapes, build or print templates. Secure them to the metal and follow the outline with the plasma cutter.
- Pilot Arc: Utilize a plasma cutter with a pilot arc feature to enable easier starts and stops without affecting the material.
Improving Cut Quality:
- Standoff Distance: Maintain a consistent standoff distance (the gap between the torch and the workpiece) for a steady arc and uniform cut quality.
- Drag Shield: Some torches come with a drag shield which allows you to rest the torch on the workpiece for a steadier hand.
Extending Consumable Life:
- Regular Maintenance: Clean the torch and replace consumables regularly to prevent poor performance and potential damage.
- Avoid Double Arcing: Ensure the work clamp has a good connection. A poor ground can cause double arcing, which wears out consumables quickly.
Enhancing Safety and Efficiency:
- Fume Extraction: Use a fume extraction system or work in a well-ventilated area to avoid inhaling harmful gases.
- Noise Reduction: Consider using noise-dampening equipment or ear protection, as plasma cutting can be loud.
Use these advanced plasma cutting techniques for precise cuts, longer equipment life, and safer, more efficient work.
Troubleshooting Common Issues
When working with a DIY plasma cutter, you might encounter a few hiccups along the way. Here's how to troubleshoot some common issues:
Grounding Problems:
- Ensure your plasma cutter is plugged into a grounded outlet. A proper ground is crucial for the electrical arc to work effectively.
- Check the grounding clamp is connected to the workpiece. This completes the circuit and allows the cutter to build the necessary charge.
Air Pressure Issues:
- Maintain the recommended air pressure as per the owner's manual. The built-in air compressor should blow away cut material and debris.
Clogged or Burned Tips:
- Clean any accumulated dirt or metal slag from the cutting tip. This prevents electrical discharge issues.
- Replace burned tips promptly. A misshapen cutting hole can reduce the efficiency of the electric charge.
Dirty Cutting Surface:
- Clean the metal surface before cutting. Dust, oil, rust, or other contaminants can interfere with the electrical current.
Safety Precautions
When it comes to operating a DIY plasma cutter, safety is paramount. Here's a comprehensive guide to ensure you handle your equipment safely and responsibly:
Personal Protective Equipment (PPE):
- Safety Glasses: Protect your eyes from sparks and intense light with at least shade 4 safety glasses.
- Gloves: Wear insulated gloves to safeguard your hands from heat and electrical shock.
- Flame-Resistant Clothing: Don flame-resistant clothing to shield your skin from hot metal and sparks.
Electrical Safety:
- Proper Grounding: Ensure your plasma cutter is grounded to prevent electrical hazards.
- Voltage Awareness: Be aware that plasma cutters can produce high voltages; handle with care.
Work Environment:
- Clutter-Free Area: Keep your workspace free of flammable materials and clutter to reduce fire risks.
- Fire Extinguisher: Always have a fire extinguisher nearby in case of sparks igniting a fire.
Ventilation:
- Fume Extraction: Plasma cutting can release harmful fumes; work in a well-ventilated area or use a fume extraction system.
Equipment Maintenance:
- Regular Checks: Inspect your plasma cutter for damaged parts before each use.
- Consumable Care: Replace consumables regularly to maintain cutting efficiency and safety.
Training:
- Proper Instruction: Before using a plasma cutter, ensure you have received adequate training.
Ensure safety while plasma cutting with essential precautions. Minimize risks and protect yourself and others.
FAQs About DIY Plasma Cutter
Our comprehensive FAQ guide provides answers to common questions about DIY Plasma Cutters. It also includes tips, safety advice, and more!
A DIY plasma cutter is a tool you can build at home to cut through metal. It uses a plasma torch, which is a device that builds a jet of hot plasma to slice metals like steel and aluminum.
A plasma cutter works by sending an electric arc through a gas that is passing through a constricted opening. The gas can be air, nitrogen, argon, or even oxygen. This process increases the temperature of the gas to the point where it enters the fourth state of matter, plasma. The plasma is hot enough to melt the metal being cut and moves fast enough to blow molten metal away from the cut.
Yes, you can build a CNC (Computer Numerical Control) plasma cutter at home. It involves making a machine that uses computer controls to move the plasma torch in precise patterns. You'll need knowledge of electronics and computer programming, as well as the materials listed in the previous question.
Building a DIY plasma cutter can be safe if you follow proper safety guidelines. Always wear protective gear, such as gloves and a welding helmet, and work in a well-ventilated area. Be sure to have a fire extinguisher nearby and never cut near flammable materials or gases.
When using a plasma cutter, safety is paramount. Here are some key precautions:
Wear Protective Gear: Always wear a welding helmet with the appropriate shade, flame-resistant gloves, and clothing.
Ventilation: Work in a well-ventilated area to avoid inhaling fumes.
Avoid Water: Never use a plasma cutter near water or while standing in water.
Check Connections: Ensure all electrical connections are secure and ground clamps are attached.
Fire Safety: Keep a fire extinguisher close by and clear the area of flammable materials.
The Result
Wrapping up, building a powerful DIY plasma cutter can be an incredibly rewarding project. By following these steps, you'll have a functional tool perfect for your metalworking needs. Enjoy the process, and happy cutting!


