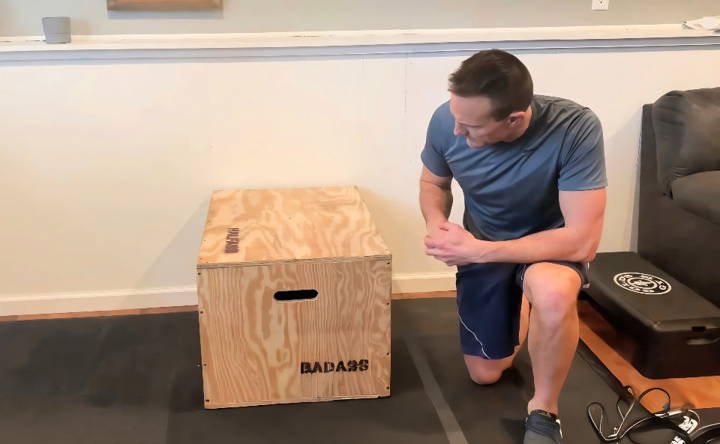
Building my own DIY plyo box was an amazing experience. I wanted to improve my workout routine, so I decided to make a plyo box. I gathered some basic materials like plywood, screws, and a drill. The instructions I found were clear and easy to follow. I felt a sense of accomplishment once I assembled the box.
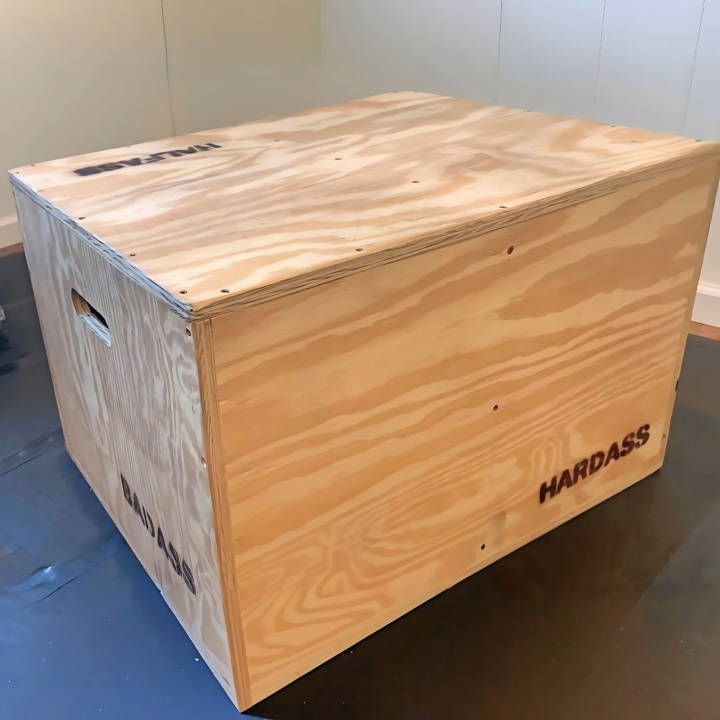
Jumping on the plyo box was a game-changer for my exercises. It added a fun and challenging element to my workouts. I noticed improved strength and coordination after a few weeks. If you are looking to enhance your fitness routine, building your own plyometric box could be incredibly beneficial. This guide will help you get started on the right track.
What is Plyometric Training?
At its core, plyometric training involves rapid stretching and contracting of muscles, like a rubber band being stretched and released, to generate powerful movements. When you jump onto a box, for example, your leg muscles stretch as you bend your knees before the jump (the eccentric phase), and then they contract quickly to propel you upward (the concentric phase).
Benefits of Plyometrics
Plyometric exercises can:
- Enhance athletic performance: By improving the speed and force of muscle contractions, plyometrics can significantly boost performance in sports such as basketball, volleyball, and track and field.
- Build muscle strength: These exercises target fast-twitch muscle fibers, which are responsible for generating quick bursts of strength or speed.
- Improve coordination: Plyometrics require precise body control, which can enhance overall coordination and balance.
- Increase calorie burn: Due to their high-intensity nature, plyometric exercises can burn more calories in a shorter amount of time compared to traditional workouts.
How to Get Started with Plyometrics
If you're new to plyometric training, start with lower-intensity exercises and gradually increase the difficulty as your strength and confidence grow. Always focus on form and technique over speed or height to prevent injuries. Common beginner exercises include:
- Squat jumps: Stand with feet shoulder-width apart, squat down, and then jump up explosively.
- Box step-ups: Step onto a sturdy box one foot at a time, then step back down.
- Lateral hops: Jump side to side over a small object or line on the floor.
Plyometrics can be intense, so it's important to include them as part of a balanced training program. Always warm up thoroughly before starting plyometric exercises to prepare your muscles and joints for the workout ahead.
Gathering Your Materials
Here's what you'll need:
- Three-quarter inch sheet of plywood: Essential for durability and support. Opt for the unsanded variety for a more budget-friendly option.
- Drill and two-inch construction screws: These screws come with a star bit to prevent stripping, unlike their Phillips' head counterparts.
- Pilot drill bit and countersink: These tools ensure that screws are flush or slightly below the surface to prevent injuries.
- Paddle bit or hole saw (1 and a half inch): For crafting the handles. Ensure it's sharp to make the process smoother.
- Jigsaw: This will be used to connect the holes drilled for the handles.
- Sandpaper or power sander: To smooth out all surfaces and edges, minimizing the risk of splinters.
Why Each Material Matters:
Every material in this list plays a pivotal role in making a safe, durable, and usable plyo box. For instance, opting for a lower grade plywood might save costs upfront but could compromise the box's integrity and safety over time. Similarly, the type of screws and drill bits used can affect the assembly process's ease and the final product's quality.
Step by Step Instructions
Build your own DIY plyo box with our step-by-step instructions. Perfect for fitness enthusiasts looking for an affordable workout solution!
1. Cutting the Plywood
First off, if you're not comfortable cutting the plywood yourself, many hardware stores offer cutting services. Just make sure you have your measurements ready. For my project, I followed a design that called for precise cuts to form the box's different sides and a central brace for added stability.
2. Drilling and Assembling
Begin by marking where you'll need to drill for the screws. Remember, pilot holes are your friends here; they guide the screws in and prevent the wood from splitting. The countersink bit then allows each screw to rest below the surface. I started by assembling the sides, securing each piece with the construction screws, then added the central brace for extra rigidity.
3. Crafting the Handles
Handles might seem like a small detail, but they are game-changers for portability. Using the paddle bit, drill two adjacent holes, then employ the jigsaw to connect them, forming a handle. A pro tip: leave one side uncut till the end to easily remove the excess wood.
4. Sanding Down
The final step involved sanding down every surface and edge. This not only prevents potential splinters but also gives the box a more professional finish. Don't underestimate the power of sanding; it truly makes a difference in the overall feel and safety of the box.
Maintenance and Care
Taking care of your DIY plyo box is essential to ensure it remains safe to use and lasts a long time. Here are simple, easy-to-follow steps for maintaining your plyo box.
Regular Inspection
- Check for Damage: Before and after each use, inspect your plyo box for any signs of wear and tear. Look for loose screws, splinters, or cracks in the wood. If you find any damage, repair it before using the box again to prevent injuries.
Cleaning
- Keep it Clean: Sweat and dirt can build up on your plyo box, making it slippery and unsafe. Wipe it down with a damp cloth after every session. If it's particularly dirty, use a mild detergent mixed with water, but avoid harsh chemicals that can damage the wood.
Storage
- Proper Storage: Store your plyo box in a dry, cool place away from direct sunlight. Extreme temperatures and moisture can warp the wood and weaken the structure. If you're storing it outside, cover it with a waterproof tarp.
Surface Maintenance
- Maintain the Grip: The top surface of the plyo box should have a non-slip texture. Over time, this can wear down. You can reapply a non-slip coating or add a new layer of non-slip tape to keep the surface safe for exercises.
Tightening and Adjustments
- Tighten the Screws: Periodically, go over the box with a screwdriver and tighten any screws that have become loose. This will help maintain the box's stability and integrity.
Wood Treatment
- Treat the Wood: If your plyo box is made of wood, consider treating it with a sealant or wood conditioner once a year. This will protect it from moisture and help prevent the wood from splitting.
By following these maintenance and care tips, your DIY plyo box will remain a reliable and safe piece of equipment for your plyometric workouts.
Safety Precautions
When engaging in exercises using a plyo box, safety is paramount. Here are some key precautions to ensure your workouts are not only effective but also secure.
Proper Footwear
- Wear the Right Shoes: Always wear athletic shoes with good grip and support. This reduces the risk of slipping and provides stability during jumps and other plyometric exercises.
Exercise Area
- Clear the Area: Ensure the space around your plyo box is clear of any objects that could cause injury if you fall or jump off balance.
Body Readiness
- Warm-Up: Prepare your body with a dynamic warm-up to increase blood flow and reduce the risk of injury. Focus on exercises that gently stretch and activate the muscles you'll be using.
Technique
- Focus on Form: Good form is crucial. When jumping onto the box, land softly with your knees slightly bent to absorb the impact. Avoid locking your knees or elbows during exercises.
Box Stability
- Check Box Stability: Before each workout, make sure the plyo box is stable. It shouldn't wobble or tilt when you apply pressure.
Progress Gradually
- Start Low, Go Slow: Begin with a lower height and simple exercises. As you become more comfortable and your fitness improves, gradually increase the difficulty.
Listen to Your Body
- Pay Attention to Pain: If you feel sharp pain or discomfort beyond normal muscle fatigue, stop the exercise. Rest and seek medical advice if necessary.
Rest and Recovery
- Rest is Essential: Allow time for recovery between plyometric workouts. This helps prevent overuse injuries and ensures muscles have time to repair and strengthen.
By adhering to these safety precautions, you can enjoy the benefits of plyometric training while minimizing the risk of injury. Always prioritize safety and listen to your body to maintain a healthy and active lifestyle.
FAQs About DIY Plyo Box
Get answers to common questions about DIY plyo boxes. Discover materials, construction tips, and safety info for your own homemade plyometric box.
A plyo box is a sturdy platform used for plyometric exercises, which are movements that help improve your speed, power, and explosiveness. By using a plyo box, you can perform exercises like box jumps, step-ups, and elevated push-ups to enhance your athletic abilities and overall fitness.
A standard 3-in-1 plyo box typically has the dimensions of 28" x 24" x 20". This size provides three different heights for various exercises and skill levels. You can adjust the box to the height that suits your workout needs.
Absolutely! You can customize your plyo box by adjusting its dimensions to fit your space or skill level. Additionally, you can add handles for easier transportation, apply non-slip surfaces for safety, or even personalize it with paint or decals to match your style.
Yes, building your own plyo box is cost-effective. A high-quality commercial plyo box can cost over $75, not including shipping and taxes. In contrast, you can build a DIY plyo box for under $35, saving you money and providing a sense of accomplishment from making your own workout equipment.
Safety is paramount when building and using a DIY plyo box. Here are some tips to ensure your plyo box is safe:
Double-check measurements and cuts to ensure all pieces fit together without gaps.
Use sturdy materials; 3/4" thick plywood is recommended for its strength and durability.
Reinforce joints with wood glue in addition to screws for added stability.
Sand all edges smoothly to prevent splinters and injuries.
Apply a non-slip surface to the top of the box to prevent slipping during exercises.
Regularly inspect your plyo box for any signs of wear or damage before use.
Conclusion
By making your own DIY plyo box, you're not just building equipment—you're building strength and confidence. This project is a great way to take control of your fitness goals. Get started today, and watch how it transforms your workouts!


