Making DIY pocket boutonnieres is a fun and easy way to add a personal touch to any occasion. I remember making one for a friend's wedding, and it instantly became a memorable part of the day. Not only were they unique, but they also provided a wonderful keepsake for everyone involved. The process itself was surprisingly simple and quite enjoyable.
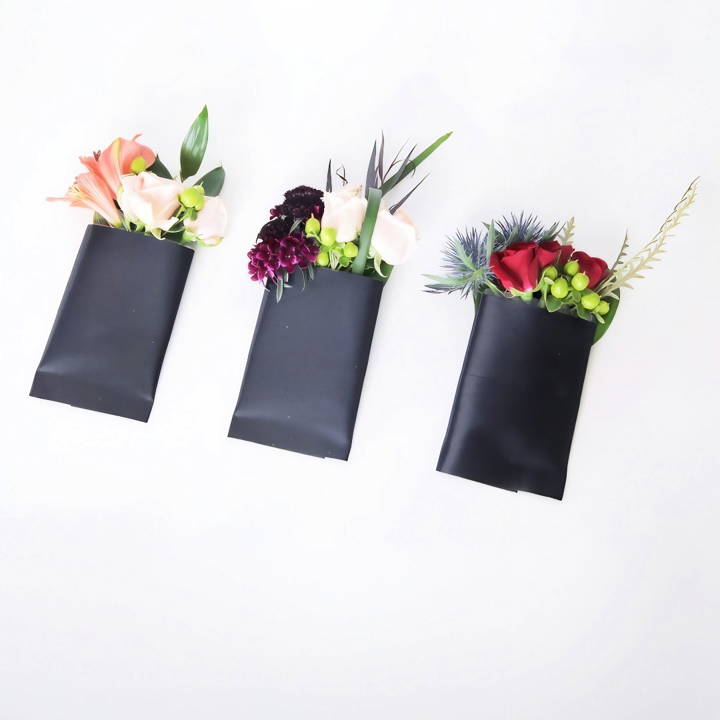
To start, I gathered a few materials: some small flowers, wire, and a pocket square. Step by step, I transformed these everyday items into a stylish pocket square boutonniere. It was amazing to see how a bit of creativity and resourcefulness could make something so elegant. With these tips, you can make thoughtful and beautiful boutonnieres effortlessly.
I'm helping you with these tips to make your own boutonnieres. Let's get started with these easy instructions.
Materials Needed and Their Significance
Before we start, it's crucial to gather all the necessary materials. Each component plays a pivotal role in the creation and longevity of your pocket boutonnieres:
- Satin Ribbon (8 inches long, two pieces): The satin ribbon is used to extend the size of the pocket boutonniere base, ensuring it fits perfectly and doesn't slip. Its luxurious texture adds an extra touch of elegance.
- U-Glue Strips: These adhesive strips are essential for securely attaching the satin ribbon to the boutonniere base. They guarantee that everything stays in place, preventing any mishaps during the event.
- Titanium Scissors: These are used for cutting the U-Glue strips. Titanium scissors provide a clean and precise cut, which is crucial for a polished look.
- Baseball Card Holders: Acting as the pocket boutonniere base, these holders are convenient for arranging and securing the floral elements. However, as noted, they might need modification to ensure optimal length and stability.
- Oasis Floral Adhesive: This special adhesive is crucial for attaching smaller floral elements to the boutonniere. It ensures that all pieces remain securely in place throughout the event.
- Crown and Glory Spray: A final spritz of this spray helps to keep the flowers fresh and vibrant for longer periods, ensuring that your boutonniere looks stunning from start to finish.
Step by Step Instructions
Learn how to make a DIY pocket boutonniere with our easy step-by-step instructions. Perfect for weddings, proms, and special events!
Preparing the Ribbon Extension
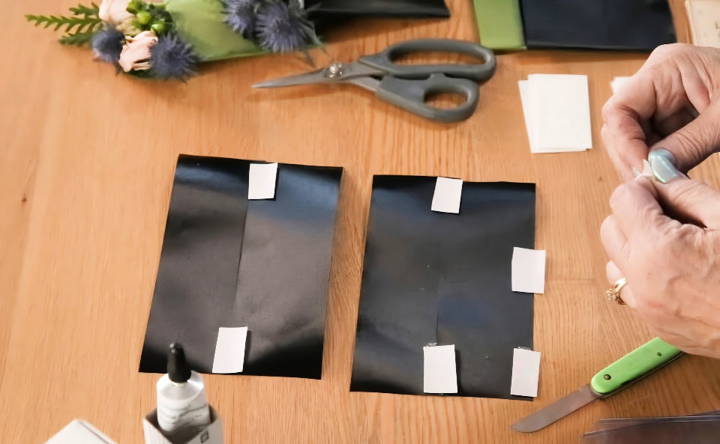
- Lay the Two Pieces of Satin Ribbon Together: Start by aligning two pieces of the satin ribbon. Choose whether you prefer the shiny side or the matte side facing out based on your preference.
- Apply U-Glue Strips: Cut the U-Glue strips into four smaller pieces using the titanium scissors. Place these strips along the ribbon length, spacing them evenly. This will form the backbone of your extension, providing the necessary support and adhesion.
Assembling the Pocket Boutonniere Base
- Remove the Wax Coating: Carefully peel off the wax coating from the U-Glue strips. This exposes the adhesive, preparing it for the next step.
- Fold and Seal: Fold the ribbon over at the point where the U-Glue strips are applied. Press firmly to ensure a strong bond. Properly done, this makes a slight pocket or envelope, extending the length of your baseball card holder base.
Embedding the Florals
- Insert Floral Elements: Now, you can start inserting your chosen florals into the newly maked pocket. Begin with the largest piece as your focal point, then strategically place smaller blooms and foliage to complement it.
- Secure Smaller Pieces with Floral Adhesive: For those tiny, delicate pieces that add intricate detail to your boutonniere, use the Oasis Floral adhesive. Apply a small dot of glue to the base of these floral elements before placing them in your arrangement. This ensures they stay put.
Final Touches
- Apply Crown and Glory Spray: Once your boutonniere is assembled, give it a gentle spray with the Crown and Glory to help maintain its freshness. This step is crucial for prolonging the life of your floral creation.
- Fitting Test: Lastly, do a fitting test by gently sliding the boutonniere into a pocket. This is to ensure it sits securely without slipping down. Adjust as necessary to achieve a perfect fit.
Personalization Ideas for Your Pocket Boutonniere
Personalizing your pocket boutonniere adds a special touch that can make any occasion feel even more unique. Here are some ideas to inspire you:
- Choose Meaningful Flowers: Select flowers that have a personal significance. For example, if you have a favorite flower or one that reminds you of a special moment, include it in your design.
- Incorporate Family Heirlooms: Adding a small family heirloom, like a piece of lace from a grandmother's wedding dress or a locket with a photo, can make your boutonniere a cherished keepsake.
- Use Themed Embellishments: If your event has a theme, reflect it in your boutonniere. For a beach wedding, consider seashells or starfish. For a winter event, pinecones or holly berries can be lovely.
- Monogrammed Elements: Add a monogrammed ribbon or tag to your boutonniere. The monogram could be your initials, the date of the event, or a special symbol representing you.
- Play with Colors: Choose colors that complement or contrast with your outfit for a striking effect. You can also use colors to convey a mood or emotion.
- Add Textures: Mix different textures by using various materials like burlap, silk, or velvet. This can add depth and interest to your boutonniere.
- Aromatic Herbs: Incorporate herbs like rosemary or lavender for a boutonniere that smells as good as it looks.
- Charms and Trinkets: Attach small charms or trinkets that represent your hobbies, interests, or milestones.
- Interactive Elements: Consider adding something interactive, like a tiny envelope with a message inside, which can be a fun surprise for the recipient.
The key to personalization is making it true to you. These touches not only make your boutonniere unique but also tell a story about who you are.
Design Variations for Pocket Boutonnieres
When it comes to pocket boutonnieres, there's a world of creative possibilities. Here are some design variations that can cater to different tastes and occasions:
- Classic Elegance: For a timeless look, choose a single flower, like a rose or a carnation. Pair it with a sprig of greenery and wrap the stem in a satin ribbon.
- Rustic Charm: Combine wildflowers with herbs and twine for a boutonniere that suits outdoor or barn weddings. Think daisies, lavender, and rosemary.
- Modern Twist: Use geometric shapes or unusual materials like metal or paper. A single, bold succulent can serve as a modern and masculine focal point.
- Vintage Flair: Look for antique brooches or lace to add to your boutonniere. Old-world flowers like peonies or garden roses can complete this style.
- Bohemian Vibes: Feathers, beads, and colorful threads can give your boutonniere a free-spirited feel. Mix textures and colors for a playful look.
- Seasonal Themes: Your design should reflect the season. For example, bright tulips in spring, sunflowers in summer, berries in fall, or holly in winter.
- Cultural Touches: Incorporate elements that represent your heritage, such as tartan patterns, traditional fabrics, or symbolic flowers.
- Minimalist Approach: Sometimes, less is more. A single, striking bloom with a sleek pin can make a powerful statement.
- Whimsical Wonderland: Use unexpected items like miniature figurines, buttons, or candy for a touch of whimsy.
- Eco-Friendly Options: Consider using dried flowers, reusable items, or living plants that can be replanted after the event.
Each design uniquely expresses personality and style. Consider the event's theme and attire when choosing.
Troubleshooting Common Issues with Pocket Boutonnieres
Making a pocket boutonniere can be a fun DIY project, but sometimes you might run into a few hiccups. Here's how to solve some common issues:
- Wilting Flowers: If your flowers start to droop, trim the ends and soak them in cold water for a few minutes. To prevent wilting, choose fresh, sturdy blooms and keep them hydrated.
- Loose Petals: Should petals come loose, you can reattach them with a small dab of floral glue. Be gentle to avoid damaging the petals.
- Difficulty Pinning: If you're struggling to pin the boutonniere, ensure the pin is sharp and long enough. Pin through the thickest part of the stem and fabric for a secure hold.
- Mismatched Colors: In case the colors don't match your outfit as expected, add neutral elements like white flowers or greenery to balance the palette.
- Allergic Reactions: Some flowers can cause allergies. If this is a concern, opt for hypoallergenic flowers like roses, peonies, or orchids.
- Size Issues: A boutonniere that's too large or small can look out of place. Aim for a size that complements the wearer's frame and the pocket's dimensions.
- Falling Arrangements: If elements of your boutonniere fall out, use floral tape to secure the stems together tightly. A backing-like felt can also provide extra stability.
- Staining: To prevent pollen stains, remove any stamens from the flowers before assembly. Choose flowers with less risk of staining, like tulips or ranunculus.
By anticipating these issues and knowing how to fix them, you'll ensure your pocket boutonniere looks great and stays intact throughout your event.
FAQs About DIY Pocket Boutonniere
Discover all you need to know about making your own DIY pocket boutonniere with our frequently asked questions guide. Simple, easy, and stylish tips!
A DIY pocket boutonniere is a handmade floral decoration designed to fit into the pocket of a jacket or shirt. It’s a creative alternative to traditional lapel boutonnieres and adds a personal touch to your outfit.
No, you don’t need special skills. With basic crafting supplies like cardboard, ribbon, glue, and your choice of flowers and greenery, you can create a beautiful pocket boutonniere. There are many tutorials available that guide you through the process step-by-step.
Yes, you can use a variety of flowers and greenery for your pocket boutonniere. Sola wood flowers, fresh blooms, or even silk flowers are all suitable choices. The key is to select flowers that complement your outfit and the occasion.
The time it takes can vary, but generally, you can make a simple pocket boutonniere in about an hour. This includes the time for the glue to dry and for you to arrange the flowers and greenery neatly on the base.
To secure the pocket boutonniere, ensure the base fits snugly into your pocket. You can also use a pin or double-sided tape for extra stability. Make sure it's secure enough to stay in place throughout your event.
Closing Thoughts
By following these steps, you'll find making DIY pocket boutonnieres can be both fun and rewarding. Get creative and enjoy the process!


