Making a DIY pond filter can be easy and fun. I remember building my own pond filter system last summer. I just gathered some simple items from around the house and followed an easy method. It only took a few hours, and I noticed the water in my pond stayed clear and healthy. This DIY project not only saved me money but also gave me a sense of accomplishment.
By making your own homemade pond filter, you ensure your pond stays clean without spending a lot. I've shared this method with friends, and they also love the results. Making a pond filter is a great weekend project that can bring long-term benefits. If you have a pond, this guide can really help you keep the water clear and your fish happy.
This easy DIY pond filter method will help you get clear water without hassle. Give it a try, and enjoy the results!
What You'll Need
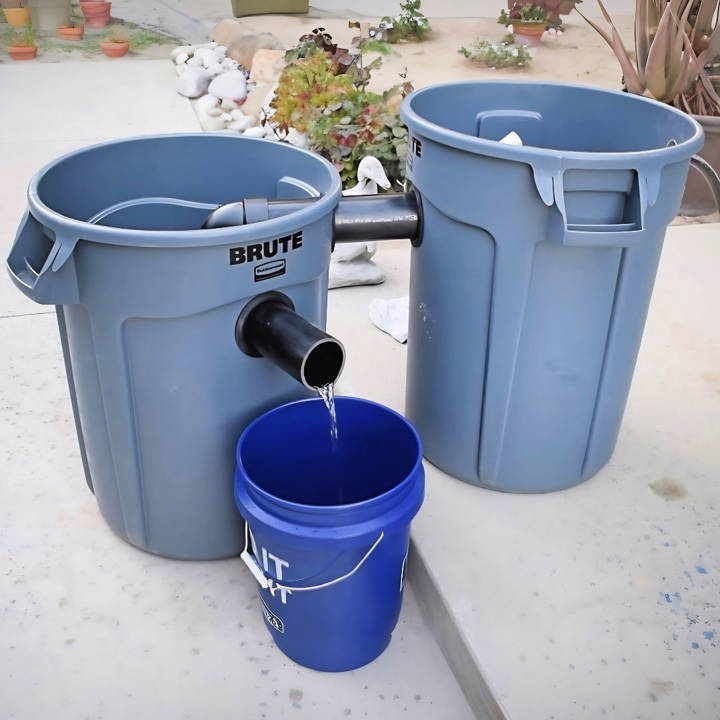
- 32 Gallon Brute Trash Cans (x2): The large capacity is ideal for making an efficient filter system. One will serve as a mechanical filter and the other for biological filtration.
- Uniseals (3-inch and 1-inch): These provide a watertight seal for the pipes passing through the trash cans.
- Hole Saw (4-inch and appropriate size for 1-inch pipe): Necessary for making precise holes for the uniseals.
- PVC Pipes (3-inch and 1-inch): These will connect the two trash cans and serve as the main conduits for water.
- ABS Pipe (3-inch): Provides a sturdy connection between the trash cans.
- PVC Elbow and T-Fitting: These will help direct the flow of water inside the filter.
- Mesh Bags with Lava Rocks: Serve as biological media to house beneficial bacteria.
- Silicone Lubricant: Helps ease the installation of pipes through unseals.
- Sandpaper: Smoothens the cut edges of pipes for easier installation.
Step by Step Instructions
Learn how to build a DIY pond filter with our step-by-step guide. From planning to setup, make an efficient pond filter system easily.
Step 1: Planning and Placement
Position one trash can slightly higher than the other. This elevation difference is crucial as the first bin (mechanical filter) will overflow into the second (biological filter), which will then overflow back into the pond.
Step 2: Drilling Holes
Using the hole saw, drill appropriate-sized holes in the trash cans for the uniseals. For the 3-inch uniseals, I used a 4-inch hole saw. It's vital to make the holes smooth and clean to ensure a good seal.
Step 3: Installing Uniseals and Pipes
Insert the uniseals into the holes. I found it beneficial to lubricate the pipes with silicone or dish soap to ease them through the uniseals. Ensure a tight fit to prevent leaks. The 3-inch pipes connect the trash cans, while the 1-inch pipes serve as the intake and outflow.
Step 4: Connecting the Trash Cans
Using the ABS pipe, connect the bottom of the higher trash can to the top of the lower one. This setup allows water to flow from the mechanical to the biological filter seamlessly. Ensuring that the pipes fit snugly and securely is crucial.
Step 5: Adding Filtration Media
In the first trash can (mechanical filter), place coarse filter media to catch larger debris. The second can (biological filter) should contain mesh bags filled with lava rocks. These provide a large surface area for beneficial bacteria to colonize.
Step 6: Setting up the Intake and Outflow
The intake pipe should be positioned at the top of the mechanical filter. Water from the pond pumps into this bin, passes through the media, then into the biological filter before returning to the pond through the outflow.
Testing and Adjustments
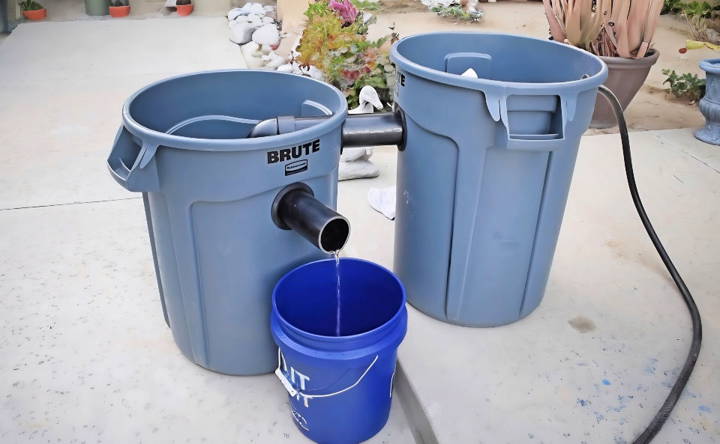
After assembly, I tested the system with a garden hose to simulate the pond pump. The goal was to ensure water flowed correctly through both filters and back out without any leaks. I made minor adjustments, ensuring the outflow was directed back into the pond effectively.
Customization Options for Different Pond Sizes
Making a DIY pond filter is a fantastic way to ensure clean and clear water in your pond, no matter its size. Here's how you can customize your filter to suit the specific needs of your pond:
Small Ponds
For small ponds under 1,000 gallons:
- Use a Submersible Filter: These are easy to install and maintain.
- Sponge Filters Work Great: They provide mechanical and biological filtration and are inexpensive.
- Consider Plant Filtration: Incorporate plants that naturally clean the water, like water lilies and irises.
Medium Ponds
For medium ponds between 1,000 to 5,000 gallons:
- External Pressurized Filters: These are more powerful and can handle the increased bioload.
- Add a UV Clarifier: This will help control algae growth and keep the water clear.
- Increase Aeration: Use a larger pump or add an air stone to keep the water oxygenated.
Large Ponds
For large ponds over 5,000 gallons:
- Multiple Filter Systems: Combine submersible and external filters for maximum efficiency.
- Biofilter with a Waterfall: This not only adds beauty but also increases oxygen levels and filtration.
- Regular Cleaning Schedule: Larger ponds will need more frequent maintenance to stay healthy.
Koi Ponds or Heavy Bioloads
If you have a koi pond or a pond with a heavy bioload:
- Oversize Your Filter: It's better to have a filter that's too big than too small.
- Mechanical and Biological Filtration: Ensure your system can handle solid waste and convert harmful ammonia.
- Professional Grade Equipment: Consider investing in higher-end equipment to ensure the health of your fish.
To succeed with a DIY pond filter, know your pond's needs and maintain it regularly. Keep it simple and seek advice from other pond lovers!
Advanced Filtration Techniques
When it comes to keeping your pond water pristine, advanced filtration techniques can make a significant difference. These methods go beyond basic filtration to ensure your pond is a healthy environment for plants and wildlife. Here's a breakdown of some sophisticated options:
Biological Filtration
Biological filters use natural processes to clean the water. They rely on beneficial bacteria to break down harmful ammonia from fish waste into less toxic substances. These filters are essential for larger ponds with more fish, as they help maintain a balanced nitrogen cycle.
Mechanical Filtration
Mechanical filters physically remove debris from the water. This can be anything from a simple sponge on the pump's intake to more complex systems like a lava rock filter or a pond skimmer. The key is to choose a filter that matches the size and needs of your pond.
Ultra Violet Clarifiers
UV clarifiers are a game-changer for controlling algae. They use ultraviolet light to kill single-celled algae, which are then removed by the filter. This process keeps the water clear and prevents green water, which is common in sunlit ponds.
Aeration Techniques
Proper aeration is vital for a healthy pond. It ensures there is enough oxygen for fish and beneficial bacteria. Techniques include using air stones, waterfalls, or fountains to circulate the water and add oxygen.
Combining Techniques
The most effective filtration systems often combine these techniques. For example, a biological filter can work alongside a UV clarifier to ensure the water is both clear and healthy. It's about finding the right balance for your pond's unique ecosystem.
By implementing these advanced filtration techniques, you'll make a more robust and self-sustaining environment for your pond. The goal is to mimic nature's way of purifying water, making a haven for your aquatic friends.
Filter Maintenance and Troubleshooting
Keeping your pond filter in good working order is crucial for a healthy pond. Regular maintenance and knowing how to troubleshoot common problems will ensure your filter continues to work effectively. Here's a guide to help you:
Regular Maintenance
- Clean the Filter Media: Rinse the filter media in a bucket of pond water to remove debris. Avoid tap water as it can kill beneficial bacteria.
- Check the Pump: Ensure the pump is clear of debris and working smoothly. Clean the impeller and intake valves if necessary.
- Inspect Hoses and Connections: Look for any signs of wear or leaks and replace parts as needed.
Troubleshooting Common Issues
- Reduced Water Flow: This could be due to a clogged filter or pump. Clean the filter media and check the pump for blockages.
- Water Not Clear: If the water is still murky after cleaning, consider adding more filtration or a UV clarifier.
- Strange Noises: Gurgling or grinding sounds can indicate air in the system or a problem with the pump. Check for air leaks and inspect the pump.
Seasonal Care
- Spring: Prepare your filter for increased activity as temperatures rise and fish become more active.
- Summer: Monitor the filter closely, as warmer water can lead to faster algae growth and more waste.
- Fall: Clear falling leaves and debris to prevent clogging.
- Winter: If you live in a cold climate, decide whether to keep the filter running or shut it down, depending on the needs of your pond.
By following these maintenance and troubleshooting tips, you'll keep your pond filter functioning well and your pond environment thriving. Remember, a little care goes a long way in preventing bigger issues down the road.
Legal and Safety Considerations
When embarking on a project to build a DIY pond filter, it's important to be aware of the legal and safety considerations to ensure that your project is not only effective but also compliant and safe for everyone involved.
Legal Compliance
- Check Local Regulations: Before you start, check with your local authorities. Some areas require permits for pond construction.
- Building Codes: Ensure your design adheres to local building codes, which may dictate the materials and methods you can use.
Safety Measures
- Electrical Safety: If your filter uses a pump, make sure all electrical components are properly insulated and waterproofed to prevent shocks.
- Structural Integrity: Your filter should be built to withstand the elements and the weight of the water without collapsing.
- Child Safety: If children have access to the area, consider installing a fence or barrier around the pond to prevent accidental falls.
Environmental Considerations
- Wildlife Protection: Design your filter to be safe for local wildlife. Avoid materials that could be toxic to fish or other animals.
- Water Runoff: Make sure that the filtered water does not cause erosion or harm to the surrounding environment.
Consider legal and safety aspects to make an efficient and secure DIY pond filter. Prioritize safety and compliance for worry-free enjoyment.
FAQs About DIY Pond Filter
Discover essential FAQs about DIY pond filters. Learn how to make & maintain an efficient water filtration system for a healthy pond environment.
The cleaning frequency depends on the pond’s size, the number of fish, and the filter’s design. Generally, inspect your filter every few weeks and clean or replace the media as needed to maintain water clarity and quality.
To maintain proper water flow, ensure the pump’s flow rate matches your pond’s volume. Clean the pump and filter media regularly to prevent clogs. Adjust the PVC piping if necessary to optimize water circulation.
The best location for a DIY pond filter is near the pond, slightly elevated to allow gravity to assist in water flow. It should be easily accessible for maintenance and hidden from view to maintain the pond’s aesthetic.
Yes, plants can be an excellent addition to your DIY pond filter. They provide natural filtration by absorbing nutrients that algae would otherwise use to grow. Suitable plants include water hyacinth, water lettuce, and various submerged plants.
You'll know your DIY pond filter is working effectively if the water is clear, there is no unpleasant odor, and your pond's ecosystem (fish and plants) appears healthy. Regularly test the water for ammonia, nitrites, and pH levels.
Conclusion:
Taking the first step toward making your pond filter can be rewarding. This DIY pond filter method not only saves money but also keeps your water clear. Try it out!


