Keeping my pool clean used to be a struggle. I always wanted to enjoy clear, inviting water without the hassle of high-cost maintenance. I found a solution with a DIY pool vacuum. It really made my life easier and saved me money. The steps to make one are simple, and the materials are easy to acquire.
Using a homemade pool vacuum helped me maintain my pool efficiently. I followed straightforward instructions I found online. This method was both fun and rewarding. Now, I can enjoy my pool without worrying about expensive cleaning services. I hope sharing this helps you achieve the same satisfaction with your pool.
Why is Pool Maintenance Important?
A well-maintained pool is the cornerstone of countless hours of relaxation and fun. Neglecting pool care can lead to various problems, such as algae growth, cloudy water, and bacterial contamination, which can be harmful to swimmers' health. Moreover, debris and leaves can clog filters and reduce the efficiency of pool pumps, leading to costly repairs.
The Basics of Pool Cleaning
Pool cleaning involves several key steps:
- Skimming and Brushing: Use a net to remove leaves and other debris from the water's surface. Regularly brush the walls and floor of the pool to prevent algae buildup.
- Vacuuming: A pool vacuum can help remove debris from the bottom of the pool. A homemade pool vacuum can be an economical alternative to store-bought ones.
- Filter Maintenance: Clean or replace your pool filter regularly to ensure it's trapping contaminants effectively.
- Chemical Balance: Test and adjust the chemical levels in your pool to maintain the pH balance and sanitize the water.
Making Your Own Pool Vacuum
Building a homemade pool vacuum can be a rewarding DIY project. It can save you money and provide a custom solution tailored to your pool's specific needs. In the following sections, we'll explore how to construct your own pool vacuum, troubleshoot common issues, and keep it running efficiently.
Regular upkeep keeps your pool sparkling. Follow these steps for a refreshing swim anytime, knowing it's in top shape. Stay tuned for our next section on DIY pool vacuums.
Gathering Materials
The project began with a list of essentials:
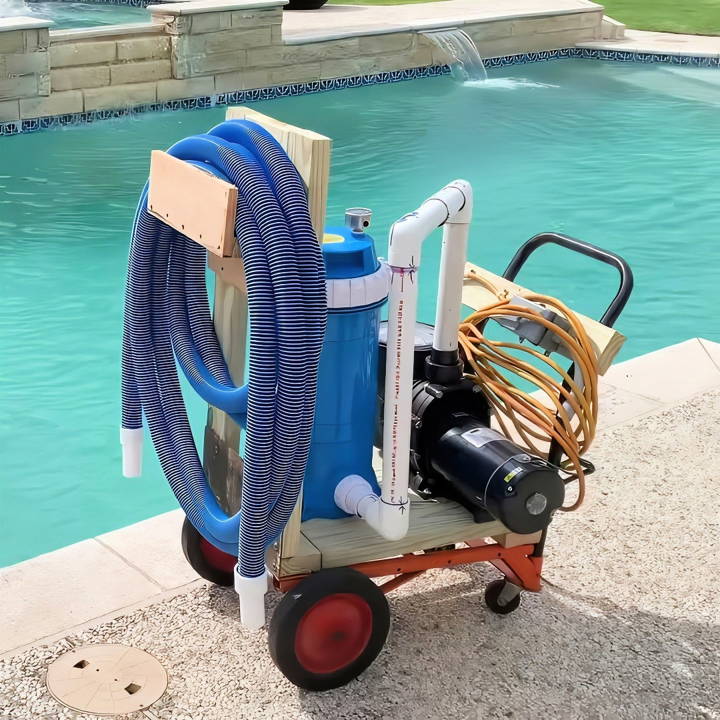
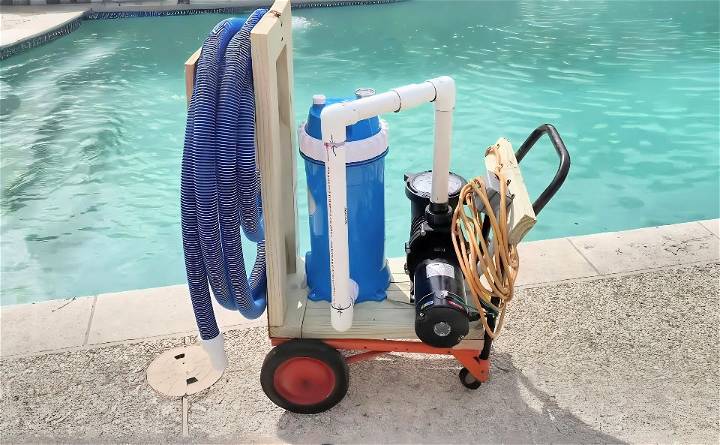
- Two Horsepower Pump: Essential for its capability to self-prime and provide strong suction. This is the heart of the vacuum, pulling water and debris through the system.
- 50 Square Foot Cartridge Filter: To trap and hold all the sand, leaves, and debris. This was crucial for clear water, without constantly clogging the system.
- Vacuum Head and Hose: For manually steering around the pool floor. The head connects to the hose, which then attaches to the pump, making a straightforward pathway for the dirt.
- Utility Cart: This acted as the base for my homemade system, making it mobile and easy to store. I used an old dolly, which saved cost and added a recycling element to the project.
- Miscellaneous Items: Including pocket hole screws for assembly, an on/off switch for easy operation, and a GFCI circuit breaker for safety.
Step by Step Instructions
Discover step-by-step instructions for making a homemade DIY pool vacuum. Easy to follow, cost-effective DIY guide for a clean and sparkling pool.
Putting It All Together
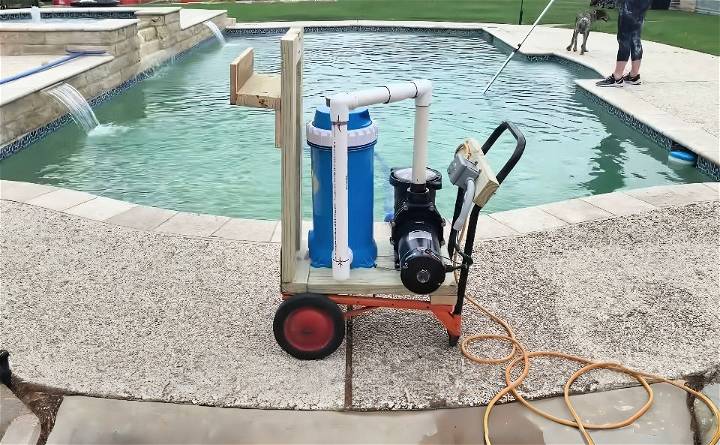
The assembly process was surprisingly straightforward. The utility cart was converted into a frame to hold the pump and filter vertically, saving space. I attached racks to hold the hose and a place to wrap the extension cord, ensuring everything stayed tidy.
I must admit, drilling and screwing the parts together felt empowering. It wasn't just about saving money anymore; it was about solving a problem, hands-on. The total cost edged towards $800, partly due to the wooden frame's expense, but it was a worthy investment considering the savings on pool cleaning services and future equipment.
The First Test
The moment of truth was exhilarating. With my wife as my eager assistant, we fired up the homemade pool vacuum. It worked like a charm, visibly clearing the areas it passed over, proving that sometimes, the simplest solutions are the most effective.
What I loved about this setup was its flexibility. Not only could it vacuum the pool, but it could potentially serve as a temporary filtration system if our main pool equipment failed.
Maintenance and Storage
Ease of use and storage was a key part of the project's success. When not in use, the hose coiled neatly onto the cart, and the entire system tucked away in the shed, ready for its next deployment. This setup meant that we could maintain the pool in top condition with minimal effort - something around 20 to 30 minutes every few days.
Aftermath and Reflections
After a few days of use, the pool transformed. The water clarity improved significantly, and with a balanced chemical treatment, it was all set for summer.
This experience taught me the value of DIY solutions in home maintenance. Not only did it save money in the long run, but it also provided a deep sense of satisfaction and self-reliance.
Troubleshooting Common Issues
When it comes to maintaining your homemade pool vacuum, you might encounter a few hiccups along the way. Don't worry; most problems have simple solutions. Here's a guide to help you troubleshoot common issues with ease and confidence.
Vacuum Loses Suction
If your vacuum isn't picking up debris as it should, check for:
- Blockages: Inspect the hose and head for leaves or other debris that might be causing a blockage.
- Leaks: Ensure there are no leaks in the hose. Even a small hole can significantly reduce suction power.
- Filter: A full or dirty filter can impede suction. Clean or replace it as needed.
Vacuum Moves Slowly or Not at All
A vacuum that's sluggish or stationary might be due to:
- Water Flow: Verify that your pool's pump is on and that the water flow is strong enough to power the vacuum.
- Hose Length: Make sure the hose is long enough to allow the vacuum to reach all areas of the pool without stretching.
Vacuum Doesn't Pick Up All Debris
Sometimes, the vacuum might miss some dirt or leaves because of:
- Brush Adjustment: Adjust the brushes on the vacuum head for better contact with the pool surface.
- Vacuum Speed: Moving the vacuum too fast can cause it to leave debris behind. Slow down your movements for thorough cleaning.
Air Bubbles in the Return Line
Air entering the system can disrupt the vacuum's efficiency. To fix this:
- Check Connections: Ensure all connections are tight and secure.
- Prime the Hose: Before attaching the hose to the pump, fill it with water to remove air.
Vacuum Hose Coils or Kinks
A coiled or kinked hose can restrict movement and suction:
- Straighten the Hose: Lay the hose out in the sun to warm it, making it more pliable and easier to straighten.
- Proper Storage: After use, store the hose flat or on a large reel to prevent kinks from forming.
Addressing common issues keeps your DIY pool vacuum running smoothly. Regular checks and maintenance can prevent problems. Now, you can ensure your pool stays clean and inviting.
Maintenance and Care
Taking care of your homemade pool vacuum is just as important as using it. Proper maintenance ensures that your vacuum keeps your pool clean and lasts for many seasons. Here's a simple guide to keeping your vacuum in top shape.
- Cleaning the Vacuum After each use, rinse the vacuum head and hose with fresh water. This removes any pool chemicals or debris that could degrade the materials over time. If your vacuum has a filter or collection bag, empty and clean it out as well.
- Storing the Vacuum Store your vacuum in a cool, dry place away from direct sunlight. UV rays can weaken the plastic parts of your vacuum. If possible, hang the hose in large loops on a hook to prevent kinks and preserve its shape.
- Inspecting for Wear and Tear Regularly check your vacuum for signs of wear, such as cracks in the hose or a loose vacuum head. Catching these issues early can prevent them from becoming bigger problems.
- Replacing Parts If a part of your vacuum does break, replace it as soon as possible. Using a vacuum with broken parts can lead to inefficient cleaning and further damage.
- Seasonal Care Before storing your vacuum for the winter, give it a thorough cleaning and dry it completely. This prevents mold and mildew from growing during the off-season.
By following these simple steps, you can ensure that your homemade pool vacuum continues to serve you well. Regular maintenance not only extends the life of your vacuum but also helps keep your pool crystal clear.
Safety Precautions
When making and using a homemade pool vacuum, safety is paramount. It's important to take the right precautions to protect yourself and others. Here's a guide to staying safe while keeping your pool clean.
Before You Begin
- Read All Instructions: If you're following a guide or manual, read it thoroughly before starting.
- Understand Your Tools: Know how to properly use any tools required for building your vacuum.
While Building Your Vacuum
- Wear Protective Gear: Use gloves to protect your hands and goggles if you're cutting or drilling.
- Ventilation: Work in a well-ventilated area to avoid inhaling dust or fumes.
- Electrical Safety: If your vacuum uses electricity, be cautious. Never work with electrical components near water.
Using Your Vacuum
- Check for Damages: Before each use, inspect your vacuum for any signs of wear or damage.
- Electrical Precautions: Ensure all electrical connections are safe and dry. Use a ground-fault circuit interrupter (GFCI) for added protection.
- Keep Children Away: Operate the vacuum when children are not in the pool area to prevent accidents.
After Use
- Proper Storage: Store your vacuum and its components out of reach of children and in a safe place.
- Clean Up: Clear your workspace of any tools or sharp objects that could cause injury.
General Tips
- Stay Informed: Keep up-to-date with pool safety guidelines and best practices.
- First Aid: Have a first aid kit handy in case of minor injuries.
- Seek Help: If you're unsure about any part of the building or maintenance process, consult with a professional.
Follow these safety steps to keep the pool clean and safe. Taking time to ensure safety prevents accidents and guarantees a pleasant pool experience for all.
FAQs About Homemade Pool Vacuum
Discover answers to common questions about homemade pool vacuums, including how-tos, tips, and benefits for a clean pool.
A homemade pool vacuum is a do-it-yourself device that you can make to clean your swimming pool. It typically uses the suction power from your pool's pump, combined with a few simple materials like a hose, funnel, and vacuum head, to suck up debris from the bottom of the pool.
While a homemade pool vacuum may not have all the features of a commercial pool cleaner, many users find them quite effective for small to medium-sized pools. They are especially good for picking up leaves, twigs, and other larger debris.
Yes, always ensure that all connections are secure to prevent any leaks. Also, be cautious when working with electricity near water, and make sure to turn off the pool pump before attaching or detaching the vacuum. Never use a homemade pool vacuum if you are unsure about the safety of your setup.
Maintaining your homemade pool vacuum is straightforward:
Rinse the vacuum head and hose with clean water after each use to remove any chlorine or chemicals.
Check for any clogs or debris stuck in the funnel or hose.
Inspect the hose for any leaks or damage, and repair or replace it if necessary.
Store your vacuum in a cool, dry place away from direct sunlight to prevent wear.
The benefits of a homemade pool vacuum include:
Cost-effective: It's much cheaper than buying a commercial pool vacuum.
Customizable: You can tailor it to fit the specific needs and size of your pool.
Easy to repair: Simple design means easy troubleshooting and repair.
Environmentally friendly: Reusing materials reduces waste and avoids the need for electrical components.
Final Thoughts
Wrapping up, keeping your pool sparkling clean has never been easier with a DIY pool vacuum. By making your own vacuum, you save money and ensure your pool's hygiene. This approach is not only cost-effective but also satisfying.


