Making my own pottery wheel was one of the most fun and rewarding projects I've ever completed. I always wanted to try ceramics but didn't have a big budget for expensive equipment. I decided to build my own DIY pottery wheel to save money. Gathering a few simple materials, I spent one weekend assembling the wheel and was surprised at how well it turned out!
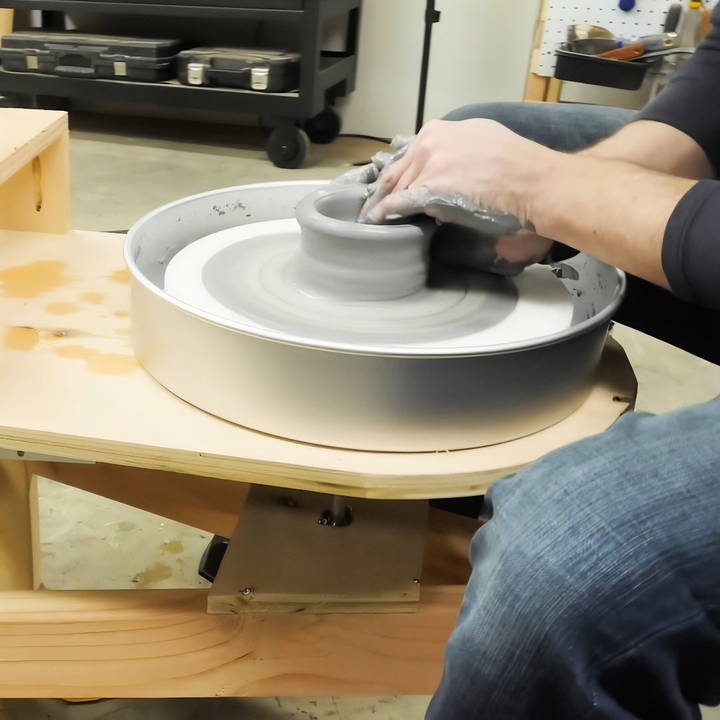
Making a pottery wheel at home is easier than you might think. With a few household items and some determination, you can start enhancing your ceramics skills quickly. All you need is a bicycle wheel, a sturdy board, and an electric motor. Once you have the setup done, you can start making your own beautiful ceramic pieces. This hands-on guide will surely help you get started!
Introduction to Pottery Making
Pottery making is a timeless craft that combines art, science, and a touch of personal flair. At its core, pottery is the process of forming vessels and other objects with clay and other ceramic materials, which are then fired at high temperatures to give them a hard, durable form. This craft has been part of human civilization for thousands of years, serving both functional and decorative purposes.
The Essence of Pottery
The essence of pottery lies in its blend of utility and beauty. From simple cups and bowls to intricate vases and sculptures, pottery can be as straightforward or as complex as the maker desires. It's a way to express creativity, whether you're a beginner shaping your first piece or an experienced artist crafting a masterpiece.
The Role of the Pottery Wheel
A pottery wheel is a device used to shape the clay into various forms. The wheel rotates rapidly, and as it spins, the potter shapes the clay with their hands, tools, or both. There are two main types of pottery wheels:
- Manual Pottery Wheels: These require the potter to use their foot or hand to spin the wheel, offering a very hands-on experience.
- Electric Pottery Wheels: These wheels are powered by electricity and allow for more consistent speed and control.
Getting Started with Pottery
To begin pottery making, you'll need a few basic supplies:
- Clay: There are many types of clay, each with its own properties and best uses. Some are ideal for beginners, while others are better suited for advanced techniques.
- Pottery Wheel: Whether you choose a manual or electric wheel, make sure it's comfortable for you to use and fits your space.
- Tools: Basic pottery tools include a wire cutter, rib tools, and sponges. These assist in shaping and smoothing your creations.
The Joy of Building
Building pottery is a rewarding experience. There's a special kind of joy in watching a formless lump of clay transform into a tangible, functional object. It's not just about the end product; it's about the process—the feel of the clay in your hands and the satisfaction of making something from scratch.
Pottery is more than a hobby; it brings accomplishment and relaxation. Whether making practical items or art, pottery offers rich possibilities. Gather your materials, sit at your wheel, and make.
Benefits of a DIY Pottery Wheel
Building your own pottery wheel can be a rewarding project that offers numerous benefits. Whether you're a seasoned potter or just starting out, a DIY pottery wheel can be a valuable addition to your craft. Here are some of the advantages:
Cost-Effectiveness
Building your own pottery wheel can be significantly more affordable than buying a pre-made one. You can often use recycled materials and spare parts, which not only saves money but also gives new life to items that might otherwise be discarded.
Personalization
A DIY pottery wheel allows you to tailor it to your specific needs. You can adjust the height, the speed, and even the type of wheelhead based on your personal preferences and the types of pottery you plan to make.
Learning Opportunity
The process of building your own wheel is a great learning experience. You'll gain a deeper understanding of how pottery wheels work, which can enhance your overall pottery skills.
Sense of Achievement
There's a profound sense of satisfaction that comes from using a tool you've built with your own hands. It adds a personal touch to your pottery and can make the creative process even more special.
Improved Skills
Using a manual DIY pottery wheel requires a certain level of skill and can actually improve your throwing techniques. The hands-on experience can help you develop a better feel for the clay and a more intimate connection with your craft.
Community Engagement
Sharing your DIY journey can inspire others and help build a community of like-minded individuals. You can exchange tips, share successes, and support each other in your pottery endeavors.
Environmental Impact
By choosing to build your own wheel, you're making an eco-friendly choice. Reusing materials reduces waste and minimizes your carbon footprint, contributing to a healthier planet.
A DIY pottery wheel is a cost-effective, customizable, educational, and eco-friendly choice that enhances pottery practice, offering practical benefits and personal satisfaction to pottery enthusiasts.
Materials and Their Purpose
- Low RPM Motor with High Torque - Essential for controlling the speed of the wheel. Pottery requires precision, and a motor with these specifications will maintain a steady rotation under varying pressures.
- Pulleys and Belt - These components work together to adjust the motor's RPM to the ideal speed for pottery. They also distribute the motor's power efficiently to the wheel.
- Speed Controller - Allows for real-time speed adjustments, which is crucial for different stages of pottery making. It's like having the throttle of your creativity in your hands.
- PWM (Pulse Width Modulation) Power Supply - Provides power to the motor with the flexibility to control voltage for speed regulation.
- Bearing and Connecting Hardware - Ensures the wheel spins smoothly without wobbling, providing a stable base for your pottery.
- Flywheel - Adds momentum to the wheel, ensuring it doesn't stop suddenly when you apply pressure to mold your clay.
- Plywood Base and Frame - Forms the structure of your pottery wheel, offering stability and a solid working surface.
- Electric Scooter or Hoverboard Motor - A cost-effective and durable option that provides the needed RPM and torque.
- Forstner Bit and Dremel Tool - For making precision holes and adjustments in the metal and wood components.
- Screws and Nuts - For securing all components together, ensuring they stay in place during operation.
Step by Step Instructions
Learn how to build a DIY pottery wheel with our step-by-step guide. From base assembly to motor setup, make your first pot effortlessly!
Step 1: Designing Your Setup
After researching and deciding on the type of motor, the first real step is designing the setup. It's crucial to understand the relationship between the motor's RPM, the wheel's diameter, and the desired speed. I opted for a lower RPM with high torque to ensure I could have fine control over my pottery.
Step 2: Assembling the Base
Using the plywood, I crafted a sturdy base and attached the motor mounting plate. Stability is key, so I reinforced the structure with additional plywood and metal brackets, ensuring it could handle the pressure of pottery making.
Step 3: Attaching the Motor and Pulleys
The motor was then secured to the base with the sprocket facing upwards. After removing an unnecessary nut with my Dremel, I attached the first flywheel to the motor's output shaft, ensuring it was perfectly aligned with the second flywheel that would eventually connect to the wheel's base.
Step 4: Setting Up the Belt System
I arranged the pulleys and belt to connect the motor and flywheel, adjusting for the right tension. This step was crucial for translating the motor's speed into usable, controllable motion for the pottery wheel.
Step 5: Wiring the Speed Controller
Electronics can be intimidating, but I followed the PWM power supply's schematic to connect the speed controller. This setup now allowed me to adjust the wheel's speed with a dial, which I planned to upgrade to a foot pedal for hands-free operation.
Step 6: Crafting the Wheel (Bat)
Using a round piece of durable wood, I fashioned the bat. Centering it onto the flywheel's shaft was tricky, but ensuring it was perfectly balanced was imperative to prevent wobbly pottery.
Step 7: Final Adjustments and Testing
With everything assembled, the moment of truth arrived. I gradually increased the speed using the controller, watching the wheel come to life. A few adjustments were necessary to reduce noise and ensure smooth operation, like adding a foam gasket under the bat.
Step 8: Building Your First Pot
Now came the fun part—throwing my first pot. With a lump of clay centered on the bat, I started the wheel and carefully worked the material. It was mesmerizing to see the clay transform, morphing under my guidance (and a bit of trial and error).
What I Learned
- Patience is Key: There were moments of frustration, especially when dealing with the electronics and achieving the right tension on the belt. But taking a step back and approaching each problem methodically paid off.
- Precision Matters: From the alignment of the motor and pulleys to the centering of the wheel, every millimeter mattered. This project honed my attention to detail.
- The Right Materials: Not skimping on quality for crucial components like the motor and bearings made a big difference in the performance of the final product.
Customization Tips
Building a DIY pottery wheel means crafting a unique tool for your art. Customizing it enhances the experience. Here are tips to personalize your pottery wheel:
Choose Your Colors
Your pottery wheel doesn't have to be plain or industrial-looking. Pick colors that inspire you. Whether you prefer calming blues, vibrant reds, or earthy greens, painting your wheel can make it a joy to look at and work with.
Add a Personal Touch
Consider adding designs or patterns that reflect your personality. You could stencil on your favorite shapes, symbols, or even inspirational quotes to motivate you as you work.
Upgrade Your Wheel Head
The wheel head is where your clay takes shape. Why not make it special? You can use different materials like tempered glass or a customized bat system that allows for quick changes between projects.
Comfort is Key
Think about how you can make your pottery wheel more comfortable. This could mean adjusting the height to match your seating or adding a cushioned edge to the wheel tray to rest your hands during long sessions.
Tool Storage
Having your tools within easy reach makes a big difference. Attach a small shelf or magnetic strip to your wheel's base to keep your most-used tools handy.
Lighting Matters
Good lighting is crucial for detailed work. Attach a flexible lamp to your pottery wheel so you can see your masterpiece come to life, no matter the time of day.
Make it Mobile
If you like to change your scenery, consider adding lockable wheels to the base of your pottery wheel. This way, you can easily move it to different locations, indoors or out.
Noise Reduction
Working with a wheel can be noisy. Think about ways to reduce sound, like adding a quiet motor or using sound-absorbing materials around the workspace.
Safety First
Customization isn't just about aesthetics; it's also about safety. Ensure all modifications don't compromise the wheel's stability and function. Always secure loose parts and double-check that any electrical components are installed correctly.
Keep it Eco-Friendly
Use sustainable materials where possible. This could mean repurposing old furniture parts or using biodegradable paints and finishes.
Customize your DIY pottery wheel to express yourself and improve your pottery workflow. With these tips, make a functional wheel that reflects you as an artist.
Advanced Modifications for DIY Pottery Wheels
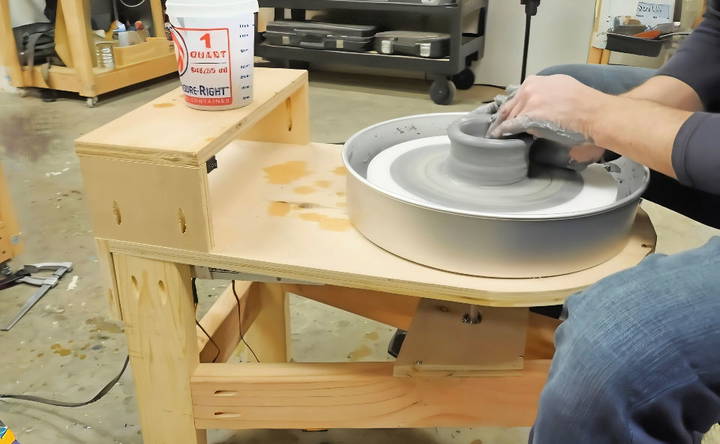
Enhance your DIY pottery wheel with advanced modifications to boost performance, add features, and personalize it to your needs.
Variable Speed Control
Adding variable speed control to your pottery wheel allows for greater flexibility and precision. You can adjust the wheel's speed to match the specific needs of the project you're working on. This can be achieved by incorporating a speed controller into your wheel's motor circuit.
Custom Wheel Head
Consider upgrading to a custom wheel head that can accommodate various bat systems. This allows for quick changes between different projects and can be especially useful if you work with multiple clay bodies.
Enhanced Motor Power
For those who throw larger pieces, upgrading to a more powerful motor can provide the necessary torque. Look for a motor with higher horsepower and ensure it's compatible with your wheel's design.
Improved Foot Pedal
An ergonomic foot pedal can offer better control over the wheel's speed, making it easier to maintain a consistent pace while throwing. Look for a pedal that provides smooth acceleration and deceleration.
Built-In Water System
A built-in water system can be a game-changer for keeping your clay at the right consistency. Install a small water pump and basin that allows you to add water to the clay with a simple foot or hand press.
Workspace Lighting
Good lighting is essential. Attach adjustable LED lights around the wheel's workspace to ensure you have clear visibility at all times, which is particularly helpful for detailed work.
Noise Reduction Techniques
If noise is a concern, explore ways to make your wheel quieter. This could involve adding a sound-dampening enclosure around the motor or using quieter bearings in the wheel's construction.
Portability Features
If you like to move your wheel around, consider adding lockable casters to the base. This will make your wheel mobile while also ensuring it stays in place when locked.
Safety Upgrades
Always prioritize safety with any modifications. Install safety switches that can quickly turn off the wheel in case of an emergency, and ensure all electrical components are properly insulated.
Sustainability Practices
Incorporate sustainable practices into your modifications. Use recycled materials where possible and consider energy-efficient components to reduce your environmental impact.
Implementing these modifications makes your pottery wheel versatile, efficient, and personalized. Consult experts for electrical components and prioritize safety.
Safety Precautions
When engaging in the rewarding activity of pottery making, safety is paramount. Whether you're a seasoned potter or just starting out, it's crucial to be aware of the potential hazards and take steps to minimize risks. Here are some essential safety precautions to keep in mind:
Personal Protective Equipment (PPE)
- Wear a dust mask: Pottery can produce silica dust, which is harmful if inhaled. Always wear a mask when working with dry clay or cleaning your workspace.
- Use eye protection: When operating a pottery wheel, bits of clay can fly off. Protect your eyes with safety goggles.
- Consider hearing protection: If you're using a noisy electric wheel, earplugs can help protect your hearing.
Workspace Safety
- Keep your area clean: Regularly sweep and mop your workspace to prevent clay dust accumulation.
- Ensure good ventilation: Adequate airflow helps disperse dust and fumes from glazes and clays.
- Organize your tools: Keep sharp tools stored safely and out of the way when not in use.
Electrical Safety
- Check cords and plugs: Before using an electric pottery wheel, inspect all cords and plugs for damage. Replace any that are frayed or worn.
- Use a ground fault circuit interrupter (GFCI): This device can prevent electric shock, especially in areas where water is used.
Safe Use of Chemicals
- Handle glazes with care: Many glazes contain chemicals that can be toxic. Always follow the manufacturer's instructions and use them in a well-ventilated area.
- Store chemicals safely: Keep glazes and other chemicals in clearly labeled containers, out of reach of children and pets.
Fire Safety
- Be cautious with kilns: Firing pottery requires high temperatures. Keep flammable materials away from the kiln and have a fire extinguisher nearby.
- Monitor the kiln: Never leave a kiln unattended while it's in use.
Ergonomics
- Adjust your wheel: Make sure your pottery wheel is at a comfortable height to prevent back strain.
- Take breaks: Regular breaks can help prevent repetitive strain injuries.
First Aid
- Keep a first aid kit handy: Accidents can happen, so it's important to have bandages, antiseptic, and burn cream readily available.
- Know basic first aid: Familiarize yourself with how to treat minor cuts, burns, and other common studio injuries.
Follow safety measures in pottery to protect yourself and others. Always choose safety, use the right gear, and practice safe methods.
FAQs About DIY Pottery Wheel
Discover answers to common questions about DIY pottery wheels, from setup and materials to tips for beginners, in this comprehensive FAQ guide.
A DIY pottery wheel is a homemade version of a professional potter’s wheel, which is used to shape and form clay into pottery. It’s a cost-effective alternative for hobbyists or those just starting out, as commercial pottery wheels can be quite expensive.
The key components of a DIY pottery wheel include a strong and stable base, a wheel head to attach the clay, and a motor to spin the wheel. You'll need materials like a motor with sufficient torque, a plastic bucket or a bicycle wheel, and other hardware items that can be found at local stores.
Yes, it's possible to make a functional pottery wheel on a budget. For example, with a motor from a ceiling fan and a plastic bucket, you can construct a pottery wheel for as little as $50. The process involves using a drill to cut and assemble parts, with the motor wheel being the main component.
The complexity of building a DIY pottery wheel can vary based on the design and materials used. Some designs are straightforward and can be completed in less than an hour, while others may require more time and mechanical skill. Detailed video tutorials and guides are available to help you through the process.
Once you have your DIY pottery wheel, you can use it for various pottery techniques such as throwing (shaping the clay), trimming (refining the shape), and applying decorations. It's important to follow a systematic approach from preparation to final inspection to ensure successful pottery creation.
Conclusion
Wrapping up, the DIY pottery wheel is your perfect companion to enhance your ceramics skills. Crafting your wheel allows you to understand the process deeply and enjoy a rewarding hobby. Start today and experience the joy of making personalized ceramic pieces right at home.


