Making something useful is always exciting and rewarding. I remember when I decided to build my first DIY press brake in my garage. It was a simple yet engaging project that allowed me to save money and gain hands-on experience. Using basic tools and materials, I followed straightforward instructions and successfully made a tool that worked just as well as any store-bought version.
The experience was incredibly satisfying. Not only did I learn a lot about metal bending, but I also gained confidence in my skills. Now, every time I use my homemade press brake, I feel a sense of pride and accomplishment. If you are interested in DIY projects, building your own press brake can be a great start.
With these tips, you can get started and experience the joy of making something with your own hands.
What is a Press Brake?
A press brake is a machine pressing tool for bending sheet and plate material, most commonly sheet metal. It forms predetermined bends by clamping the workpiece between a matching punch and die.
Types of Press Brakes
- Mechanical Press Brakes: These are driven by a flywheel and work by transferring the energy from the flywheel through a clutch to the bending process.
- Hydraulic Press Brakes: These use two synchronized hydraulic cylinders on the C-frames moving the upper beam.
- Pneumatic Press Brakes: These operate using air pressure to move the ram and are suitable for smaller, thinner materials.
- Servo-Electric Press Brakes: These use a servo-motor to drive a ball screw or belt drive to exert control over the ram.
Why Use a Press Brake?
- Versatility: They can handle a wide range of material types and thicknesses.
- Precision: Offers high accuracy and repeatability for bends.
- Efficiency: Speeds up the production process and reduces the need for manual labor.
- Customization: With various dies, you can build multiple bend angles and shapes.
Materials Needed and Their Purpose
Before diving into the step-by-step process, it's crucial to understand the materials needed for this project and why each one is essential:
- 44 inches of 1-inch Angle Iron (3/16 inch thick): This forms the two sides of the press brake, providing the structure and stability it needs.
- Quarter Inch Thick Base Plate (5 inches by 21 inches): Serves as the foundation where the metal sheet will rest during bending.
- 3/8 Inch Thick Brake Bar (3 inches by 22 inches): This bar will be making contact with the metal sheet, making the bend.
- Two Pieces of 3/8 Inch Rod (6 inches length): These rods will be used to align and secure the moving parts of the press brake.
- Tubing for the Rods: This helps in reinforcing and guiding the rods smoothly during the bending process.
Step by Step Instructions
Learn how to build a DIY press brake at home with step-by-step instructions. From material prep to final assembly, get the complete guide here.
1. Preparing the Materials
The first step was to visit my local metal fabrication shop where I found all the necessary materials for just $26.63. Since precision is key in a project like this, I made sure each piece was cut to the exact dimensions needed.
2. Drilling and Assembling
With all materials cleaned and ready, I began by drilling holes to accommodate the 3/8 inch rods. It was vital to ensure that these holes were precise, as they would greatly impact the functionality of the press brake.
3. Welding the Frame
Once the holes were drilled, the next step was to start welding. I carefully aligned the angle iron on the base plate and welded them securely. This would form the stationary frame of the press brake. Welding needed a steady hand and patience, especially since alignment was crucial for the press brake to function correctly.
4. Constructing the Brake Bar
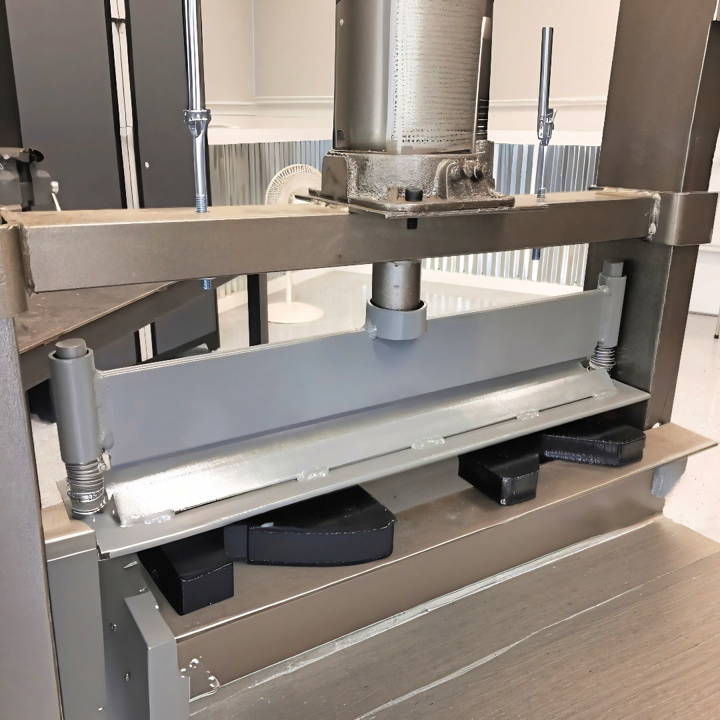
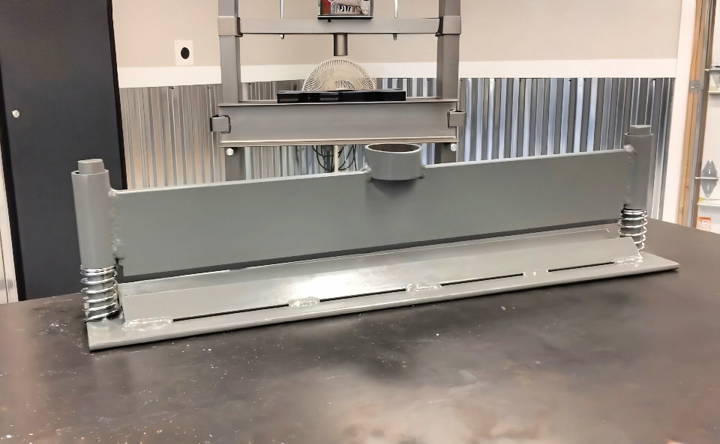
The brake bar was the centerpiece of the press brake, responsible for the bending action. I cut a 45-degree angle at the base of the bar to ensure it would build a precise bend. After cutting, welding was done to secure the bar to the frame, making sure it was perfectly aligned and moved smoothly.
5. Final Assembly and Adjustments
After all components were welded together, the final assembly began. This included installing the rods and tube guide, ensuring everything moved smoothly. I used stronger springs from Ace Hardware to provide sufficient force needed for the bending process. Ensuring the press brake was functional and safe to use was my top priority.
6. Operational Test
The moment of truth came when I tested the press brake with a piece of 1/8 inch thick steel. The goal was to achieve a clean 90-degree bend, and to my satisfaction, the press brake worked flawlessly. I also tested it on a piece of 3/16 inch steel with equally impressive results.
Advanced Techniques and Tips
When it comes to bending metal, mastering advanced techniques can elevate your craftsmanship and allow you to build more complex and precise pieces. Here are some tips and techniques that can help you refine your metal bending skills:
Understanding Metal Properties
Before diving into advanced bending, it's crucial to understand the properties of the metal you're working with. Different metals have varying levels of malleability and strength, which will affect how they bend. For instance, aluminum is more malleable than steel, making it easier to bend but also more prone to deformation.
Heat Bending
Applying heat to metal can make it more pliable and easier to bend. This technique is particularly useful for thicker or stronger metals. However, it's important to heat the metal evenly to avoid weak spots or warping.
Rotary Draw Bending
This method uses a set of dies to shape materials and precisely bend a tube or pipe. It's ideal for making consistent, tight-radius bends.
Roll Bending
Also known as pyramid rolling, this process involves feeding steel through three adjustable rollers to build large, sweeping bends.
Induction Bending
Induction bending heats a specific area of the metal using an induction coil, allowing for localized bending without affecting the rest of the piece.
CNC Pipe Bending
Computer Numerical Control (CNC) bending machines offer precision and repeatability, allowing for complex bends with high accuracy.
Incremental Bending
This technique involves making a series of small bends over a longer area to build a larger, more gradual bend. It's useful for making complex shapes without specialized equipment.
Using the Right Tools
Investing in quality bending tools can make a significant difference in the outcome of your projects. Tools like press brakes, tube benders, and angle finders can help achieve precise bends.
Practice Makes Perfect
As with any skill, practice is essential. Start with scrap metal to hone your techniques before moving on to your final project.
Safety First
Always prioritize safety when working with metal. Wear protective gear, and ensure your workspace is clear of hazards.
Incorporate these advanced techniques to enhance your metalworking, achieving both functional and artistic bends.
Safety Precautions and Best Practices
Working with a DIY press brake involves several risks, but with the right safety precautions and best practices, you can minimize them. Here's a comprehensive guide to staying safe while getting the most out of your press brake.
Personal Protective Equipment (PPE)
Always wear the appropriate PPE:
- Safety glasses to protect your eyes from flying debris.
- Gloves to safeguard your hands from sharp edges and hot surfaces.
- Ear protection if you're working in a noisy environment.
Workspace Organization
Keep your workspace tidy and organized:
- Remove any clutter that could cause you to trip or fall.
- Ensure all tools are stored safely when not in use.
- Keep the floor free of oil, grease, and scrap materials.
Machine Inspection
Before using your press brake, perform a thorough inspection:
- Check the motor, switch, wires, and grounding to ensure they are functioning properly.
- Verify that the control parts and buttons are in the correct positions.
Operating Procedures
Follow these best practices when operating the press brake:
- Never place your hands or fingers near the bending area.
- Use mechanical assistance or ask for help when handling heavy sheets or parts.
- Always be aware of the ram's movement and keep your body clear of the workpiece.
Maintenance
Regular maintenance is key to safe operation:
- Lubricate moving parts as required to keep them running smoothly.
- Inspect the hydraulic system for leaks or worn parts.
- Replace any damaged components immediately.
Training
Ensure you have adequate training:
- Understand how to operate the press brake safely.
- Learn about the different materials you'll be working with and how they behave when bent.
Emergency Preparedness
Be prepared for emergencies:
- Know where the emergency stop is and how to use it.
- Have a first aid kit readily available in case of an accident.
Following these safety measures builds a safer environment for you and others. Taking the time to work safely with machinery is always worth it.
FAQs About DIY Press Brake
Discover the FAQs about DIY press brake: get answers to your common questions on setup, usage, and troubleshooting for optimal DIY metal bending.
A DIY press brake is a homemade machine used for bending metal sheets and plates. Typically, it involves using a hydraulic press with custom-made dies to shape the metal. It’s a cost-effective solution for those who need a press brake for occasional projects or cannot justify the expense of a commercial unit.
Safety is paramount when operating any heavy machinery, including a DIY press brake. Always wear appropriate personal protective equipment like gloves and eye protection. Ensure that your press brake is stable and secure before use. Never place your hands or fingers near the bending area during operation. It’s also important to use the press brake within its capacity limits to avoid overstraining the machine.
The type of metal you can bend with a DIY press brake depends on the strength of your machine and the dies you have. Generally, DIY press brakes can handle mild steel up to a certain thickness. Thicker or harder metals like stainless steel or high-carbon steel may require a more powerful press brake with specialized dies.
There are numerous online resources where you can find detailed plans and tutorials for building a DIY press brake. Websites like Instructables offer step-by-step guides, and YouTube has a variety of instructional videos from experienced metalworkers who have built their own press brakes. These resources often include tips, material lists, and safety advice to help you through the process.
While a DIY press brake can be a great asset for personal projects, using it for commercial purposes may not be advisable. Commercial operations typically require machines that are consistent, reliable, and adhere to certain safety standards. A homemade press brake might not meet these criteria, and there could be legal implications for using non-commercial equipment in a business setting. If you're considering using a press brake for commercial purposes, investing in a certified commercial model would be a safer and more reliable choice.
Lessons Learned and Conclusion
Starting a project like a DIY press brake is an opportunity to learn and grow. When you start and finish it, you'll see you can build useful tools from simple materials.


