Master DIY product photography with easy tips on lighting, setup, and editing to capture professional-looking photos that boost your brand's appeal. Creating beautiful, high-quality product photos doesn't have to be costly or complex. With a few simple tools and techniques, you can capture professional-looking images using items you likely have at home. For anyone with a camera or smartphone, this guide details how to capture standout photos that can enhance your online store, social media, or any other platform.
Why DIY Product Photography?
Product photography plays a crucial role in online sales. Eye-catching, well-lit images make a strong impression and help communicate the quality and details of your product. While hiring a professional can be expensive, setting up your own mini-studio at home can be both effective and affordable. Here's how to get started with DIY product photography for a polished, professional look.
What You'll Need for DIY Product Photography
You don't need an elaborate setup for quality product photos. Here are the essential items:
- A table (any size that fits your product)
- Background paper (preferably a pliable, clean white sheet)
- Lamp with a clean white light bulb (for even lighting)
- Foam core or whiteboard (to bounce light)
- Baking paper (to soften light)
Optional:
- Smartphone or camera with a decent resolution
- Photo editing software (like Lightroom Mobile or similar free apps)
Step by Step Instructions
Master DIY product photography with step-by-step setup, lighting, and editing tips. Enhance your skills using natural light and solve common issues.
Step 1: Setting Up the Table and Background
The foundation of your setup is a table placed against a wall. Here's how to arrange it for the best effect:
- Position the Table: Place your table up against a wall for stability.
- Attach the Background: Use a piece of pliable white paper as your backdrop. Secure the top edge to the wall and let it curve naturally down onto the table, creating an “infinity wall.” This curved background eliminates lines or creases, making the background appear seamless.
- Tape the Paper: Attach the paper to the table surface so it stays in place. Aim for about three-quarters of the sheet on the table and a quarter up the wall.
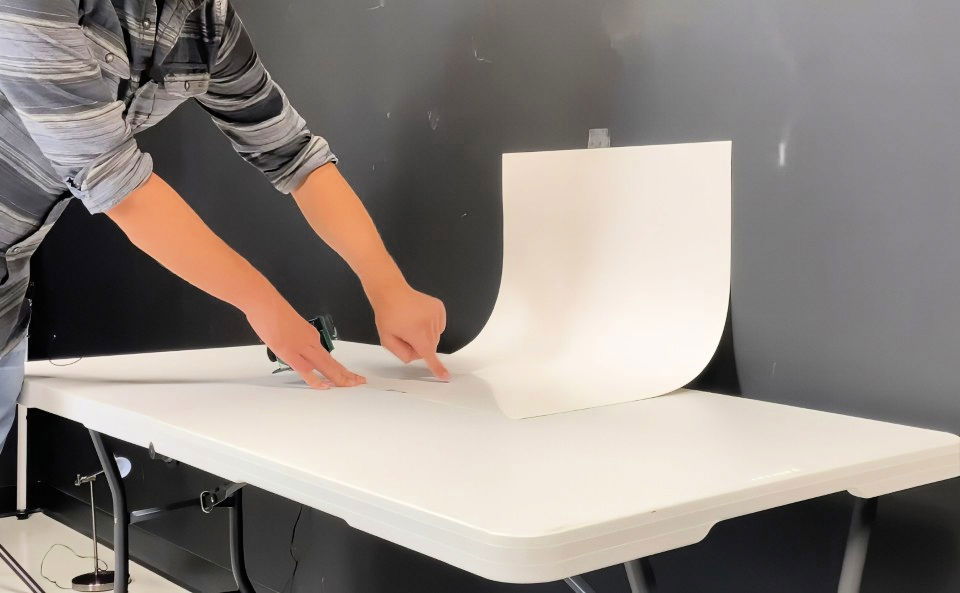
This simple setup gives a clean, professional look to your photos, with the product appearing against a pure, endless white background.
Step 2: Lighting the Scene
Lighting is critical in product photography. Avoid the temptation to use direct, harsh lighting, as it can create unflattering shadows and highlights. Here's a step-by-step guide to lighting your product effectively:
- Choose a Lamp: Use a basic lamp with a white light bulb, as this creates a neutral color tone. Avoid bulbs that cast an orange or yellow tint, as this can affect the colors in your photos.
- Position the Lamp: Place the lamp at an angle to the product, creating dimension with slight shadows that add depth to the image. Direct, overhead lighting can lead to harsh shadows, so aim to position the light slightly to the side.
- Softening the Light: Harsh lighting can be diffused by covering the lamp with baking paper. This trick creates an “artificial cloud,” which softens shadows and produces a smoother look. Tape the baking paper around the lamp's light source, allowing enough room for the light to pass through without being obstructed.
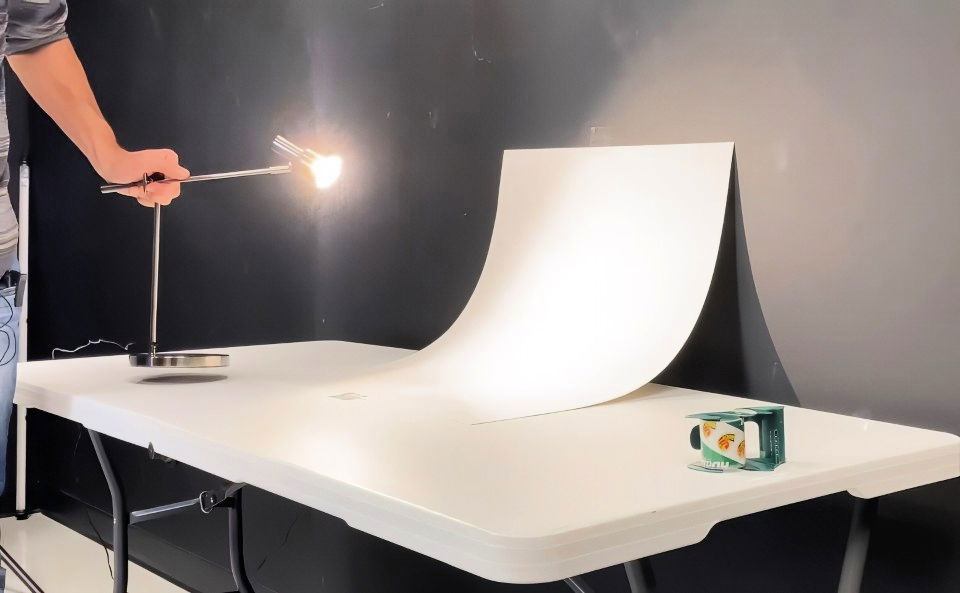
By diffusing the light, you achieve a softer, more professional look, similar to how outdoor photos look softer on a cloudy day.
Step 3: Adding a Reflector
Reflectors are essential to fill in shadows and balance the light in your photos. In DIY photography, foam core or a whiteboard can work as an inexpensive reflector.
- Position the Reflector: Place the foam core on the opposite side of the light source, near the product. This setup bounces light back onto the product, filling in any harsh shadows created by the lamp.
- Adjust for the Best Results: Move the reflector closer or further from the product to find the ideal balance. Bringing it closer will increase the amount of light reflected, while moving it back will reduce the light.
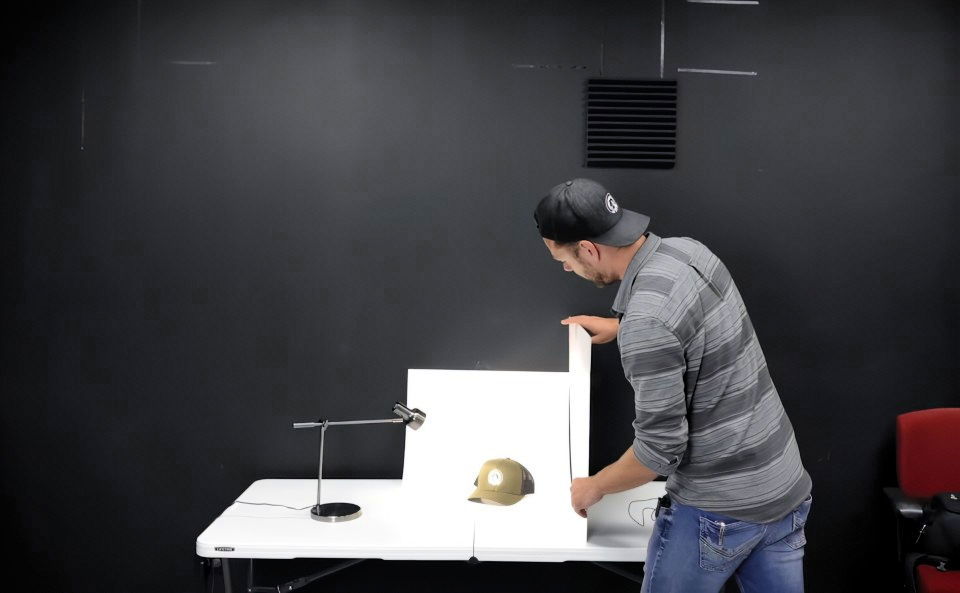
Using a reflector creates a more even, professional look by balancing the shadows and making the product look well-lit on all sides.
Step 4: Taking the Photos
With your setup complete, you're ready to capture some shots. Follow these steps for the best results:
- Arrange the Product: Position your product slightly angled for dimension. Experiment with angles to see which perspective highlights the product's best features.
- Camera Settings: If using a camera, ensure it's on a stable surface, and use a low ISO setting (100-400) for the least grain in your photos. Keep the aperture wide (low f-stop) to get a soft background, but focus sharply on the product.
- Smartphone Tips: If you're using a smartphone, zoom in slightly and tap to focus on the product. Use the exposure slider to adjust brightness if your phone has that feature.
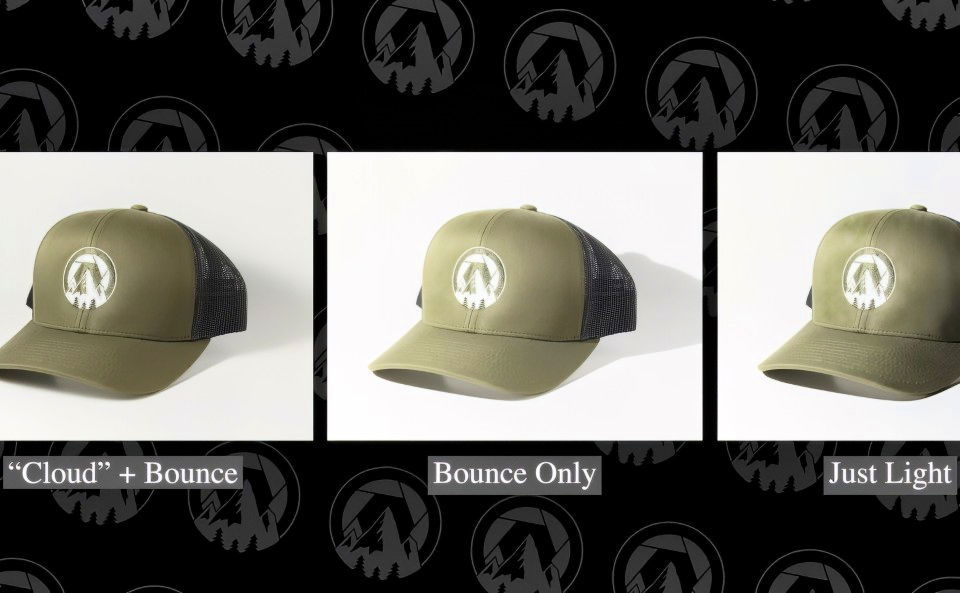
- Experiment with Lighting and Angles: Take a photo with just the direct light first. Then, add the reflector and finally the baking paper diffuser. Compare the images to see how each element improves the lighting.

Sample Image Comparison:
- Without Reflector: Notice harsh shadows on the side away from the light source.
- With Reflector: Shadows are filled, giving a balanced look.
- With Diffuser: Light is soft, and shadows are smooth and natural.
Editing Your Photos
After capturing your photos, a few simple edits can enhance them further. Here's a basic editing guide:
- Brightness and Contrast: Increase brightness and contrast to make your product stand out.
- Temperature and Tint: If the photo looks too warm or cool, adjust the temperature to neutralize any color casts.
- Sharpness and Clarity: Boosting sharpness and clarity can make details pop, especially if your product has texture.
- Background Touch-Up: If there are any imperfections in the background, use the healing or clone tool to create a flawless look.
Free apps like Lightroom Mobile or even your phone's built-in editor can achieve these adjustments. For more advanced editing, you can use software like Photoshop or GIMP.
Tips for Using Natural Light as an Alternative
If you don't have a lamp or would like to try natural lighting, windows can be a fantastic source of soft, indirect light:
- Position the Table Near a Window: Find a window with indirect sunlight. If the light is too harsh, cover the window with a white curtain or sheer cloth to diffuse it.
- Cloudy Days are Best: Cloud cover naturally diffuses sunlight, creating a soft, even light. Schedule your shoot for a cloudy day if possible.
- Reflectors Still Apply: Use a foam core to bounce window light onto the other side of the product, filling in shadows just as you would with a lamp setup.
Natural light is a cost-effective way to achieve beautiful lighting, but remember that it can be unpredictable. Be prepared to adapt as the sunlight changes.
Troubleshooting Common Issues
Discover effective solutions to troubleshoot common issues in DIY product photography and enhance your skills for stunning results.
- Photos Look Orange or Warm: Ensure you're using a clean white light source, not a warm-toned bulb.
- If the photo is still warm, correct the color in your editing software by adjusting the temperature slider.
- Harsh Shadows on the Product: Use the baking paper diffuser or try placing the lamp further away from the product to soften the light.
- Position a reflector to fill in shadows on the opposite side of the light source.
- Background Isn't Pure White: Adjust brightness or contrast to make the background appear white.
- If shadows still appear on the background, carefully edit them out or increase exposure on the background area.
- Photos Appear Blurry: Make sure the camera or smartphone is stable. Use a tripod if possible, or rest your phone on a solid surface.
- Tap to focus on the product if you're using a smartphone, and avoid moving the camera as you take the shot.
Final Thoughts: Perfecting Your DIY Product Photography
Achieving professional-looking product photos at home is possible with some creativity and a few inexpensive tools. A simple table, background paper, a reflector, and diffused lighting can make a huge difference in showcasing your products in the best light. Practice with different arrangements, lighting setups, and angles to develop a style that highlights your products beautifully.
With these steps, you're well on your way to taking high-quality photos that will impress your audience and help your products stand out online. Whether you're photographing for your website, social media, or online marketplaces, these DIY techniques can help elevate your brand image without breaking the bank.
FAQs About DIY Product Photography
Explore essential FAQs about DIY product photography to enhance your skills and capture stunning photos effortlessly. Unlock pro tips today!
A white, cool-toned LED bulb is ideal for product photography, as it provides a neutral, clean light without yellow or orange tones. Aim for a bulb temperature around 5000-6500K for natural-looking colors.
Yes, you can experiment with various colors. However, white is the best at reflecting light evenly. If you choose a dark or colored background, you may need additional lighting or to adjust for any color cast on the product.
Using clear fishing line can be a great solution for hanging items. It’s minimally visible and easy to edit out in post-processing, providing a floating effect without distracting from the product.
Yes, a ring light can be effective. However, ensure it’s positioned to avoid direct reflections on shiny surfaces, and consider using a diffuser to soften any harsh shadows it might create.
You can use an off-white or light gray background to create slight contrast. Alternatively, add more lighting to create soft shadows that enhance the edges and details of your product.
Adjust your camera settings for better exposure by lowering the ISO or increasing the shutter speed. For yellow tones, change the white balance in your editing software to cool down the image.
Yes, a phone camera works well if you have proper lighting. Use the phone’s exposure adjustment feature, and consider editing in an app like Lightroom Mobile for more control over brightness and color.
Position lights at an angle to avoid direct reflections on shiny surfaces. Using a diffuser and adjusting your light’s position can help reduce visible reflections.
Yes, but ensure it's indirect (like through a window with a sheer curtain) to avoid harsh shadows. Reflectors are especially useful in natural light setups to balance shadows on the product's opposite side.
Scale up your setup with larger backdrops and reflectors. For furniture or bigger products, use a large white wall or backdrop and position lights strategically to illuminate the entire product evenly.


