Starting with DIY propagation was the best decision I made for my plants. I set up a plant propagation station in my small kitchen. It was affordable and easy to build. I used old bottles and jars, gave them a thorough wash, and they were ready for my plant cuttings. Not only did it save money, but it also provided a constant supply of new plants.
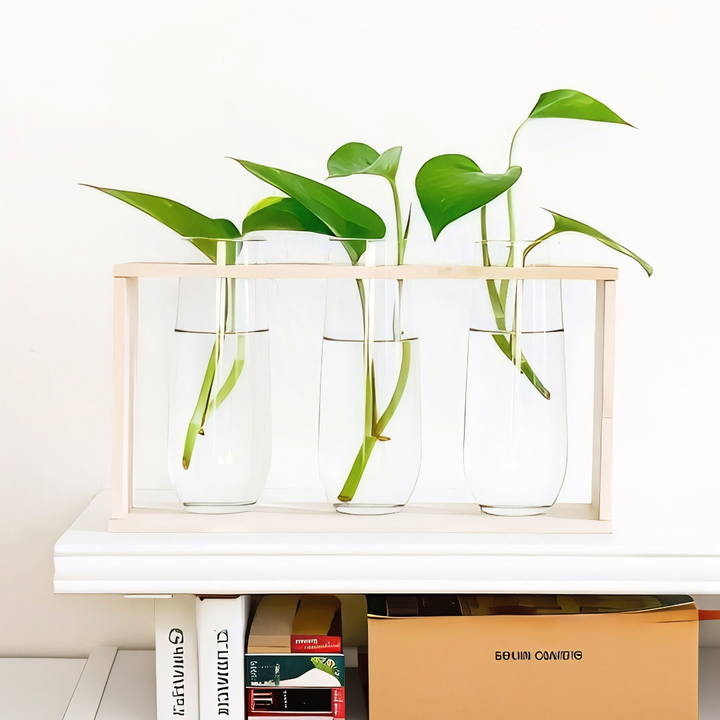
Seeing my plants grow and sprout new roots gave me immense joy. This simple DIY plant propagation project has helped me expand my little indoor garden. It's easy, fun, and satisfying.
I hope by sharing my experience, you get inspired to start your own plant propagation station. Give it a try, and let the joy of new plant growth enrich your life too.
Propagation Science
When we talk about plant propagation, we're referring to the process of making new plants from a variety of sources: seeds, cuttings, and other plant parts. Plant propagation can be a fun and rewarding way to expand your garden or share plants with friends and family. Let's dive into the science behind it, in a way that's easy to understand.
What is Plant Propagation?
At its core, plant propagation is the natural or intentional process of growing new plants. There are two main types of propagation: sexual and asexual.
- Sexual Propagation: This involves the use of seeds. Seeds are the result of the pollination process in flowering plants, where genetic material from two parents is combined to build a new plant with characteristics of both.
- Asexual Propagation: Also known as vegetative propagation, this method doesn't involve seeds. Instead, new plants are grown from parts of the parent plant, such as leaves, stems, or roots. This is a way to clone the parent plant, as the new plant will have the same genetic makeup.
How Does It Work?
Plants have an amazing ability to regenerate. For example, when you take a cutting from a plant, you're essentially making an environment where the plant's cells can multiply and differentiate into all the necessary parts to form a new plant. This includes roots, stems, leaves, and eventually flowers and seeds.
The Role of Hormones
Plant hormones play a crucial role in propagation. One key hormone is auxin, which stimulates root growth in cuttings. When you dip a cutting into rooting hormone, you're using synthetic auxins to encourage the plant to produce roots.
Environmental Factors
The success of plant propagation often depends on environmental factors such as:
- Temperature: Most plants need a warm environment to grow. Too cold, and the plant won't be able to develop properly.
- Moisture: Water is essential for plant growth, but too much can cause rot. It's important to maintain a balance.
- Light: Plants need light for photosynthesis, but the intensity and duration should be carefully controlled, especially for young plants.
Why Propagate Plants?
Propagation isn't just about growing more plants. It's a way to preserve the genetic material of plants that perform well, to reproduce plants that may not produce viable seeds, or to grow a large number of plants economically.
Understanding plant propagation helps improve your gardening. Knowing growth and reproduction lets you build ideal conditions for thriving plants. Be patient – some plants take longer, but it's worth it.
Materials Needed:
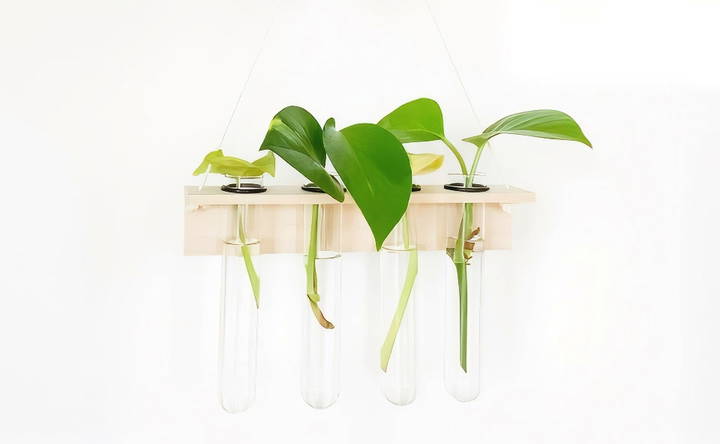
- Poplar Wooden Board: I chose poplar for its smooth texture and workability. It's essential for both the hanging and standing stations.
- Test Tubes/Glasses: For propagating the cuttings. Their size will determine the size of the holes you'll drill into the wood.
- O-Rings: These are necessary for securing the test tubes or glasses in place.
- Saw (Hand or Power): You'll need this to cut the wood to the desired size.
- Drill and Hole Saw Attachments: These tools are critical for making the slots for the test tubes or glasses.
- Wood Glue: For assembling the wooden parts together.
- Sandpaper or a Sanding Tool: For smoothing the wood surfaces and edges.
- Safety Gear (Gloves, Goggles, Mask): Safety cannot be overstated when working with power tools and wood.
- String (for the hanging station): This will be used to hang the station from a ceiling or hook.
Why These Materials?
- Poplar Wood: It's lightweight and has a beautiful, natural look.
- Test Tubes/Glasses: They are perfect for holding plant cuttings and add an elegant touch to the propagation station.
- O-Rings and Wood Glue: These ensure the structure is stable and the test tubes/glasses don't fall out.
- Power Tools and Safety Gear: These make the process easier and safer, especially when working with wood.
Step by Step Instructions
Learn how to build a DIY propagation station with our step-by-step guide. From cutting to assembly, propagate your plants easily at home.
Step 1: Planning and Cutting
Measure and mark the wood according to the length of time you desire for your station. Space the test tube marks evenly across the board. After sawing the wood to your specified length, sand the edges to smooth out any rough patches.
Step 2: Drilling the Holes
Position the hole saw attachment over your marked points and begin drilling. Ensure the holes are slightly smaller than the diameter of your test tubes so they fit snugly. Safety gear is a must during this step to protect yourself from flying wood chips and dust.
Step 3: Adding the Test Tubes
Insert the O-rings into the test tubes before sliding them into the holes. The O-rings will prevent the tubes from slipping through.
Step 4: Final Touches
Measure and drill small holes at both ends of the board. Thread the string through these holes, securing it with knots. This string will allow you to hang your propagation station.
Making the Standing Propagation Station:
Making the Standing Propagation Station: Step-by-step guide from preparing the base to placement and sealing. Perfect for plant propagation enthusiasts.
Step 1: Preparing the Base and Top
Similar to the hanging station, start by cutting your poplar board to the desired size for both the base and the top part of the station. Ensure that the base is wide enough to provide stability.
Step 2: Drilling for Glasses
Mark the center points for where your glasses will go on the top board. Drill holes using the hole saw, ensuring they're the appropriate size for your glasses to fit into. Remember, this step requires a bit more power, so using an 18-volt drill might be helpful.
Step 3: Assembling
Once all the pieces are cut and drilled, sand everything down to remove rough edges. Begin assembling by gluing the side supports between the base and the top board. Let the glue dry thoroughly.
Step 4: Placement and Sealing
After the structure is solid and the glue has dried, place the glasses into the holes on the top board. If desired, apply a sealer to the wood to protect it and give it a finished look.
Design Ideas
Building a DIY plant propagation station nurtures new life and adds green elegance to your space. Here are design ideas that make it functional and decorative.
- Repurpose with Purpose Look around your home for items that can be repurposed into unique propagation vessels. Old jars, wine glasses, or even light bulbs can be transformed into eye-catching displays for your plant cuttings. The key is to ensure they're clear so you can observe the root growth and enjoy the beauty of the process.
- Go Vertical If space is a constraint, think vertically. Wall-mounted test tube racks or hanging glass orbs can turn an empty wall or window into a lush, vertical garden. This not only saves space but also builds a living art installation in your home.
- Magnetic Attraction For a modern twist, consider a magnetic propagation station. Attach magnetic strips or disks to small vases or containers and stick them onto a metal surface like a refrigerator or a magnetic board. This floating garden effect is both surprising and delightful.
- Wooden Wonders Wooden planks or blocks with holes drilled in can serve as rustic stands for test tubes or small vases. The warmth of the wood, paired with the freshness of the cuttings, makes for a cozy, natural look.
- Macrame Magic Macrame hangers are back in style and perfect for suspending small propagation containers. They add a bohemian flair to your space and are especially fitting for a relaxed, laid-back decor theme.
- Upcycled Chic: An old bookshelf or a tiered cake stand can be upcycled into a multi-level propagation station. This approach allows you to have a concentrated area of greenery that's both functional and stylish.
- Simple Elegance Sometimes, simplicity is the ultimate sophistication. A single, elegant vase with a few well-chosen cuttings can make a bold statement. Choose plants with interesting root structures for an added visual impact.
- Personal Touch: Customize your propagation station with personal touches. Paint the containers, add labels, or incorporate decorative elements that reflect your style. This makes the station uniquely yours and adds a personal narrative to your plant-growing journey.
The goal is to build a propagation station that not only serves the purpose of growing new plants but also resonates with your personal style and enhances your living space.
Troubleshooting Common Issues
When you're diving into the world of plant propagation, it's normal to encounter a few hiccups along the way. Here's a straightforward guide to solving some common problems you might face, ensuring your propagation journey is as smooth as possible.
- Overwatering and Root Rot It's easy to think that more water equals more growth, but that's not always the case. Overwatering can lead to root rot, a deadly issue for your new plants. To avoid this, make sure your propagation medium is moist but not soggy, and has proper drainage.
- Insufficient Light and Leggy Growth Plants need light to grow, but not all plants require the same amount. If your cuttings are stretching out with weak stems, they're probably craving more light. Place them in a well-lit area, but away from direct sunlight that could scorch them.
- Improper Temperature Control Just like us, plants have a comfort zone when it comes to temperature. Too hot or too cold, and they won't thrive. Keep your propagation station in a spot where the temperature is consistent and appropriate for the plants you're growing.
- Lack of Humidity and Drying Out Humidity helps cuttings develop roots. If the air is too dry, they might not take root at all. Covering your cuttings with a clear plastic bag can build a mini greenhouse effect, trapping moisture and warmth.
- Incorrect Propagation Medium The medium you choose for propagation matters. Soil, perlite, vermiculite, or water? It depends on the plant. Research the best medium for your specific plant to give it the best start in life.
- Inadequate Air Circulation Good air flow is essential to prevent fungal diseases. Don't crowd your cuttings; give them space to breathe. If you're using a cover, open it occasionally to let fresh air in.
- Failure to Sterilize Tools and Equipment Always use clean tools and containers. Bacteria and fungi love to hitch a ride on dirty equipment, leading to disease. A quick rinse in a bleach solution can keep your tools sterile.
- Neglecting Proper Hygiene Practices Lastly, keep your hands clean when handling plants and cuttings. It's a simple step, but it goes a long way in preventing the spread of diseases.
Patience and observation are your best tools. Watch your plants closely, and they will indicate their needs.
FAQs About DIY Propagation Station
Discover answers to frequently asked questions about DIY propagation stations and learn how to build and maintain your plant's growth hub effectively.
A DIY propagation station is a setup where you can grow new plants from cuttings of existing ones. It usually consists of containers like test tubes or jars filled with water, where plant cuttings are placed to develop roots. This method is a simple and cost-effective way to expand your plant collection.
Most houseplants can be propagated in water. Popular choices include pothos, spider plants, ZZ plants, and prayer plants. However, some plants like snake plants may not fit in smaller containers due to their size.
The time it takes for roots to develop varies by plant species. Generally, you can expect to see roots within a few weeks to a couple of months. Be patient and keep the water clean to encourage healthy root growth.
Yes, once the roots are a few inches long, you can transfer the propagated plants to soil. Gently plant them in a pot with suitable soil and continue to care for them as you would any other plant.
Yes, you can use tap water for your propagation station. However, it's best to let the water sit for a day before using it to allow chlorine to evaporate, as some plants are sensitive to chlorine. Also, using room temperature water is ideal to avoid shocking the plant cuttings.
Conclusion
Setting up your own DIY plant propagation station can be a rewarding and enriching experience. It's simple and inexpensive to start. Try it out and watch your garden flourish!


