When my son asked me how heavy equipment on construction sites is lifted with such ease, I took it as a golden opportunity to explain to him the concept of pulleys. This sparked the idea of making a simple pulley system at home, which turned out to be a fun-filled, educational project for both of us.
In this step-by-step guide, I'll walk you through how I built a basic DIY pulley system that you can easily set up with your kids, enabling them to lift weights effortlessly while learning about simple machines.
Understanding the Basics of a Pulley System
Before diving into the construction, it's essential to understand what a pulley system is and why it's beneficial. A pulley is a type of simple machine used to change the direction of a force and make lifting heavy objects easier. The setup consists of a wheel with a groove, which allows a rope or cable to run smoothly over it.
Why Use a Pulley System?
- Ease of Use: Even a simplistic setup allows an individual to lift heavy objects with minimal effort.
- Educational Value: This project provides a practical demonstration of physics principles in action.
- Cost-Effective: You don't need expensive materials to construct a basic pulley system; most items are easily available or already at home.
Materials You Will Need
For our simple pulley project, we will need a few basic materials. Here's why each is necessary:
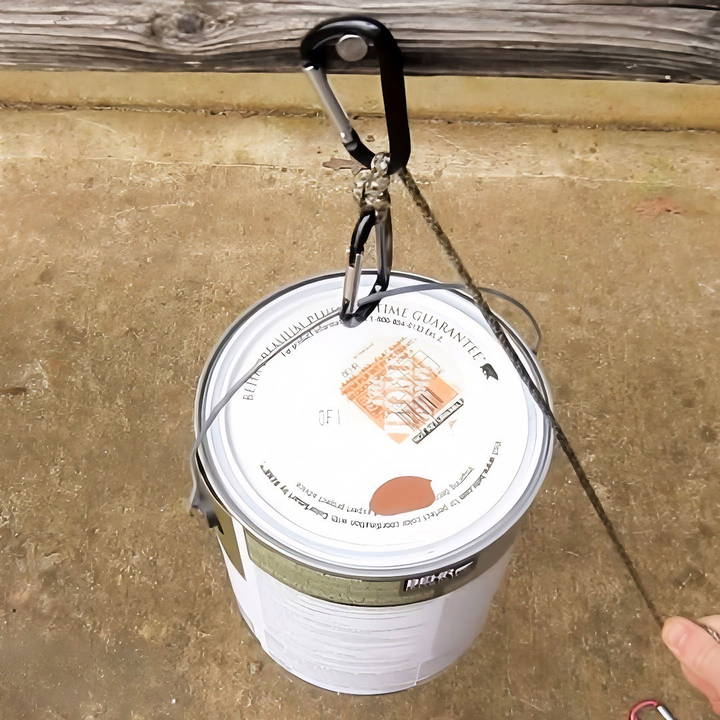
- Carabiners: These metal clips serve as the ‘wheels' in our pulley. Though not true wheels, they work by allowing the rope to move smoothly. Choose sturdy ones; although they don't need to be suitable for climbing, they should still be made of metal to withstand some weight.
- Rope or Paracord: The rope will pass through the carabiners and attach to the object you wish to lift. Paracord is ideal because it is strong yet thin, allowing a smooth passage through our makeshift pulley ‘wheels.'
- Old Sawhorse or Sturdy Beam: You will need something to fix the carabiners to, which supports the weight being lifted. An old sawhorse is excellent because it's stable and strong.
- Nails (Optional): These might be necessary to secure the carabiners to your sawhorse or beam, depending on the design.
- Heavy Object (like a Paint Can): To test the system, use an object that weighs between 10 to 15 pounds. A paint can works perfectly for this purpose.
Step by Step Instructions
Learn to make a DIY pulley system for easier lifting. Enhance setups from materials to games with this complete guide.
Step 1: Assemble Your Materials
Firstly, gather all the materials on a flat surface. Check that your carabiners are in working condition and that your rope is cut to a suitable length, at least a few feet longer than the height of the sawhorse.
Step 2: Setting Up the Foundation
With your sawhorse positioned upright, fix one of the carabiners to the top using a nail. Ensure it's securely fastened and can rotate freely before proceeding.
Step 3: Thread the First Carabiner
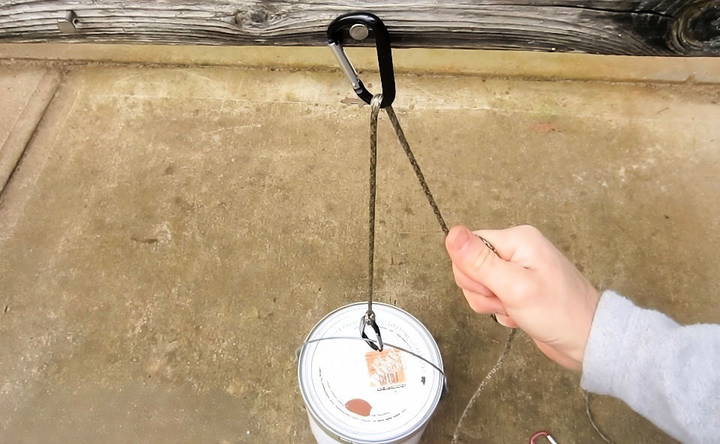
Take one end of your rope and tie it securely to a second carabiner. The other end will be used to thread through the carabiner attached to your sawhorse. This setup will form the basic one-pulley system.
Step 4: Attach the Weighted Object
Secure the heavy object, such as a paint can, to the carabiner tied to the rope. This replicates the resistance typically faced in lifting.
Step 5: Test the Basic Pulley
Now give the free end of the rope a pull. You'll find you can lift the object with less effort than you'd need to lift it directly. This step demonstrates the advantage of using pulleys.
Enhancing the Pulley System for Easier Lifting
Want to make lifting even more effortless? I certainly did, so I added an enhancement to the basic system.
Step 6: Install a Second Carabiner
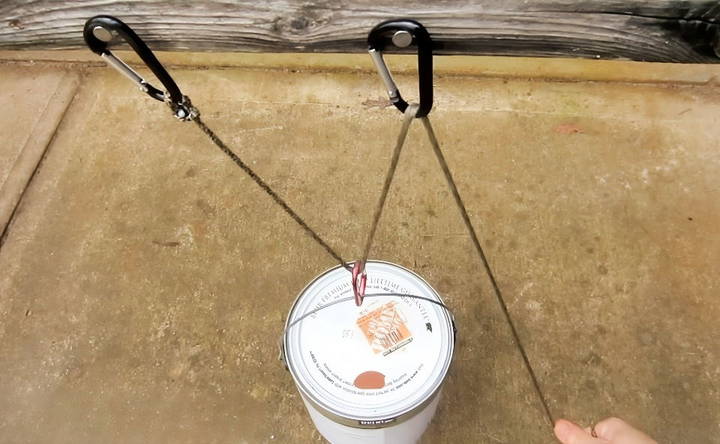
Remove the weight temporarily. Then, suspend a second carabiner from the first fixed carabiner on the sawhorse. This step ensures the two carabiners can move relative to each other.
Step 7: Make a Compound Pulley
Pass the rope through this second carabiner, and then thread it back through the first carabiner fixed to the sawhorse. Finally, attach the weight to the rope via a third carabiner.
Step 8: Testing the Enhanced Setup
With this setup, you'll notice that the effort required to lift the weight is approximately halved. This dual-carabiner system distributes the load across two supports, making it significantly easier to lift the same weight.
Further Refinements and Fun Activities
After trying the enhanced pulley system, I realized there were more ways to engage my son and spice up the learning process.
Step 9: Increase the Challenge
Once comfortable with the basic and enhanced systems, add more weight to test their limits. My son enjoyed guessing how much more he could lift with the dual-carabiner system.
Step 10: Make a Game
We introduced a simple game—seeing who could collect the most small items using the pulley in a minute. This was not just educational but also incredibly fun, leading to hours of entertainment.
Safety Tips and Guidelines
While constructing and using the pulley system, it's crucial to ensure safety, especially when kids are involved:
- Supervision: Always supervise children while they use the pulley, ensuring they don't handle weights beyond their capacity.
- Quality Check: Regularly inspect the carabiners and rope for any signs of wear or damage.
- Secure Anchors: Ensure the sawhorse or beam is stable and can withstand the stress imposed by the weight.
Troubleshooting
Even with careful assembly, pulley systems can sometimes encounter issues. Here are some common problems and how to fix them:
Rope Slipping
- Problem: The rope slips off the pulley wheel.
- Solution: Ensure the rope is the correct size for the pulley. It should fit snugly in the groove. Check for wear and tear on the rope and replace it if necessary. Make sure the pulley wheel is clean and free of debris.
Pulley Wheel Not Turning
- Problem: The pulley wheel is stuck and does not turn.
- Solution: Lubricate the axle with a suitable lubricant like WD-40. Check for any obstructions or debris that might be blocking the wheel. Ensure the axle is not bent or damaged.
Excessive Friction
- Problem: There is too much friction, making it hard to lift the load.
- Solution: Lubricate all moving parts, including the pulley wheel and axle. Ensure the rope is not too thick or rough. Use a smoother, more flexible rope if necessary.
Uneven Load Distribution
- Problem: The load is not lifting evenly.
- Solution: Check that the load is balanced and centered. Adjust the attachment points if needed. Ensure the pulley system is aligned properly and not twisted.
Rope Wear and Tear
- Problem: The rope shows signs of wear and tear.
- Solution: Regularly inspect the rope for fraying or damage. Replace the rope if it shows significant wear. Use a rope made of durable material suitable for the load weight.
Pulley Misalignment
- Problem: The pulleys are not aligned properly.
- Solution: Realign the pulleys so they are in a straight line. Ensure the mounting points are secure and level. Use a level tool to check alignment if necessary.
Load Not Lifting
- Problem: The load does not lift even when the rope is pulled.
- Solution: Check for any knots or tangles in the rope. Ensure the rope is properly threaded through all pulleys. Verify that the load is not too heavy for the pulley system.
Noise During Operation
- Problem: The pulley system makes noise during operation.
- Solution: Lubricate all moving parts to reduce friction. Check for any loose components and tighten them. Ensure the rope is not rubbing against any sharp edges.
Pulley Wheel Damage
- Problem: The pulley wheel is cracked or damaged.
- Solution: Replace the damaged pulley wheel with a new one. Ensure the new wheel is the correct size and type for your system. Regularly inspect the pulley wheels for any signs of damage.
Addressing issues ensures smooth pulley operation. Regular maintenance prevents problems and extends system life.
Safety Tips
When working with pulley systems, safety should always be your top priority. Here are some essential safety tips to ensure you and others stay safe:
Wear Protective Gear
- Gloves: Protect your hands from rope burns and sharp edges.
- Safety Glasses: Shield your eyes from debris and accidental rope snaps.
- Helmet: Wear a helmet if working with heavy loads or at heights.
Inspect Equipment Regularly
- Check Ropes: Look for fraying, cuts, or wear. Replace damaged ropes immediately.
- Examine Pulleys: Ensure pulleys are free of cracks and rotate smoothly.
- Verify Connections: Make sure all knots, hooks, and fasteners are secure.
Use the Right Materials
- Rope Size and Type: Use ropes that are appropriate for the load and pulley system.
- Pulley Capacity: Ensure the pulleys can handle the weight of the load.
- Quality Hardware: Use high-quality, durable materials to prevent failures.
Set Up Properly
- Stable Anchors: Secure pulleys to strong, stable anchors to prevent movement.
- Even Load Distribution: Balance the load to avoid tipping or uneven lifting.
- Clear Pathways: Ensure the area around the pulley system is free of obstacles.
Operate with Care
- Slow and Steady: Lift loads slowly to maintain control and prevent accidents.
- Avoid Overloading: Never exceed the weight limit of your pulley system.
- Stay Alert: Be aware of your surroundings and watch for potential hazards.
Communicate Clearly
- Use Signals: Establish clear hand signals or verbal commands if working with others.
- Stay in Contact: Maintain communication to coordinate movements and ensure safety.
Emergency Preparedness
- First Aid Kit: Keep a first aid kit nearby in case of injuries.
- Emergency Plan: Have a plan in place for emergencies, including contact numbers and procedures.
Training and Practice
- Learn Proper Techniques: Educate yourself on the correct use of pulley systems.
- Practice Safely: Practice setting up and using the system in a controlled environment before tackling real tasks.
Follow these safety tips to reduce risks and use your pulley system safely. Regular maintenance prevents accidents and prolongs equipment life.
FAQs About DIY Pulley Systems
Discover answers to common questions about DIY pulley systems, including setup tips, materials needed, and safety guidelines.
A DIY pulley system is a simple mechanical device you can build at home to help lift or move heavy objects with less effort. It consists of ropes and wheels (pulleys) that change the direction of the force applied, making it easier to lift heavy loads. You might need one for various tasks, such as lifting heavy items in your garage, setting up a home gym, or even for educational projects with kids.
A DIY pulley system offers several benefits:
Cost-effective: Building your own system is much cheaper than buying commercial lifting equipment.
Customizable: You can tailor the system to your specific needs and space.
Educational: It's a great way to learn about physics and mechanics.
Versatile: Can be used for various tasks, from lifting weights in a home gym to moving heavy objects in a workshop.
Safety is crucial when using a pulley system. Here are some tips:
Check the weight limit: Ensure your pulleys, rope, and anchor points can handle the load.
Inspect regularly: Check for wear and tear on the rope and pulleys.
Secure attachments: Make sure all knots and carabiners are secure before lifting.
Use gloves: Protect your hands from rope burns and blisters.
Lift slowly: Avoid sudden movements to prevent accidents.
Absolutely! A DIY pulley system can be a great addition to your home gym. You can use it for various exercises such as lat pulldowns, tricep extensions, and rows. It's a cost-effective way to add resistance training to your workout routine without investing in expensive gym equipment.
Maintaining your DIY pulley system is crucial for safety and longevity. Here are some tips:
Regular inspection: Check the rope, pulleys, and anchor points for any signs of wear and tear.
Lubrication: Apply a suitable lubricant to the pulleys to ensure smooth operation.
Tighten connections: Make sure all knots, carabiners, and attachments are secure before each use.
Store properly: When not in use, store the system in a dry place to prevent rust and damage.
Conclusion: Learning Through Experience
Building a simple DIY pulley system was a rewarding project, blending learning with hands-on experience. Through this exercise, my son gained insights into physics and engineering principles in an interactive manner. It also served as a creative way to spend time together, fostering curiosity and exploration.
Giving children the opportunity to understand concepts like pulleys through practical activities aids in their cognitive development and nurtures a love for learning. I cannot recommend enough taking a weekend to set this up; not only is it educational, but it also provides an unforgettable family bonding experience.


