Making a DIY pumpkin arch for Halloween was one of the most fun and rewarding projects I've ever done. I gathered all the materials: pumpkins, wire, and a sturdy frame. My kids helped clean and carve the pumpkins. It was messy but a great way to bond and get into the Halloween spirit. We even set up a small assembly line to give each pumpkin a unique look.
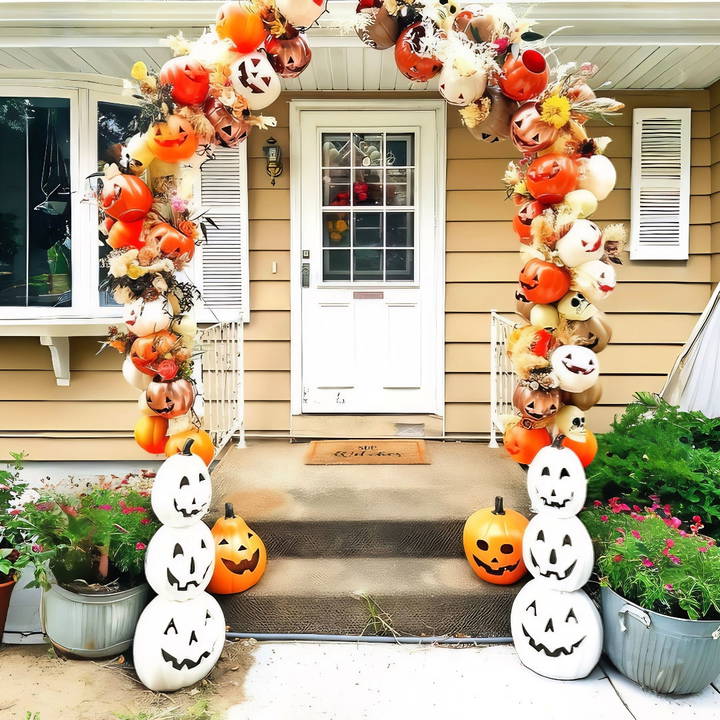
There were challenges, like balancing the pumpkins on the frame and securing them with wire. But it was all worth it when we lit the candles inside each pumpkin. The arch looked amazing and became the star of our Halloween decorations. This project might seem tricky, but with these tips and tricks, you can make an eye-catching Halloween pumpkin arch that will wow everyone.
I'm helping with making your DIY pumpkin arch project successful and fun with these simple tips. Just keep reading these useful steps and ideas – you'll see how easy and exciting this can be!
Historical Context or Fun Facts
When we think of Halloween, images of jack-o'-lanterns, costumes, and trick-or-treating come to mind. But have you ever wondered where these traditions originated? Let's delve into the historical context and some fun facts about Halloween decorations.
- The Ancient Roots of Halloween: Halloween's history dates back over 2,000 years to the ancient Celtic festival of Samhain, celebrated on October 31st. This marked the end of the harvest season and the beginning of winter—a time associated with death. The Celts believed that on this night, the boundary between the living and the dead blurred, allowing spirits to return to Earth.
- Bonfires and Costumes: To commemorate Samhain, the Celts lit grand bonfires and wore costumes made of animal heads and skins. These practices were not just for celebration but also to ward off any unwelcome spirits.
- Jack-o'-Lanterns: The iconic jack-o'-lantern has its origins in an Irish myth about Stingy Jack, a man who tricked the Devil and was doomed to roam the Earth with only a coal-lit turnip to light his way. This led to the tradition of carving scary faces into turnips, and later pumpkins, to scare away evil spirits.
- Trick-or-Treating: The practice of trick-or-treating has evolved from ancient traditions. One theory suggests it began with the Celts leaving out food to appease wandering spirits. Another theory ties it to the medieval practice of ‘souling,' where children and poor adults would go door-to-door, offering prayers for the dead in exchange for food.
- A Sweet Fact: Did you know that a quarter of all the candy sold annually in the U.S. is purchased for Halloween? This sweet tradition is a huge part of the holiday's modern celebration.
Knowing Halloween's history makes us value its depth. It mixes ancient customs, superstitions, and community fun, still evolving. While you carve pumpkins or dress up, recall the old traditions shaping today's vibrant holiday.
Gathering the Materials
Learn why each material matters when gathering the materials. Discover essential insights to optimize your project efficiently and effectively.
Why Each Material Matters
- Pumpkins (Plastic): The stars of the show. I chose plastic for durability and ease of manipulation. They needed to withstand drilling and the elements.
- Carving Tools: Essential for customizing the pumpkin faces. I opted for a power rotary tool for speed, though a simple X-Acto knife can also do the trick.
- Spray Paint: In burnt orange, tans, and browns, to give the pumpkins a more natural, varied look.
- Skulls: These added a spooky touch. I gathered various sizes from dollar stores—a cost-effective way to elevate the theme.
- Lights: A must for any Halloween display. I ended up using LED strings to illuminate the arch from within.
- Greenery and Flowers: To add texture and fill gaps. I used a mix of real and faux to keep things interesting.
- Zip Ties: The unsung heroes, these secured everything to the arch frame.
Step by Step Instructions
Learn how to make a stunning DIY pumpkin arch with step-by-step instructions on carving, painting, building, and perfecting every detail.
Carving and Painting
Armed with enthusiasm, I set up shop in my garage, transforming pumpkin after pumpkin. Each carved face began to take on its own character, an assembly of ghastly grins and eerie expressions. Despite the mess of plastic shavings and the occasional frustration of intricate cuts, the vision was taking shape. The pumpkins were then bathed in spray paint, shifting from their garish grocery-store orange to a more subdued harvest palette.
Building the Arch
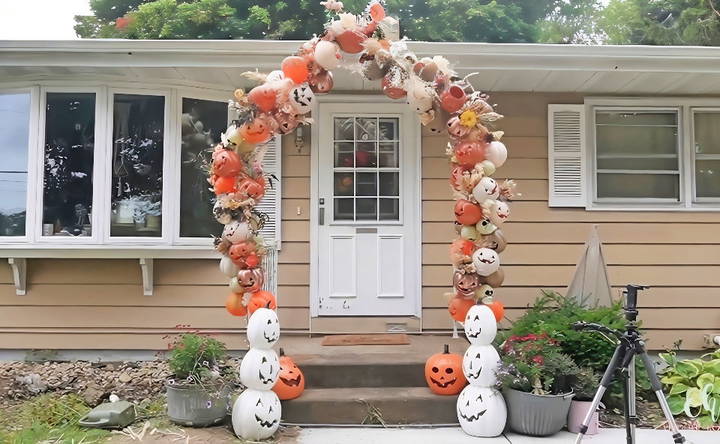
Constructing the arch itself was a trial of trial and error. Securing it to the door required a steady hand and an improvisational spirit. As I drilled holes for the lights and zip-tied pumpkins into place, the project's scope became clear. This was no afternoon dalliance but a venture that spanned days. Each step, from stringing lights to weaving in skeletons and swathes of greenery, was a lesson in patience and creativity.
Overcoming Challenges
There were moments of doubt—would the arch hold? Did I have enough pumpkins? The answer to the latter was a resounding "just barely." Adapting on the fly became second nature, whether it meant adding more lights for an ethereal glow or incorporating extra greenery to cover any gaps. This project tested my resolve, but with each challenge overcome, the end product grew closer to what I had envisioned.
The Final Touches
As the arch took shape, it was the details that truly brought it to life. Strategic placement of lights ensured a haunting glow, while floral accents offered a hint of the macabre amidst beauty. Skulls peeked from between pumpkins, their grins a stark contrast to the softness of the petals surrounding them.
On stepping back, weary but exhilarated, I beheld a transformation. My front door, once unremarkable, now served as a gateway to autumnal enchantment. The project, while daunting, taught me the value of persistence, the beauty of seasonal change, and the sheer joy of making something with my own hands.
Design Variations for Your DIY Pumpkin Arch
Making a DIY pumpkin arch is a delightful way to welcome the fall season. Here are some design variations that can make your arch stand out and capture the essence of autumn.
- Choose the Right Pumpkins: Selecting various sizes and colors of pumpkins can add depth and interest to your arch. Consider mixing traditional orange pumpkins with white, green, or even striped varieties to make a visually appealing palette.
- Incorporate Natural Elements: Enhance the rustic charm by weaving in natural elements like dried cornstalks, colorful autumn leaves, or even bales of hay at the base of your arch. These additions can provide a fuller look and a more authentic fall feel.
- Light It Up: String lights or lanterns can give your pumpkin arch a magical glow in the evenings. Opt for warm, soft lighting to make a cozy atmosphere that invites guests to your doorstep.
- Add a Personal Touch: Personalize your arch by carving or painting pumpkins with your family's initials, patterns that match your home's decor, or even scenes that tell a story.
- Utilize Vertical Space: If you're short on ground space, consider building your arch over a garden path or entryway. This not only saves space but also makes an enchanting walk-through experience.
- Support Structure: Ensure your arch has a sturdy frame. Materials like wood or metal can provide the necessary support for the weight of the pumpkins and additional decorations.
- Seasonal Flair: For a touch of whimsy, add seasonal decorations such as fake spiders and webs for Halloween or turkeys and pilgrims for Thanksgiving.
- Sustainable Options: If you're environmentally conscious, use biodegradable or reusable materials. You can also opt for faux pumpkins that can be stored and reused year after year.
By considering these design variations, you can make a pumpkin arch that is not only a beautiful fall decoration but also a reflection of your personal style and creativity.
Troubleshooting Common Issues with DIY Pumpkin Arches
Making a DIY pumpkin arch can be a fun project, but sometimes, you might run into a few hiccups. Here's how to solve some common issues so your pumpkin arch turns out just right.
- Pumpkins Falling Off: If your pumpkins keep slipping or falling off the arch, make sure they're securely attached. Use sturdy ties like zip ties or twine, and consider using a support structure like chicken wire for extra hold.
- Arch Collapsing: A collapsing arch is often due to a weak frame. Choose materials that can support the weight of the pumpkins and the structure itself. Reinforcing the frame with additional supports or using thicker materials can help prevent collapse.
- Uneven Ground: For an arch that's wobbly due to uneven ground, try to level the surface as much as possible. If that's not an option, you can stabilize the arch by driving stakes or rebar into the ground and attaching the arch to these for added stability.
- Vines Taking Over: Pumpkin vines can grow vigorously and take over your space. Regularly trim the vines to keep them in check, and direct them to grow where you want them to by gently tying them to the arch.
- Pumpkins Not Maturing: If your pumpkins aren't maturing on the vine, they may not be getting enough nutrients or water. Make sure the soil at the base of your arch is rich and well-watered. You can also use a fertilizer high in potassium to encourage fruit growth.
- Pests and Rot: Keep an eye out for pests that might damage your pumpkins. Use natural repellents or pesticides if necessary. If rot is an issue, it could be due to too much moisture. Ensure your pumpkins have good air circulation and consider using a fungicide to protect them.
Fix these common issues to keep your DIY pumpkin arch stunning all season. A bit of troubleshooting keeps your autumn display top-notch!
FAQs About DIY Pumpkin Arch
Discover answers to common questions about making a DIY pumpkin arch. Learn tips, tools, and techniques for a stunning homemade pumpkin arch display.
Start by measuring the width and height of your doorway to determine the amount of PVC pipe needed. Use PVC elbows and tee fittings to connect the pipes into a U-shape frame. For stability, you may use PVC cement at the joints that you do not plan to disassemble.
Absolutely! You can paint the pumpkins in different colors, carve out faces, or add designs to give your arch a unique touch. Some people use chalk paint or spray paint for a matte finish and LED lights inside the pumpkins for a glowing effect.
Once your frame is assembled, use a craft knife or drill to make small holes in the pumpkins. Then, secure each pumpkin to the PVC frame using zip ties. It's helpful to have extra zip ties on hand in case you need more than one per pumpkin.
If assembled with care, your pumpkin arch can be quite durable. Using PVC cement on certain joints will add strength, but avoid gluing all parts if you plan to disassemble and store the arch for future use. The plastic pumpkins are weather-resistant and can be reused for many seasons.
To ensure the pumpkins are securely attached to your DIY arch, use strong zip ties and consider the weight distribution of the pumpkins. It's recommended to attach the pumpkins at multiple points for added stability. If you're using real pumpkins, hollow them out to reduce weight and prevent sagging. For additional support, you can reinforce the frame with chicken wire or eye bolts if the pumpkins are particularly heavy.
Advice for Fellow Crafters
Wrapping up, making a DIY pumpkin arch can be a fun and rewarding project. With these tips and tricks, you'll ensure your arch stands out and impresses. Remember to plan ahead, secure your materials, and enjoy the process. With creativity and care, your DIY pumpkin arch will be the perfect addition to your decor.


