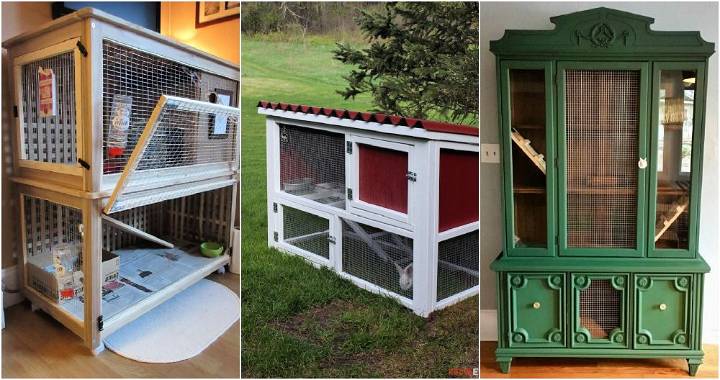
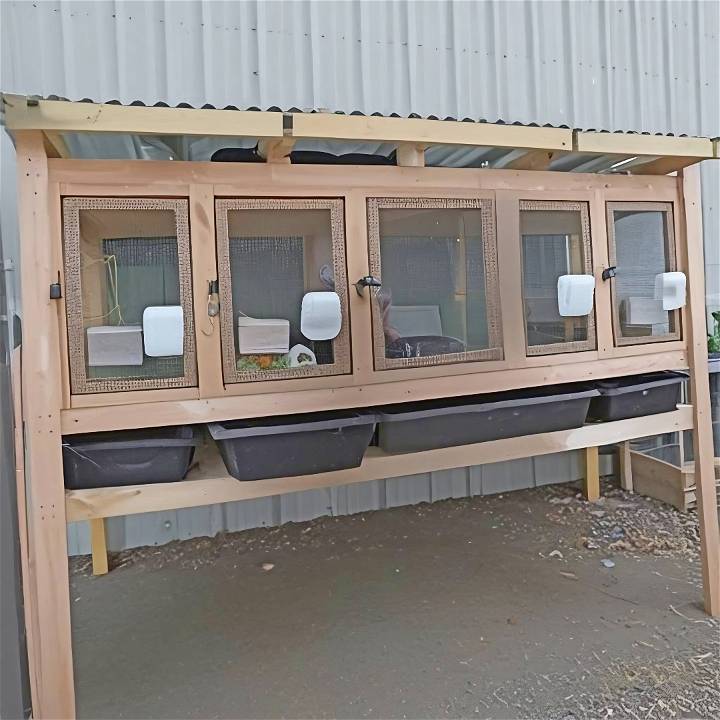
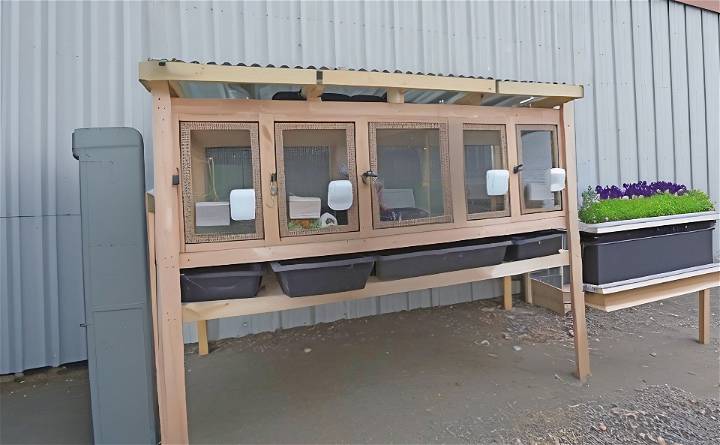
Building a DIY rabbit hutch from scratch without any predefined plans was a journey filled with trial and error, improvisation, and a lot of learning. Our aim was to build a spacious, predator-resistant home for our rabbits using materials we could easily source. Here's how we did it, broken down step by step.
Why We Started This Project
After an unfortunate incident where a dog attack led to the loss of one of our precious rabbits, the urgency to build a safer, sturdier hutch became apparent. We had initially brought our rabbits home under a bartering system, and looking after their well-being was our responsibility. So, we decided to embark on this project without any fixed plans, drawing inspiration from various internet resources and videos.
Gathering Materials
The very first step involved a trip to our local big-box store to pick up the necessary wood. We chose materials that promised durability and would ensure the hutch could withstand predator attacks and harsh weather conditions. Here's why we selected each material:
- Wood: For the frame and main structure, giving the hutch its strength.
- Half-inch hardware cloth: To provide ventilation and prevent predators from getting in.
- Hinges and latches: For secure doors that could be easily accessed.
- Weatherproof roofing: To protect the rabbits from the elements.
Building Process
Discover the DIY rabbit hutch building process in 3 days. From setting the foundation to adding floors and roofs, get expert tips for a successful project.
Day 1: Setting the Foundation
- Measuring and Cutting: We started by measuring and cutting the wood for the base and the walls, ensuring dimensions accommodated five rabbits comfortably. Each rabbit's space was designed to be 24 inches wide, 30 inches deep, and 30 inches high.
- Assembling the Base and Walls: After cutting the wood, we assembled the base and walls, attaching them securely with screws.
Day 2: Adding Floors and Divisions
- Hardware Cloth for Flooring: We cut the hardware cloth to fit each section of the hutch. This would allow droppings to pass through, making it easier to keep the hutch clean.
- Installing Dividers: Each rabbit's space was sectioned off using the same wood material, building individual areas.
Day 3: Roof, Doors, and Finishing Touches
- Roof Installation: We chose a weatherproof material for the roof to ensure our rabbits stayed dry through rainy seasons. The installation process required precision to prevent any leaks.
- Fitting the Doors: We built doors from wood and secured them with hardware cloth. They were attached to the hutch frame with hinges and secured with latches for easy access.
- Protective Measures: Given the previous dog attack, we paid extra attention to securing the hutch's base and its surroundings.
What We Learned and Tips for Others
- Security is Key: Ensure every part of the hutch is predator-proof. We used hardware cloth instead of chicken wire for added security.
- Comfort for the Rabbits: While focusing on security, we also made sure our design provided comfort. This included ample space for each rabbit, protection from the elements, and easy access to food and water.
- Maintenance and Accessibility: Design your hutch with cleaning in mind. The drop-through floor made of hardware cloth greatly simplified the cleaning process.
- Flexibility: Our design was a result of trial and improvement. Be prepared to adapt and make changes as you go along.
Climate Considerations for Your Rabbit Hutch
When designing and building a DIY rabbit hutch, it's essential to consider the local climate. Rabbits are sensitive creatures, and their well-being depends on a comfortable and safe environment. Here are some climate-related factors to keep in mind:
1. Temperature Regulation
Rabbits thrive in moderate temperatures. Extreme heat or cold can adversely affect their health. Here's how to address temperature concerns:
- Insulation: Insulate the hutch appropriately to maintain a stable internal temperature. Use materials like foam board or straw to provide insulation. Ensure that the insulation doesn't compromise ventilation.
- Shade and Sunlight: Position the hutch in an area that receives partial shade during hot days. Too much direct sunlight can lead to heat stress. Conversely, during colder months, ensure the hutch receives some sunlight to keep it warm.
- Elevated Design: Elevate the hutch slightly off the ground to prevent direct contact with cold surfaces. This also helps with drainage during rainy weather.
2. Ventilation
Proper ventilation is crucial for your rabbit's health. Stagnant air can lead to respiratory issues. Follow these guidelines:
- Airflow: Design the hutch with adequate ventilation. Include vents or mesh panels to allow fresh air circulation. Avoid drafts, as they can be harmful.
- Mesh Size: Use wire mesh with small openings to prevent predators from entering while still allowing air to flow. Ensure the mesh is securely attached to the hutch.
3. Rain and Humidity
Rain and high humidity levels can impact your rabbit's comfort. Here's how to address these concerns:
- Waterproofing: Ensure the hutch roof is waterproof. Use weather-resistant materials such as treated wood or plastic. Regularly check for leaks.
- Raised Flooring: Construct the hutch with a slightly sloped floor to allow rainwater to drain away. A raised floor also prevents dampness and mold.
- Bedding Choice: Select absorbent bedding that wicks away moisture. Straw, hay, or wood shavings work well.
4. Winter Preparations
During colder months, take extra precautions:
- Thick Bedding: Layer the hutch floor with thick bedding to provide insulation. Rabbits love to burrow, so give them plenty of cozy material.
- Snuggle Spots: Add hideaways or small boxes where your rabbit can snuggle for warmth.
5. Summer Cooling
In hot weather, help your rabbit stay cool:
- Frozen Water Bottles: Place frozen water bottles in the hutch. Rabbits can lean against them to cool down.
- Damp Towels: Hang damp towels near the hutch entrance. As the air passes through, it cools down.
Observing your rabbit's behavior is essential. If they seem uncomfortable, adjust the hutch accordingly. By considering climate factors, you'll build a safe and comfortable home for your furry friend.
Rain and Humidity: Keeping Your DIY Rabbit Hutch Dry and Comfortable
Learn how to keep your rabbit hutch dry and cozy with our tips on managing rain and humidity. Keep your furry friends happy and healthy.
1. Waterproofing the Roof
A dry hutch is essential for your rabbit's health. Rainwater can seep in and build damp conditions, leading to discomfort and potential health issues. Here's how to address rain and humidity concerns:
- Choose Weather-Resistant Materials: When building your rabbit hutch, select materials that are naturally resistant to water. Treated wood, plastic, or metal are good options. Ensure that the roof is well-constructed and doesn't allow water to penetrate.
- Regular Roof Inspections: Regularly inspect the hutch roof for any signs of wear, cracks, or leaks. Fix any issues promptly to prevent water from entering. Remember, prevention is key.
2. Raised Flooring for Drainage
A wet floor can be problematic for rabbits. It can lead to mold growth, discomfort, and even health problems. Follow these steps to maintain a dry floor:
- Sloped Flooring: Construct the hutch with a slightly sloped floor. This allows rainwater to drain away naturally. The slope should be gentle enough to prevent your rabbit from slipping.
- Elevated Hutch Design: Elevate the entire hutch slightly off the ground. This not only helps with drainage but also prevents direct contact with wet soil. Use sturdy legs or blocks to achieve the elevation.
3. Choosing the Right Bedding
Bedding plays a crucial role in keeping the hutch dry. Opt for absorbent materials that wick away moisture:
- Straw: Straw is a popular choice for rabbit bedding. It's absorbent and provides insulation. Change the straw regularly to maintain freshness.
- Hay: High-quality hay can also serve as bedding. It's comfortable for rabbits and helps absorb excess moisture.
- Wood Shavings: Use untreated wood shavings as an additional layer. They absorb well and build a cozy surface for your rabbit.
4. Preventing Mold and Mildew
Excess moisture can lead to mold and mildew growth, which is harmful to both rabbits and humans. Take these precautions:
- Regular Cleaning: Clean the hutch frequently to remove wet bedding and any accumulated debris. A clean hutch is less likely to harbor mold.
- Good Air Circulation: Proper ventilation prevents stagnant air and reduces humidity levels. Include vents or mesh panels to allow fresh air to circulate.
5. Rainy Weather Tips
During heavy rain or storms, take extra steps to protect your rabbit:
- Cover the Hutch: If possible, cover the hutch with a waterproof tarp or sheet. Ensure it's securely fastened to prevent wind from blowing it away.
- Indoor Shelter: If extreme weather persists, consider bringing your rabbit indoors temporarily. Provide a safe, dry space for them until the storm passes.
A dry and comfortable hutch contributes to your rabbit's overall well-being. Regular maintenance and thoughtful design will keep your furry friend happy and healthy.
FAQs About DIY Rabbit Hutches
Get answers to all your questions about DIY rabbit hutches in this comprehensive FAQ guide. Learn how to build and maintain your own rabbit habitat.
1. What Size Should My Rabbit Hutch Be?
- Answer: The ideal hutch size depends on the number of rabbits you plan to house. As a general guideline, allow at least 4 square feet of space per rabbit. For larger breeds, aim for more space. Additionally, consider height—rabbits love to hop and stand on their hind legs, so a taller hutch provides enrichment.
2. How Do I Keep the Hutch Clean?
- Answer: Regular cleaning is essential for your rabbit's health:
- Daily: Remove uneaten food, soiled bedding, and droppings.
- Weekly: Change the bedding entirely.
- Monthly: Scrub the hutch with mild soap and water.
3. Should I Insulate the Hutch?
- Answer: Yes, especially if you live in an area with extreme temperatures. Insulate the hutch with foam board or straw. Ensure proper ventilation to prevent condensation.
4. Can I Add a Run or Play Area?
- Answer: Absolutely! Rabbits need exercise. Attach a secure outdoor run to the hutch, or build a fenced playpen nearby. Make sure it's predator-proof.
5. How Do I Protect My Rabbits from Predators?
- Answer: Predators can include foxes, raccoons, and birds of prey. Take these precautions:
- Secure Latches: Use sturdy latches on doors and openings.
- Elevate the Hutch: Raise it off the ground to deter burrowing predators.
- Wire Mesh: Ensure the mesh is strong and covers all openings.
- Nighttime Safety: Bring your rabbits indoors at night or provide a secure enclosure.
A well-designed hutch ensures your rabbits' comfort and safety. Regular maintenance and attention to their needs will keep them hopping happily!
Conclusion
Building a rabbit hutch without plans was a rewarding challenge. It taught us a lot about carpentry, rabbit care, and the importance of a secure, comfortable environment for our pets. If you're considering building your own rabbit hutch, remember that planning, adaptation, and focusing on the needs of your rabbits are the keys to success. Our journey demonstrates that with some research, creativity, and hard work, you can build a safe haven for your rabbits that caters to their needs and protects them from harm.


