I remember the first time I noticed how ugly the radiator looked in my living room. It was big, bulky, and out of place. I wanted something to make it look better, so I decided to make my own DIY radiator cover. At first, I was nervous about doing it myself, but I found it easier than I thought. I'm sharing this to help you get started too!
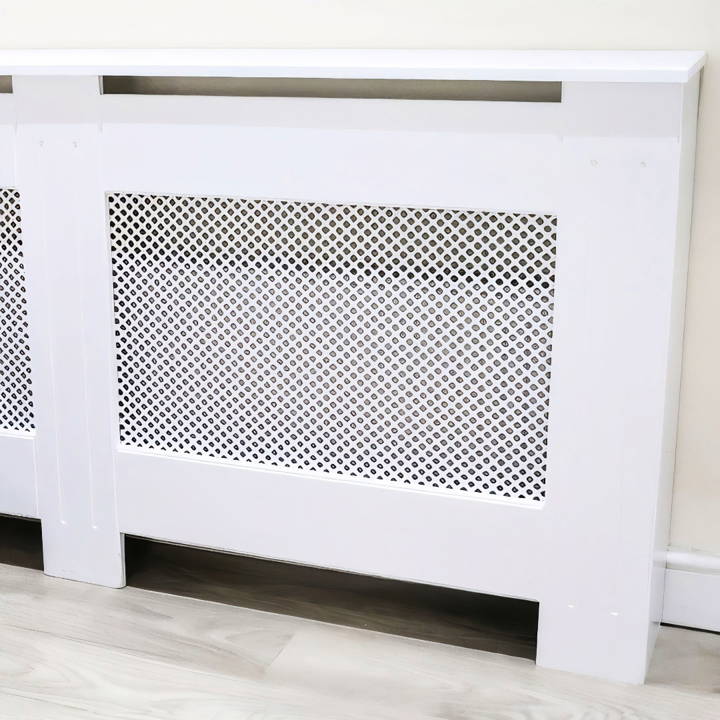
Building a DIY radiator cover has been one of my best projects. Some simple materials and basic tools transformed the look of my space. If you're thinking about doing the same, trust me, it's worth it!
Here's a step-by-step guide to help you make a radiator cover. Start today - I assure you, it's fun and rewarding!
What Is a Radiator Cover?
A radiator cover is essentially a shell that encases your radiator. Typically made from wood or metal, these covers come in various designs to match your home's decor. They can be bought ready-made or custom-built if you have a unique size or style in mind.
Why Use a Radiator Cover?
- Safety: Radiator covers protect children and pets from the hot surface of the radiator.
- Aesthetics: They can transform an old, unsightly radiator into a beautiful feature of your room.
- Functionality: The top shelf of a radiator cover provides additional space for decor items or plants.
- Efficiency: Well-designed covers can help direct heat flow into the room rather than up against the wall.
Choosing the Right Radiator Cover
When selecting a radiator cover, consider the following:
- Material: Choose materials that can withstand high temperatures and complement your interior.
- Ventilation: Ensure the cover has proper ventilation to allow heat to circulate.
- Size: Measure your radiator accurately to ensure a good fit, leaving room for heat expansion.
Installation Tips
Installing a radiator cover is usually straightforward:
- Measure: Accurately measure the height, width, and depth of your radiator.
- Assemble: Follow the manufacturer's instructions to assemble the cover.
- Position: Place the cover over the radiator, making sure it's stable and allows for proper airflow.
Adding a radiator cover boosts safety, aesthetics, and functionality. Choose a design that complements your space and doesn't hinder radiator performance.
Step by Step Instructions
Learn how to build a stylish and functional DIY radiator cover with our step-by-step instructions, from gathering materials to the final touches.
Gathering Materials: The Foundation of the Project
The journey began with a trip to the local hardware store to purchase 18mm thick MDF boards. I requested the store to cut them down to 85 centimeters wide to fit in my van—an essential step to ease the transportation hassle. The reason I opted for MDF was its affordability, workability, and smooth finish, making it ideal for painting later on.
Why MDF?
- Affordability: Cost-effective for a large project.
- Workability: Easy to cut and shape with the right tools.
- Smooth Finish: Ideal for painting and achieving a professional look.
Planning and Measuring: Envisioning the End Product
Back home, I laid out my tools and materials, ready to tackle the project head-on. Planning was crucial—I needed to ensure the cover would not only fit over my radiator but also accommodate airflow effectively. Research and advice from fellow DIY enthusiasts led me to design the cover 5 centimeters taller than the radiator for optimal efficiency and aesthetic balance.
Essential Measurements:
- Height: Radiator height + 5cm
- Ventilation: 100mm vent at the bottom and a 30mm vent at the top for proper airflow
Cutting and Assembling: Where Precision Meets Patience
Equipped with a circular saw and a newfound determination, I started cutting the MDF based on my measurements. I realized the importance of making a fence for my circular saw—it was a game-changer for making quick, precise cuts without constantly measuring.
Building the frame involved more than just cutting straight lines; I wanted to add decorative details to give the cover character. With a router and a bit of creativity, I added chamfered edges and rounded lines along the vertical strips. This not only enhanced the look but also allowed me to personalize my project.
Tools Making the Difference:
- Circular saw with a fence: For precise, straight cuts.
- Router: For decorative detailing on the frame.
Joining Pieces Together: The Biscuit Joiner Revelation
Facing the task of joining the pieces together, I discovered the magic of a biscuit joiner. It enabled me to seamlessly connect the MDF pieces with precision and solidity. The process, although intimidating at first, became enjoyable as I got the hang of it. Each piece of MDF snugly joined with another, thanks to the biscuit joiner, reaffirmed my decision to take on this project.
Why Biscuit Joiner?
- Precision: Ensures tight and accurate joins.
- Strength: Builds a strong bond between pieces.
- Simplicity: Easy to use once you understand the basics.
The Finishing Touches: Sealing and Painting
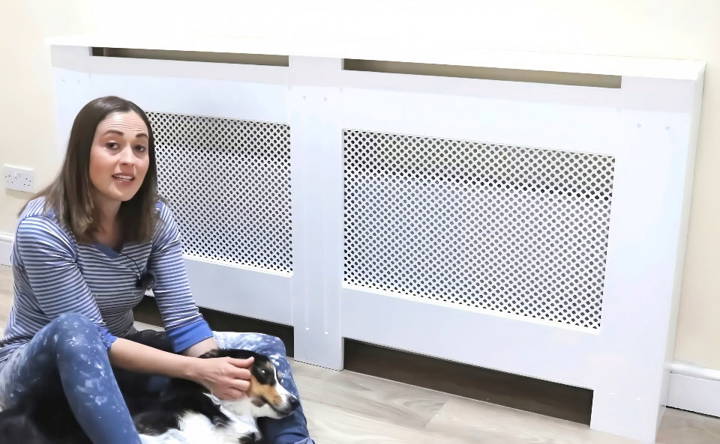
With the structure assembled, it was time to focus on aesthetics. Sealing the MDF was an essential step before painting to prevent moisture absorption and ensure a smooth finish. After some research and consideration, I opted for a quick-drying MDF sealer, followed by two coats of satin wood paint in pure brilliant white. The paint not only protected the cover but also enhanced its appearance, making it a statement piece in the room.
Final Steps:
- Sealing: To prevent moisture absorption and ensure paint adheres properly.
- Painting: Two coats of satin wood paint for a durable and glossy finish.
Customization Tips
When it comes to DIY radiator covers, customization is key to ensuring that the cover not only serves its purpose but also reflects your personal style. Here are some tips to help you customize your radiator cover in a way that's both practical and pleasing to the eye.
Choose Your Style
- Modern: Opt for clean lines and sleek materials like metal or glossy wood.
- Classic: Consider using wood with detailed moldings for a timeless look.
- Rustic: Reclaimed wood or distressed finishes can add a cozy, country charm.
Selecting the Right Color
- Neutral: Whites, grays, and beiges can blend seamlessly with most decor.
- Bold: A pop of color can turn your radiator cover into a statement piece.
- Match: Coordinate with your wall color for a cohesive look.
Functional Additions
- Shelving: Add shelves above or around the cover for extra storage space.
- Seating: If the radiator is under a window, consider a cover that doubles as a window seat.
Decorative Elements
- Grill Design: The front grill can be a decorative feature—choose from geometric patterns, floral designs, or something bespoke.
- Hardware: Add unique knobs or handles if your cover has doors or drawers.
Material Matters
- Durability: Ensure the materials used can withstand the heat and are easy to clean.
- Quality: Invest in good quality materials that will last and look better over time.
Measuring for Success
- Accuracy: Take precise measurements to ensure your cover fits perfectly.
- Allowance: Remember to leave space for heat circulation and expansion.
DIY Tips
- Preparation: Sand and prime your materials before painting or staining.
- Finishing Touches: Seal your cover with a heat-resistant clear coat for protection.
Craft a radiator cover that showcases your style. Choose wisely for looks and function. The best DIY projects make you proud to say, "I made that!"
Safety Considerations
When incorporating a radiator cover into your home, safety is paramount. A well-designed radiator cover can provide peace of mind, especially in households with young children or pets. Here are some key safety considerations to keep in mind:
Material Selection
Choose materials that are fire-resistant. Materials like MDF (Medium Density Fiberboard) are commonly used because they are durable and have a lower risk of catching fire.
Proper Installation
Radiator covers should be securely attached to the wall with fixings or brackets to prevent tipping. Ensure there's a sufficient gap between the radiator and the cover to allow for safe air and heat flow.
Ventilation
Good ventilation is crucial. Radiator covers are designed with slots or holes to allow heat to escape efficiently and prevent the radiator from overheating.
Avoid Makeshift Covers
It's advisable not to use makeshift covers unless you're certain of the materials and design. Purchasing a pre-built unit that meets safety standards is often the safer choice.
Size and Fit
Ensure the cover is the correct size for your radiator. There should be at least:
- 5cm in width
- 3cm in height
- 3cm in depth This allows for even heat distribution and reduces the risk of overheating.
Child and Pet Safety
Radiator covers can prevent accidental burns by covering the hot surfaces of radiators, making them safer for curious children and pets.
Follow these guidelines to safely enjoy a radiator cover. Always check the manufacturer's instructions for specific safety advice.
FAQs About DIY Radiator Cover
Faqs about DIY radiator cover: discover essential tips, materials needed, and step-by-step guides to build a stylish and functional radiator cover.
A DIY radiator cover is a custom-built case or shell that conceals a home’s radiator. It’s typically made from materials like wood or MDF and can be designed to match your home’s decor. The cover allows heat to circulate while hiding the radiator’s industrial look.
Building a radiator cover can enhance your room’s aesthetic, prevent accidental burns from hot radiators, and provide additional shelf space. It’s also a relatively simple and cost-effective home improvement project that can be completed with basic tools and materials.
To maintain safety and heating efficiency, ensure there’s sufficient clearance between the cover and the radiator for airflow. Use materials that can withstand high temperatures and consider a design that allows easy access to the radiator for maintenance.
Yes, building a radiator cover is a beginner-friendly project. There are many tutorials available that provide step-by-step instructions. Just make sure to measure your radiator accurately and follow safety guidelines when using tools.
Consider slatted fronts or decorative cutouts to allow heat to escape efficiently. If you're adding a shelf on top, ensure it's securely attached and doesn't obstruct the heat flow. Paint or finish the cover to complement your room's color scheme.
Conclusion: A Project of Pride
Ready to improve your space? This guide on how to make a radiator cover will help you every step of the way. Get your materials ready and start your DIY project now – you'll love the results!


