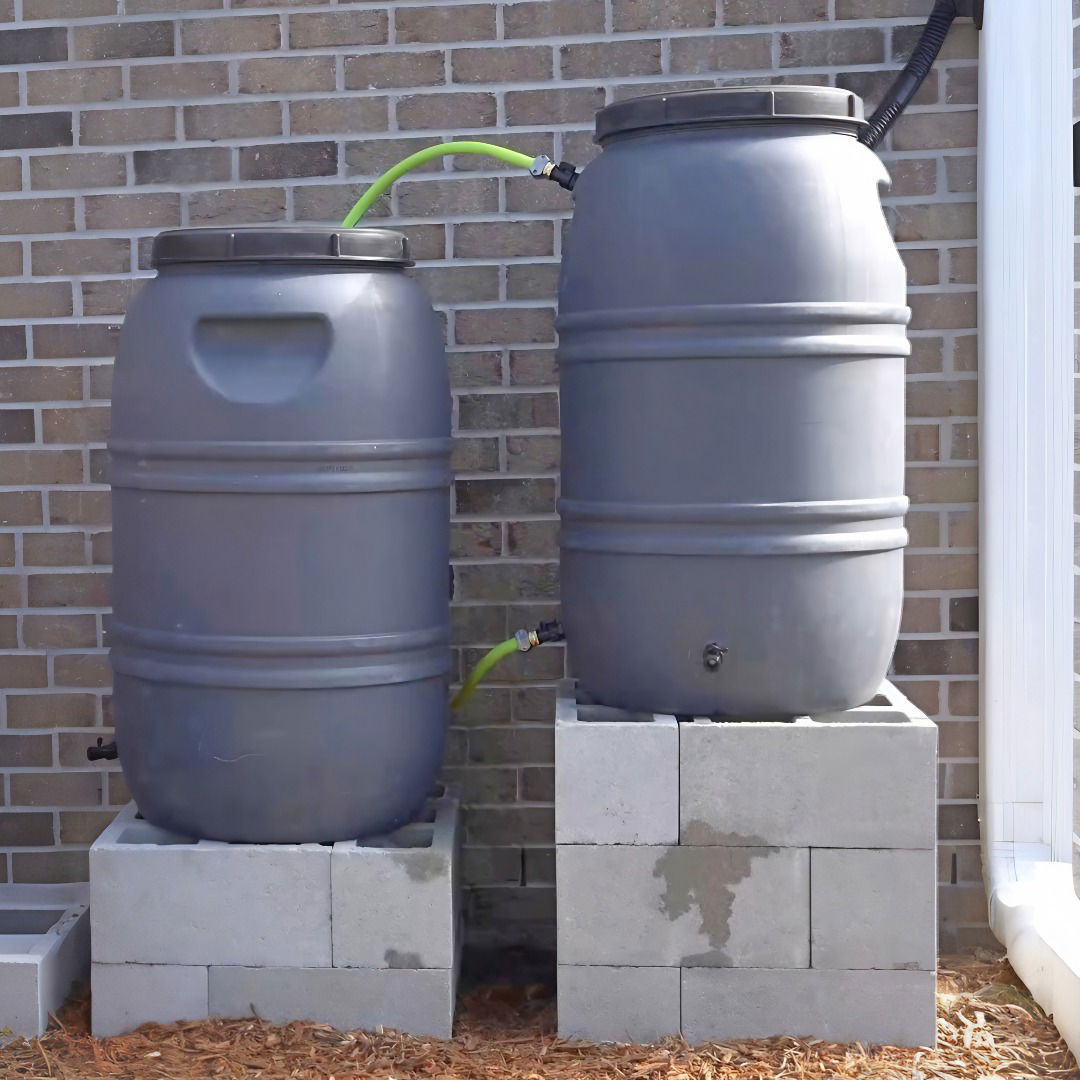
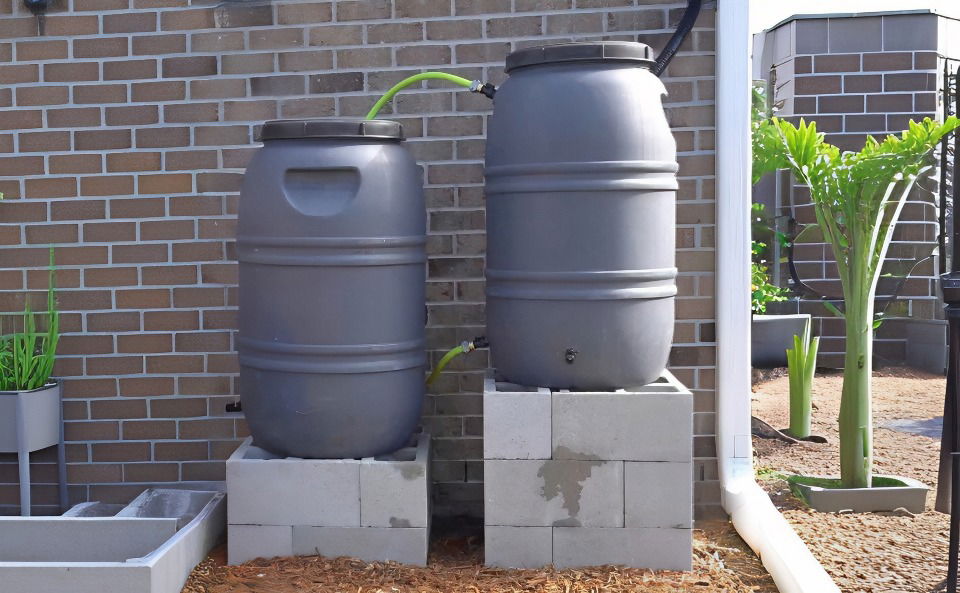
Living in a city with escalating water bills and a keen interest in sustainable gardening, I set out on a DIY adventure that not only fulfilled my green thumb aspirations but also promised a good slash on my household expenses. My project? Installing two 55-gallon rain barrels to capture nature's free resource – rainwater. Here's how I transformed my rainwater collection vision into a flourishing reality, a project that's not just about conservation but also about nurturing my garden with chemical-free water and the joy of mastering a DIY project.

Choosing the Right Rain Barrels
My journey began in the winter when rain barrels are surprisingly on clearance. I snagged two 55-gallon barrels at a fraction of their summer price. My rationale was threefold: saving on water bills, reducing chemical exposure to my garden, and setting up a drip irrigation system mixed with fertilizers, tailored to my garden's needs. Thus, with barrels in tow, I embarked on this enriching DIY project.
Materials You'll Need and Why
Before diving into the installation, let's talk materials, as each plays a pivotal role in constructing a durable and efficient rain barrel system:
- Rain Barrels (55-gallon): The core component of the project for water storage.
- Cinder Blocks and 2x4s: For making a sturdy, level base for the barrels to sit on. Stability is key to preventing any disastrous spills.
- Landscaping Fabric: Placed underneath the base, it prevents weed growth.
- Level: Essential for ensuring your base and, ultimately, your rain barrels are perfectly horizontal. A level base is crucial to avoid uneven pressure on the barrels.
- Drill and Hole Saw: For making openings in the barrels and gutter for the diverter.
- Rain Diverter Kit: It automates the collection process by redirecting rainwater from the downspout into the barrels, and back into the downspout when full.
- Connector Hose: For linking two barrels, allowing them to fill up sequentially.
- Shut Off Valves: To control the flow between connected barrels and when drawing water for garden use.
- Garden Hose, Adapters, and Teflon Tape: For a leak-proof connection from your barrel to the irrigation system or garden hose.
Step by Step Instructions
Learn how to make a DIY rain barrel with easy step-by-step instructions. From site preparation to rain barrel setup, get ready for eco-friendly rainwater collection!
Step 1: Preparing the Site and Base
Finding a spot next to a rain gutter and against a protective wall, I marked a 2x2 ft area for each barrel. Removing any vegetation and leveling the ground using a rake and a 2x4 as a makeshift screed, I buildd a snug bed for each barrel's base. Cinder blocks, arranged in a square, provided a stable and level platform. Ensuring the blocks were perfectly level was possibly the most meticulous part of the process.
Step 2: Setting Up the Rain Barrels
With the base in place, I positioned the barrels on top. My design included a slightly elevated primary barrel to utilize gravity for a more efficient flow into the secondary barrel. This elevation difference is crucial for passive pressure in a gravity-fed irrigation system.
Step 3: Installing the Diverter
This part required a bit of elbow grease. After marking the entry point on the barrel and the rain gutter, I drilled the necessary holes for the diverter. Installation was straightforward, following the product's manual. The clever design ensured overflow water would simply return to the gutter, preventing any potential foundation issues from excess water spillage.
Step 4: Connecting the Barrels
Using lead-free hoses, I connected the two barrels. Why lead-free? It's crucial for maintaining the water's purity, especially if you're using it for edibles in your garden. After cutting the hose to the desired length, installing shut-off valves allowed me to control the flow between barrels effortlessly.
Step 5: The First Rain Test
Nature didn't leave me hanging for long. A light shower soon after the installation nearly filled the first barrel, marking a successful maiden voyage for my DIY rain barrels. With a few tweaks – adjusting the hose lengths and securing the connections – my system was fully operational.
Rainwater Usage Ideas
Discover innovative rainwater usage ideas like watering plants, cleaning outdoors, pet care, bird baths, and emergency water supply. Save money and conserve resources!
1. Watering Plants and Gardens
Rainwater collected in your barrel is an excellent resource for keeping your plants and garden lush and healthy. Here's how to make the most of it:
- Direct Irrigation: Attach a soaker hose or drip irrigation system to your rain barrel's spigot. This allows you to water plants directly at the root zone, minimizing water wastage.
- Customize Flow: Adjust the flow rate using the spigot valve. Slow, steady watering prevents soil erosion and ensures efficient absorption by plants.
- Vegetable Gardens: Use rainwater for vegetable patches. It's free from chlorine and other chemicals found in tap water, making it ideal for edible crops.
2. Cleaning Outdoor Surfaces
Rainwater isn't just for plants; it's also handy for cleaning various outdoor surfaces:
- Car Wash: Fill a bucket with rainwater and use it to wash your car. It's eco-friendly and won't leave water spots.
- Outdoor Furniture: Spruce up your patio furniture by wiping it down with rainwater. It's gentle on surfaces and won't harm finishes.
3. Pet Care
Your furry friends can benefit from rainwater too:
- Pet Bowls: Fill your pet's water bowl with rainwater. It's fresh, chemical-free, and your pets will appreciate it.
4. Bird Baths and Wildlife Habitats
Build a welcoming oasis for birds and other wildlife:
- Bird Baths: Refill bird baths with rainwater. Birds love clean, natural water sources.
- Wildlife Ponds: If you have a small wildlife pond, top it up with rainwater. Frogs, insects, and other critters will thank you.
5. Emergency Water Supply
In case of water shortages or emergencies:
- Backup Supply: Keep a few gallons of rainwater stored for emergencies. It's essential for flushing toilets or basic hygiene during power outages or water disruptions.
Remember, rainwater is a precious resource, so use it wisely. Regularly maintain your rain barrel to ensure optimal functionality and cleanliness.

Emergency Water Supply
Ensure your emergency water supply with backup reserves for hygiene, first aid, and community support. Stay prepared for any disaster.
1. Backup Water Reserves
When unexpected water shortages occur, having an emergency water supply can be a lifesaver. Here's how to build and utilize backup water reserves:
- Rain Barrel Reserves: Your rain barrel serves as a reliable backup. Regularly check its water level and ensure it's well-maintained. In emergencies, you can use this stored rainwater for essential tasks.
- Storage Containers: Consider additional water storage containers. Large food-grade plastic containers or sturdy jerry cans work well. Place them in a cool, shaded area to prevent bacterial growth.
2. Hygiene and Basic Needs
During power outages or disruptions in water supply, prioritize basic hygiene and essential needs:
- Toilet Flushing: Use rainwater to flush toilets. Pour a bucket of rainwater into the toilet bowl to maintain sanitation.
- Handwashing: Keep a small container of rainwater near sinks for handwashing. Add a few drops of mild soap for effective cleaning.
- Cooking and Drinking: While rainwater isn't typically recommended for drinking without proper filtration, it can be boiled and used for cooking (e.g., boiling pasta, making soup).
3. First Aid and Medical Needs
In emergencies, access to clean water is crucial for medical purposes:
- Wound Cleaning: Use rainwater to clean minor wounds or cuts. It's free from chlorine and chemicals found in tap water.
- Medication: Dilute medications with rainwater if needed. Consult a healthcare professional for specific instructions.
4. Community Support
Consider your neighbors and community:
- Sharing Resources: If you have surplus rainwater, offer it to neighbors who may be in need. Community support during emergencies is essential.
- Community Rain Barrels: Encourage community rain barrel initiatives. Collective efforts can provide a more substantial emergency water supply.
Remember to rotate your emergency water supply periodically to keep it fresh. Label containers with dates to track usage and refilling. Having a backup water plan ensures peace of mind during unforeseen situations.
FAQs About DIY Rain Barrel
Learn all you need to know about DIY rain barrels in this comprehensive FAQ guide. Discover tips, benefits, setup process, and maintenance.
1. What is a rain barrel, and why should I consider using one?
A rain barrel is a container that collects and stores rainwater from your roof. Here's why you might want to use one:
- Water Conservation: Rain barrels help you save water by capturing runoff that would otherwise flow into storm drains.
- Garden Irrigation: Use the collected rainwater to water your plants, garden, or lawn.
- Cost Savings: Reduce your water bill by using free rainwater instead of tap water.
2. How do I set up a rain barrel?
Follow these steps to set up your rain barrel:
- Choose a Location: Place the barrel under a downspout near your garden or plants.
- Install a Diverter: Attach a diverter kit to redirect water from the downspout into the barrel.
- Secure the Lid: Ensure the lid is tightly sealed to prevent debris and mosquitoes from getting in.
- Raise the Barrel: Elevate the barrel on cinder blocks or a sturdy platform for easy access to the spigot.
3. How do I maintain my rain barrel?
Regular maintenance ensures optimal performance:
- Clean the Screen: Remove leaves and debris from the screen or mesh.
- Check for Leaks: Inspect the barrel for cracks or leaks.
- Empty in Winter: Empty the barrel before freezing temperatures to prevent damage.
4. Can I use rain barrel water for drinking or cooking?
No, rain barrel water is not safe for consumption. It may contain contaminants from the roof or air. Reserve it for non-potable uses like gardening.
5. Are there any legal restrictions on rain barrels?
Check local regulations before installing a rain barrel. Some areas have restrictions due to water rights or health concerns. Always follow guidelines to avoid legal issues.
Final Thoughts
The project took a weekend to complete, with a palpable sense of accomplishment. Not only does my garden thrive on rainwater, but I've also significantly cut down on my water bill.
In this guide, I've walked you through every step I took, mistakes I learned from, and tips I wished I'd known beforehand. If you're looking to embark on your rain barrel project, remember, patience and precision are your best tools. This initiative is more than just a weekend project; it's a step toward sustainable living and responsible gardening.
For anyone looking forward to embarking on this rewarding journey, remember, the fruits of your labor will go far beyond just savings. You're investing in the health of your garden and contributing to a more sustainable future.


