Diving into the art of making polished stones at home with a DIY rock tumbler is a rewarding endeavor. If you're captivated by the idea of transforming rough rocks into gleaming treasures, learning how to make a rock polisher is your first step. This guide provides a thorough introduction to rock tumbling, covering everything from the history to popular reasons people engage in this fascinating hobby. With step-by-step instructions and essential safety tips, you're well on your way to mastering the process.
Understanding the different types of rock tumblers, such as rotary and vibratory, and the importance of selecting the right rocks for tumbling is crucial. Whether it's grasping rock hardness or knowing the best places to find rocks, this guide has you covered. Learn how to gather the necessary materials, build your canister, and ensure a smooth tumbling process with our practical advice.
Ready to embark on this exciting journey? The next section has all the details to help you start your rock-tumbling adventure with confidence.
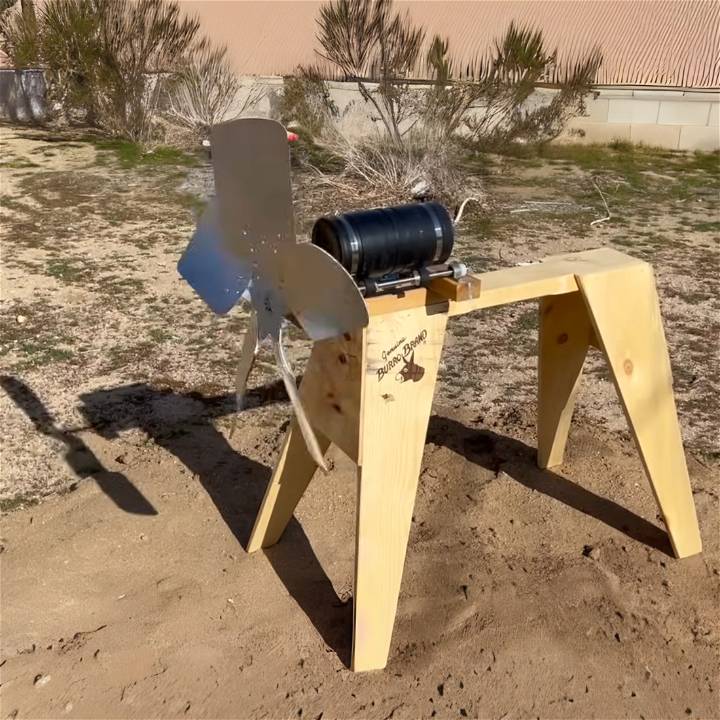
Introduction to Rock Tumbling
Rock tumbling, also known as rock polishing, is a fascinating hobby that allows you to transform ordinary rocks into shiny, beautiful gems. This process mimics the natural weathering process, but instead of taking thousands of years, you can achieve results in just a few weeks!
What is Rock Tumbling?
Rock tumbling is the process of smoothing and polishing rocks to reveal their hidden beauty. A rock tumbler is a machine that tumbles rocks until their rough edges and surfaces are smoothed and their natural colors are brought out.
The History of Rock Tumbling
The art of rock tumbling has been around for a long time. The first patent for a rock tumbler was issued in 1844 to a man named Henry D. Perky. However, rock tumbling likely dates back even further, to ancient civilizations who would polish stones by hand.
Why is Rock Tumbling Popular?
Rock tumbling is a popular hobby for several reasons:
- Educational: It's a great way to learn about geology and the natural world.
- Relaxing: Many people find the process of tumbling rocks to be a calming, therapeutic activity.
- Rewarding: There's a sense of accomplishment in transforming a rough rock into a beautiful gem.
- Creative: The finished stones can be used in a variety of crafts and jewelry making.
The key to a successful rock tumbling experience is patience and attention to detail. Happy tumbling!
Types of Rock Tumblers
When it comes to rock tumbling, there are two main types of tumblers: rotary tumblers And vibratory tumblers. Each has its own advantages and disadvantages, and the best choice depends on your specific needs and circumstances.
Rotary Tumblers
Rotary tumblers are the most common type of rock tumbler. They work by rotating a barrel containing the rocks, water, and abrasive grit. The constant rotation causes the rocks to grind against each other and the grit, smoothing and polishing the rocks over time.
Advantages:
- Versatility: Rotary tumblers can polish both hard and soft rocks.
- Ease of use: They are simple to operate, making them a good choice for beginners.
Disadvantages:
- Time-consuming: The tumbling process can take several weeks.
- Noise: They can be quite noisy due to the constant rotation.
Vibratory Tumblers
Vibratory tumblers work by vibrating the rocks in a bowl filled with grit and water. This rapid vibration causes the rocks to rub against each other and the grit, which polishes the rocks.
Advantages:
- Speed: Vibratory tumblers can polish rocks much faster than rotary tumblers.
- Better for harder rocks: They are particularly good at polishing harder rocks and metals.
Disadvantages:
- Cost: Vibratory tumblers are generally more expensive than rotary tumblers.
- Not suitable for all rocks: They are not recommended for softer rocks as the rapid vibration can damage them.
The best type of rock tumbler for you depends on your specific needs, budget, and the type of rocks you want to polish.
Choosing Your Rocks for Tumbling
Selecting the right rocks for tumbling is crucial to achieving beautiful results. Here's a guide to help you make the best choices.
Understanding Rock Hardness
The hardness of a rock is a measure of its resistance to being scratched. In rock tumbling, we use the Mohs Hardness Scale, which ranks rocks from 1 (softest) to 10 (hardest). For best results, try to tumble rocks of similar hardness in the same batch.
Tip: Quartz, with a Mohs hardness of 7, is a good standard for rock tumbling. It's readily available and produces beautiful tumbled stones.
Considering Rock Size and Shape
The size and shape of the rocks you choose can also impact the tumbling process.
- Size: Aim for rocks that are between 1/8 and 1 inch in diameter. Smaller rocks may be ground away, while larger rocks may not tumble well.
- Shape: Look for rocks with a somewhat rounded shape. Extremely angular rocks can have sharp edges that grind away other rocks.
Where to Find Rocks
You can find suitable rocks for tumbling in many places:
- Nature: Look for rocks in fields, along riverbeds, or at the beach. Always make sure you have permission to collect rocks if you're on private property.
- Rock Shops: These stores sell a variety of rocks suitable for tumbling.
- Online: There are many online retailers that sell rough rocks for tumbling.
The joy of rock tumbling comes from the process as much as the result. So take your time, enjoy the hunt for rocks, and happy tumbling!
Gathering Materials
Start by sourcing the main components for your DIY rock tumbler:
- A large piece of black plastic pipe for the tumbling canister.
- Rubber end caps that fit snugly on the ends of the pipe to make a water-tight seal.
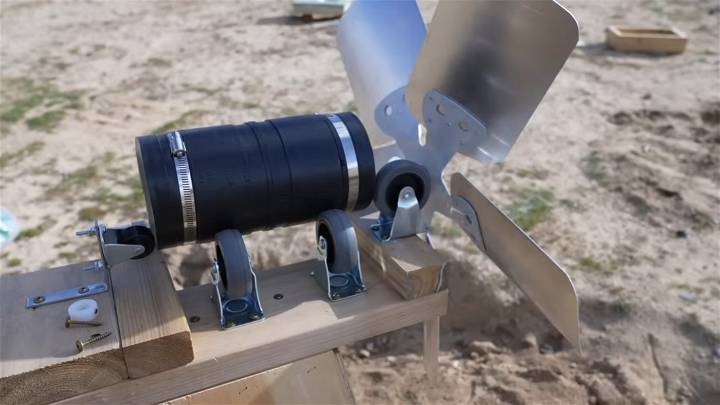
- A half-inch diameter stainless steel shaft to support and rotate the canister.
- Ball bearing mounts and a couple of drive wheels to transfer wind power to the canister.
- Rubber connecting joints to adjust the canister diameter for proper contact with the drive wheels.
- Scrap lumber, screws, Allen wrench, cheap plastic wheels, and L-brackets for the structure.
- A fan propeller to harness wind power (can be sourced from used electric fans).
- Glass pieces, water, and abrasive grit for tumbling.
Step by Step Instructions
Learn how to make a DIY rock tumbler to polish stones at home below:
Building the Canister
- Customizing the Pipe: Cut the plastic pipe to your desired length depending on the amount of material you wish to tumble.
- Sealing the Ends: Attach rubber end caps to both ends of the pipe, ensuring a water-tight seal to prevent leaks during tumbling.
Assembling the Drive Mechanism
- Mounting the Shaft: Securely attach the stainless steel shaft to your base using ball bearing mounts.
- Attaching Drive Wheels: Attach the drive wheels to the shaft, ensuring they are positioned to make contact with the canister once mounted.
- Adapting the Canister: If needed, use rubber connecting joints to adjust the canister's diameter for adequate contact with the drive wheels.
- Final Adjustments: Place the canister on the drive wheels, making any necessary adjustments to ensure a snug fit.
Harnessing Wind Power
- Attaching the Propeller: Secure the fan propeller to one end of the shaft. Make sure it's positioned to catch the wind effectively.
- Positioning for Wind: Place your setup in a location where it can receive ample wind throughout the day for consistent tumbling.
Operational Tips
- Preventing Slippage: To keep the canister from sliding off the drive wheels, consider using wheel guides or brackets as necessary.
- Checking the Seal: Periodically check the end caps for any leaks to ensure the contents remain secure.
- Load the Canister: Fill your canister with broken glass (or rocks), add water and abrasive grit, and seal the ends.
Troubleshooting for DIY Rock Tumbler
- Inconsistent Motion: If the tumbler stops frequently or the canister shifts, check the alignment and tension of the drive mechanism.
- Sludge Accumulation: Over time, a mix of ground glass and grit may build up. Regularly cleaning the canister can prevent this issue.
Video Tutorial
For a step-by-step video tutorial on building a wind-powered rock tumbler, watch this informational video here.
It pairs well with this written guide, offering a visual representation of the process in an accessible format, ensuring that the details are easy to follow and understand.
This project shows a creative way to recycle glass and use wind energy. Remember safety and environmental care in DIY.
Safety Tips for Rock Tumbling
Rock tumbling is a fun and rewarding hobby, but like any activity, it's important to keep safety in mind. Here are some safety tips to ensure a safe and enjoyable rock-tumbling experience.
Protect Your Eyes
When handling rocks and grit, always wear safety glasses. Small particles can easily get into your eyes, causing irritation or injury.
Mind the Noise
Rock tumblers, especially rotary tumblers, can be quite noisy. Consider using ear protection if you're running your tumbler for long periods, or place your tumbler in a location where the noise won't be disruptive.
Handle Rocks and Grit Carefully
Rocks can have sharp edges, and grit can be abrasive. Always handle them carefully to avoid cuts and scratches. When changing the grit, be careful not to inhale the dust.
Keep Your Work Area Clean
Keep your tumbling area clean and organized. Spilled grit can make surfaces slippery. After each tumbling cycle, clean your tumbler thoroughly to prevent contamination between grit stages.
Store Rocks and Supplies Safely
Store your rocks, grit, and other supplies in a safe place, out of reach of small children and pets.
By following these tips, you can enjoy the process of rock tumbling while keeping yourself and others safe.

Troubleshooting Common Issues in Rock Tumbling
Even with the best preparation, you may encounter some issues during the rock-tumbling process. Here are some common problems and their solutions.
Rocks are Not Shining
If your rocks are not getting the shine you expect, it could be due to a few reasons:
- Insufficient tumbling time: Each stage of the tumbling process takes time. Make sure you're not rushing the process.
- Mixing hardness: Try to tumble rocks of similar hardness together. A harder rock can scratch a softer one, preventing it from shining.
- Contaminated grit: Always clean your tumbler thoroughly between stages to avoid contamination.
Tumbler is Leaking
If your tumbler is leaking, it could be due to overfilling or a problem with the seals. Check the manufacturer's instructions for the correct fill level and ensure the seals are in good condition.
Noise Level is Too High
DIY Rock tumblers can be noisy. If the noise level is too high, consider:
- Location: Place your tumbler in a location where the noise won't be disruptive.
- Padding: Adding some padding under the tumbler can help reduce noise.
Rocks are Breaking
If your rocks are breaking:
- Check hardness: Softer rocks can break during the tumbling process. Try to select rocks of similar hardness.
- Check size and shape: Very thin or angular rocks are more likely to break.
Patience and attention to detail are key in rock tumbling. Don't be discouraged by these issues - they're part of the learning process.
Frequently Asked Questions About DIY Rock Tumbler
Here are some of the most frequently asked questions about rock tumbling:
What is Rock Tumbling?
Rock tumbling is the process of smoothing and polishing rocks to reveal their hidden beauty.
What are the Three Types of Rock?
The three types of rocks are igneous, sedimentary, and metamorphic.
How Do I Begin Rock Collecting?
You can start rock collecting by exploring your local area, studying geology, and learning to identify different types of rocks.
What are the Geology Tools and Supplies I Might Need?
Basic geology tools include a rock hammer, a field bag, a hand lens, and a set of reference materials.
Where Can I Start Rock Collecting?
You can start rock collecting in your own backyard, local parks, or nearby nature trails.
How Do I Know Which Rocks Will be Best for Tumbling?
The best rocks for tumbling are usually hard, non-porous, and free of cracks.
What is a Tumbler and What Do I Need?
A tumbler is a machine that polishes rocks by tumbling them with abrasive grit. You'll need a tumbler, rocks, tumbling grit, and water.
What are the Five Steps to Tumbling Rocks?
The five steps to tumbling rocks are rough grind, medium grind, fine grind, pre-polish, and polish.
Do you leave the rock tumbler on all day?
Yes, it's recommended to leave your rock tumbler on during the day and night to ensure the best results.
Can I speed up the rock-tumbling process?
While some factors can slightly speed up the process, rock tumbling generally takes time and patience.
Conclusion:
In conclusion, making your own homemade DIY rock tumbler opens up a world of possibilities for rock polishing enthusiasts. With the insights and guidance provided, from choosing the right rocks and gathering essential materials to following detailed step-by-step instructions, this guide offers everything you need to embark on your rock tumbling journey.
Safety tips and solutions for troubleshooting common issues ensure a smooth and enjoyable experience. Engage with the timeless hobby of rock tumbling today and transform rough rocks into stunning, polished gems with your very own rock polisher.


