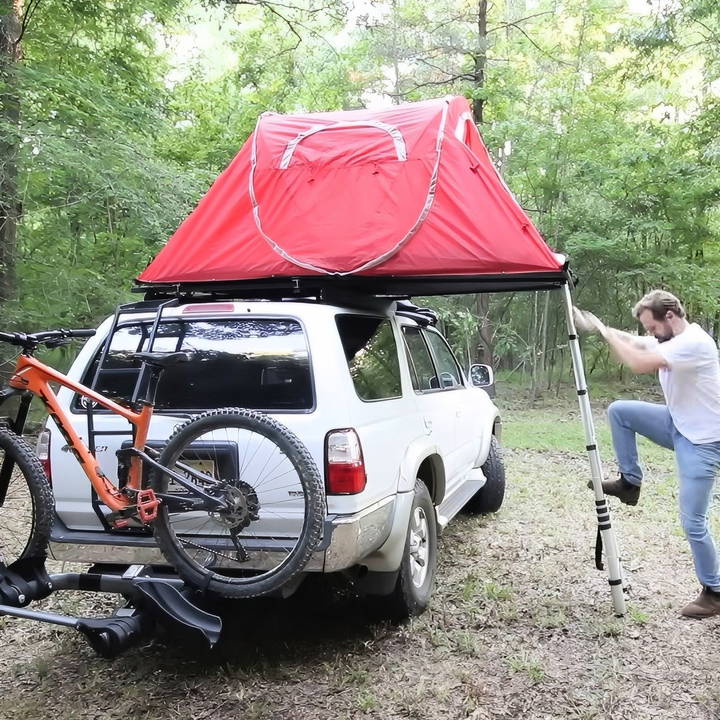
If you're an outdoor enthusiast or a frequent camper, you know how valuable it is to have a rooftop tent. It provides comfort and safety, allowing you to camp anywhere while being elevated from the ground. However, rooftop tents can be expensive, often costing thousands of dollars. Imagine building your own rooftop tent for just a few hundred dollars! In this guide, I'll show you how to build a budget-friendly DIY rooftop tent, with no sewing skills required. Plus, you'll be able to find all the materials you need at your local hardware store!
Why Build Your Own Rooftop Tent?
Building a rooftop tent from scratch is not only a cost-effective solution but also allows you to customize it according to your needs. If you're looking for a DIY project that won't break the bank, this is for you. With a little time and effort, you can build a functional, lightweight, and durable tent to mount on your vehicle's roof rack. Let's break down how you can get started.
Tools and Materials You'll Need
One of the first steps in building your DIY rooftop tent is gathering the right materials. Here's a list of everything you will need:
- 3-foot piece of 3/16-inch flat bar ($9)
- 6-foot piece of 3/4-inch angle iron ($15)
- Superstrut ($20)
- 9 bolts (2.5 inches long) – five-sixteenths, 18 count, 2.5 inches long
- Smaller screws – number 10, 3/4 inch
- Tent – A pop-up tent (around $35)
- Ladder – 10-foot ladder (roughly $60 to $80)
- Plywood – Two pieces of plywood for the base (sizes detailed below)
Additional Supplies:
- Sealer for untreated wood
- Waterproof cover (to keep your tent safe during travel)
- A few miscellaneous hardware items like knobs, eye bolts, and wire for adjustments.
While you can purchase most of these items from a local hardware store, it's important to get an affordable pop-up tent. The tent in this guide was initially purchased from Target for $35. Although that specific model has been discontinued, you can still find similar tents online or in stores for a similar price.
Choosing the Right Tent
The tent you choose for this build is crucial. The goal is to find one that meets several criteria:
- Affordability: You should be able to find a tent for $50 or less.
- Perfect Size Fit: A tent that can comfortably fit on a piece of plywood cut to 52x44 inches or similar dimensions.
- Zippered Door on the End: This design is essential since your ladder will support the overhang of the tent. You need an end-opening tent to allow easy access.
However, one downside is that most pop-up tents in this price range are only water-resistant, not waterproof. It's important to plan for rainy weather by building a rain fly or avoiding wet conditions.
Step by Step Instructions
Learn how to make a DIY rooftop tent with step-by-step instructions, from building the base to waterproofing and taking it on the road.
Step 1: Building the Base
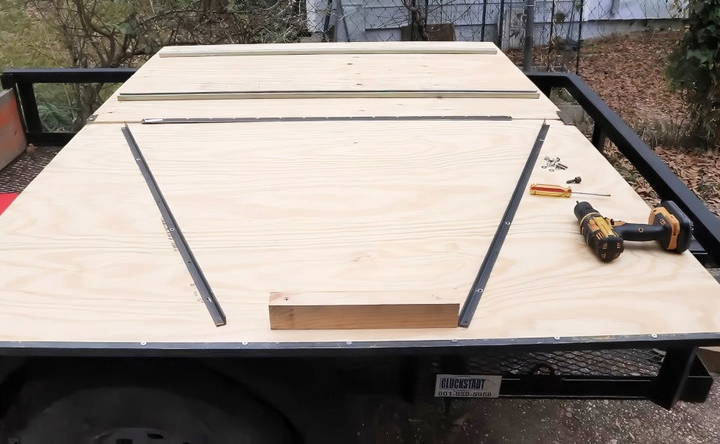
The base of your rooftop tent will consist of two pieces of plywood. You'll want to cut these pieces down to around 52x44 inches. This ensures you maximize your tent's floor space while maintaining a manageable size for mounting onto your vehicle's roof rack.
Next, you'll want to seal the plywood. Since most plywood available at hardware stores is untreated, using a sealer will help protect the wood from moisture and extend its life. Once sealed, the plywood will serve as a solid and stable platform for your tent.
Step 2: Fabricating the Hinges
One of the trickier parts of this build is constructing the hinges that will allow your rooftop tent to fold open and closed. Here's a step-by-step overview of how to build durable metal hinges from scratch.
Materials for the Hinges:
- Square tubing (3 inches)
- Metal flat bar (1 inch wide)
Instructions:
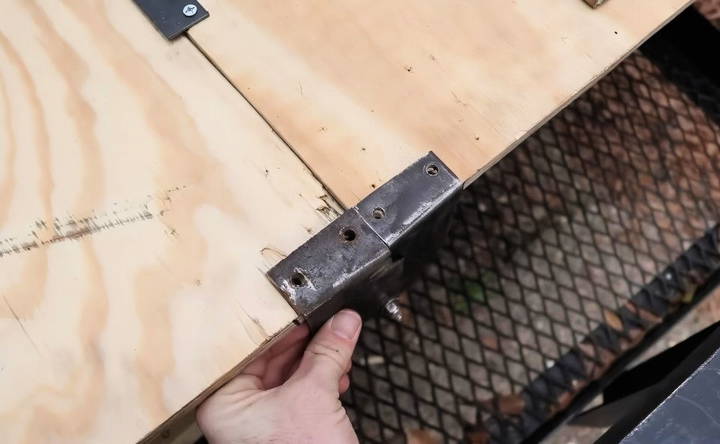
- Designing the Hinge: You want to design a hinge that will pivot but also securely hold the tent's structure when opened. The hinge should be approximately 4.5 inches tall and 3 inches wide. Ensure there is an 8.5-inch gap to store your tent and any bedding inside when it's folded.
- Cutting the Metal: Cut your square tubing into the desired size for the hinge. Be sure to leave about an extra inch at the bottom to bend upward into a flange, allowing the hinge to pivot.
- Drilling Holes: Drill a hole in the hinge for the bolt, which will serve as the pivot point. Make sure to measure accurately so the hinge components fit snugly.
- Mounting the Hinges: Once your hinges are constructed, you'll mount them onto the plywood base. You'll also need to reinforce this connection using some additional angle iron to support the weight when the tent is opened.
Step 3: Mounting the Tent to the Roof Rack
Once your base and hinges are ready, the next step is to figure out how to mount the tent to your vehicle's roof rack.
How to Build the Mounting System:
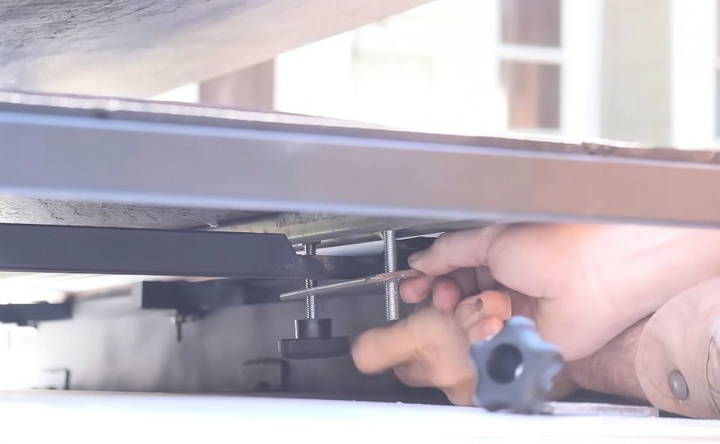
- Cutting the Superstrut: Start by cutting the superstrut down to size. This piece will be used to attach the base of the tent to your roof rack securely.
- Building Attachment Brackets: Use flat bars to build brackets that will hold the superstrut in place. These flat bar pieces should be around 5 inches long and drilled with holes to match your bolts.
- Installing the Bolts: Once the brackets are ready, use 5/16-inch bolts to secure the flat bars to the superstrut, which will ultimately mount onto your roof rack.
- Securing with Knobs: Lastly, tighten everything down using knobs that can be easily loosened when you want to remove the tent. This allows you to remove or adjust the tent as needed without using tools every time.
Step 4: Preparing the Tent for Mounting
At this point, you've got the base and the mounting system prepared. Now it's time to modify the tent so that it can be securely attached to your new base.
- Removing the Tent Floor: If your tent has a tarp floor, you will need to cut it out. This is because the tent needs to be mounted directly onto the plywood base, and leaving the tarp floor would interfere with the secure attachment. Cut it out carefully so that it fits the base without hanging over the edges.
- Cutting Fiberglass Rods: If your tent comes with fiberglass rods to give it structure, you'll likely need to remove or cut them down to fit the new shape. In this guide, it's recommended to replace the rods with half-inch conduit hoops to give the tent structure once it's mounted on the vehicle.
Making Conduit Hoops:
- Purchase half-inch conduit from a hardware store. For this build, you'll need to bend the conduit into a shape that fits the dimensions of your tent.
- Use a simple bending technique by placing the conduit in a pre-drilled hole in a piece of wood and applying leverage to shape the bend. Make sure to work slowly to avoid kinks.
- Flatten the ends of the conduit so that you can drill through them and attach them to the tent base.
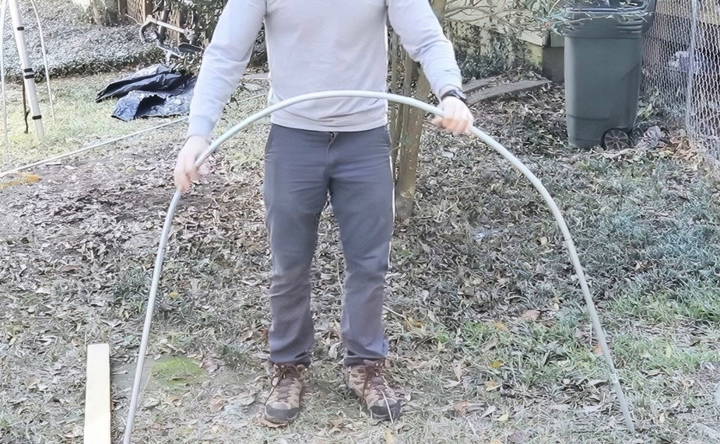
Once your hoops are ready, you'll install them inside the tent to support the structure, making the tent easier to open and close when mounted.
Step 5: Attaching the Ladder to the Overhang
The ladder is an essential part of your rooftop tent build, as it serves two primary purposes: providing access to the tent and supporting the overhang of the tent platform. Here's how you can attach the ladder securely to your build.
Materials for Ladder Attachment:
- Stainless steel hinges with removable pins
- Spacers
- Bolts and screws
Instructions:
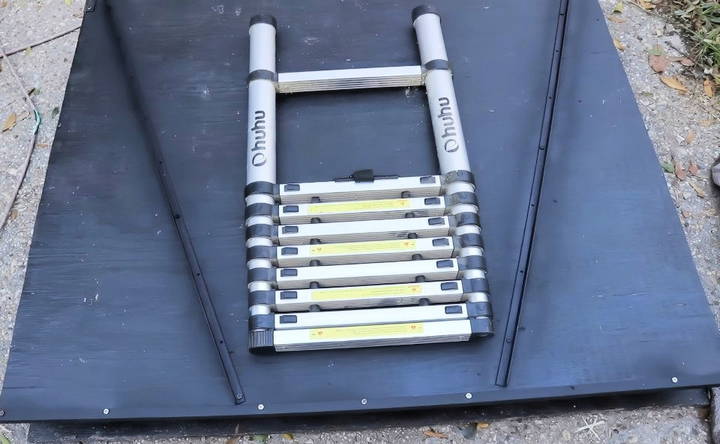
- Mounting the Ladder Hinges: To attach the ladder, use stainless steel hinges that allow the ladder to pivot and fold neatly when the tent is closed. The hinges should have removable pins so that you can detach the ladder when needed. For example, if you're not using the rooftop tent or need to take the ladder off temporarily, you can simply remove the pins to dismount the ladder.
- Adding Spacers: One small but important detail is that the ladder will need to kick out at a slight angle when deployed. To achieve this, you'll need to install spacers beneath the hinges to ensure the ladder doesn't mount flat to the platform. This also helps the ladder better support the weight of the overhanging platform when in use.
- Positioning the Ladder: Once the spacers and hinges are in place, make sure the ladder is mounted at the proper angle to support the weight of the overhang. This step is crucial to ensuring that the ladder not only helps with access but also stabilizes the platform for a safer camping experience.
Step 6: Installing Structural Support for the Overhang
The overhang portion of your rooftop tent can add stress to the tent's structure, especially since it's not supported by the vehicle's roof rack. This is where the ladder plays a key role, but you'll also want to reinforce the overhang itself to prevent sagging or bending over time.
- Adding Angle Iron Support: To help support the overhanging section of the tent, you can install pieces of angle iron underneath the plywood platform. Angle iron is strong, lightweight, and will significantly improve the rigidity of the overhang. Position the angle iron diagonally across the overhang to distribute the weight evenly.
- Temporary Ladder Brackets: As you're testing out the build, you might want to use temporary brackets to hold the ladder in place while you finalize the design. However, these temporary supports should eventually be replaced with permanent fixtures that securely attach the ladder to the base and overhang.
- Testing the Structure: Before you take the tent out for an overnight camping trip, make sure to test the structure by opening and closing the tent several times, paying close attention to how the overhang behaves. If it seems unstable or sags too much, consider adding additional support brackets.
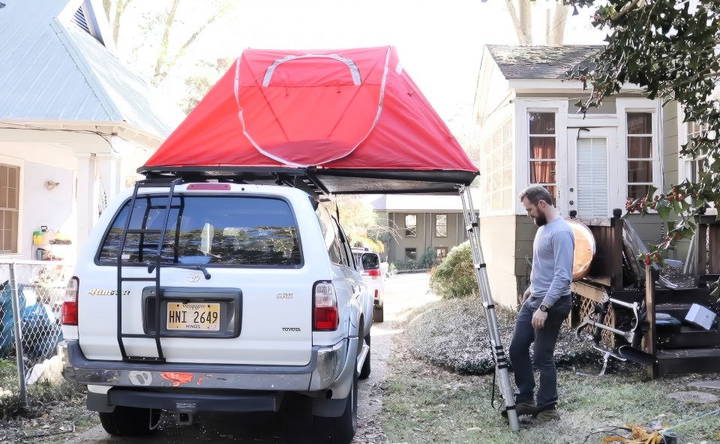
Step 7: Final Adjustments for the Tent's Frame
After constructing the base, installing the ladder, and reinforcing the overhang, it's time to make the final adjustments to the tent's frame. This includes ensuring that the conduit hoops are in place, the tent is properly attached, and the tent deploys easily when opened.
- Cutting the Conduit Hoops to Size: As mentioned earlier, you'll need to bend and shape conduit hoops to give your tent the proper structure. These hoops allow the tent to open smoothly and keep its shape when deployed. If the hoops are too long, trim them down so that they don't extend beyond the edge of the platform. The goal is for the tent to fold neatly without any overhang.
- Attaching the Tent to the Base: Secure the tent to the plywood base using screws or bolts along the edges. Be careful not to damage the fabric of the tent when attaching it. It's important to build a snug fit between the tent and the base to prevent water or debris from getting under the tent when it's in use.
- Connecting the Hoops with Cables: To ensure that the hoops stay in the correct position, use eye bolts and steel cables to tie the hoops together. This will help keep the tent structure stable and prevent the hoops from shifting when the tent is deployed. Drill holes through the ends of the conduit and use ferrule stops to secure the cables in place. The cables should be taut enough to keep the tent's shape, but not so tight that they put undue stress on the frame.
Testing the Tent's Deployment
Once everything is in place, it's time for the moment of truth: deploying the tent. Open the tent fully and make sure that the hinges and the ladder work as expected. The hoops and cables should keep the tent structure intact, and the ladder should support the overhang without any wobbling.
If you notice any issues, such as the tent not opening smoothly or the ladder feeling unstable, make adjustments before taking the tent on the road. Common fixes might include tightening the bolts on the hinges, adding extra support to the overhang, or adjusting the position of the hoops.
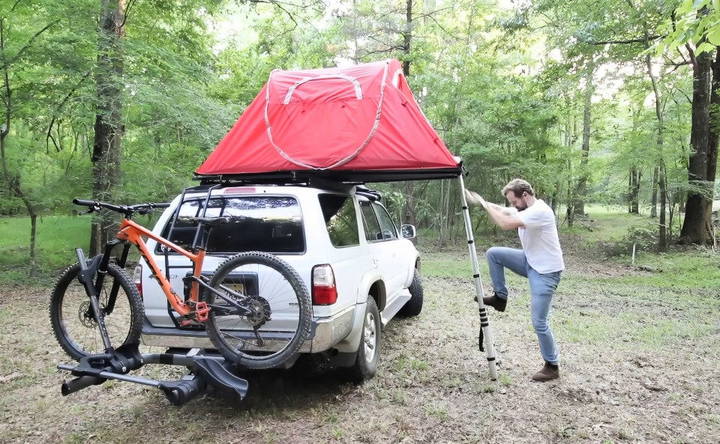
Step 8: Waterproofing and Finishing Touches
At this point, your DIY rooftop tent is almost ready to use! However, there are a few final steps you'll want to take to ensure your tent is fully functional and can withstand the elements.
Waterproofing the Tent
Most budget tents, like the one used in this build, are only water-resistant, not waterproof. To make sure you stay dry during unexpected rain showers, you'll need to waterproof the tent and the base.
- Waterproofing the Plywood: Since your plywood base is untreated, you should apply a waterproof sealer to prevent moisture from seeping into the wood. This will not only prolong the life of the tent but also prevent mold and mildew from forming. Use a brush or roller to apply the sealer evenly over the entire surface, including the edges.
- Building a Rain Fly: Since the tent used in this build doesn't come with a rain fly, you can build one using waterproof fabric or tarp material. The rain fly should be large enough to cover the entire tent and extend slightly beyond the edges to prevent water from getting inside. Attach the rain fly to the tent using Velcro straps or clips for easy removal when not needed.
- Sealing the Tent Seams: Another way to waterproof your tent is to seal the seams with seam sealer. Apply the sealer along all the seams of the tent, especially around the zipper and corners where water is most likely to leak through.
Adding a Cover for Travel
When the tent is closed and mounted on your vehicle, you'll need a way to protect it from rain, dirt, and road debris while traveling. The easiest solution is to build a cover that fits over the folded tent. You can use a waterproof tarp or heavy-duty fabric for this.
- Cutting the Cover to Size: Measure the dimensions of your folded tent and cut the fabric accordingly, leaving enough room for the cover to be easily slipped on and off.
- Attaching the Cover: You can attach the cover using bungee cords, Velcro straps, or even heavy-duty zippers. Make sure the cover is securely fastened so that it won't come loose during transit.
Step 9: Taking Your DIY Rooftop Tent on the Road
Now that your rooftop tent is complete, it's time to take it out for a spin! Before heading on a long trip, consider doing a test run at a local campsite or even in your driveway. This will give you a chance to check for any issues and ensure everything is working as it should.
- Test the Setup and Take-Down Process: Set up and take down the tent a few times to get a feel for how everything works. Make sure the ladder is stable, the tent opens smoothly, and the waterproofing holds up.
- Pack Smart: When packing for your trip, remember that the inside of the tent should be kept as light as possible when closed. While it's tempting to store bedding or other items inside, too much weight can strain the hinges and mounting system.
Final Thoughts
Building a DIY rooftop tent is a rewarding and cost-effective project. Not only do you save money, but you also get the satisfaction of building something with your own hands. With a few basic tools and materials, you can build a durable, functional rooftop tent that will serve you well on your camping adventures.
This budget build is perfect for those who want to get outdoors without spending a fortune on gear. By following the steps outlined in this guide, you'll have a lightweight, easy-to-use rooftop tent that provides both comfort and convenience.
Customization is key when building your own rooftop tent. Feel free to modify the design, improve upon it, or even add extra features to suit your specific needs.
FAQs About DIY Rooftop Tent
Explore common questions and expert answers in our comprehensive FAQs about DIY rooftop tents to elevate your outdoor adventure experience.
Using 19/32-inch plywood is ideal for strength and weight balance. You can also use 3/4-inch plywood for added durability, but this will make the base heavier. Make sure to seal the plywood with a water-resistant coating.
Yes, you can use other pop-up tents if they meet the size requirements. Look for a tent with an end entrance and avoid those with side openings, as the ladder will interfere with the entrance.
Most budget tents are only water-resistant. You can apply waterproofing spray or use a rain fly to prevent water from entering. Make sure to seal seams with seam sealer for additional protection.
Cut out the tent’s floor and secure the tent edges to the plywood base using screws or bolts. Avoid attaching the center to prevent it from tearing when folded. Ensure the tent is sealed around the edges to keep water out.
You can bend the conduit using a simple wooden jig with a hole drilled in it. Slowly bend the conduit to avoid kinking it. You don't need specialty tools beyond basic hand tools like a drill and grinder.
This rooftop tent should comfortably hold around 400 lbs. To increase capacity, you can use thicker plywood or stronger steel for the hinges and supports.
Yes, the ladder is attached with hinges that have removable pins, allowing you to easily take it off when needed. If the ladder is not required, you can simply remove the pins and detach it.
Make a custom waterproof cover for the folded tent to protect it from rain and dirt while driving. You can use heavy-duty waterproof fabric and secure it with straps or bungee cords.
Use angle iron supports beneath the platform to reinforce the overhang. This helps distribute weight and prevents the platform from sagging when the tent is open.
Ensure that all bolts on the inside of the tent are trimmed or use bolt covers. This will prevent the tent fabric from snagging and tearing on exposed hardware.


