As a budding DIY enthusiast and a lover of woodworking, finding inspired yet straightforward projects is my jam. So, when I stumbled upon a plan for the best DIY router table for beginners, I knew I had found my next weekend project. My journey through making this versatile and space-saving tool not only sharpened my woodworking skills but also provided me with a sense of accomplishment. Here's a step-by-step guide on how I did it, loaded with practical advice and useful insights to help you build your own.
Choosing the Right Materials
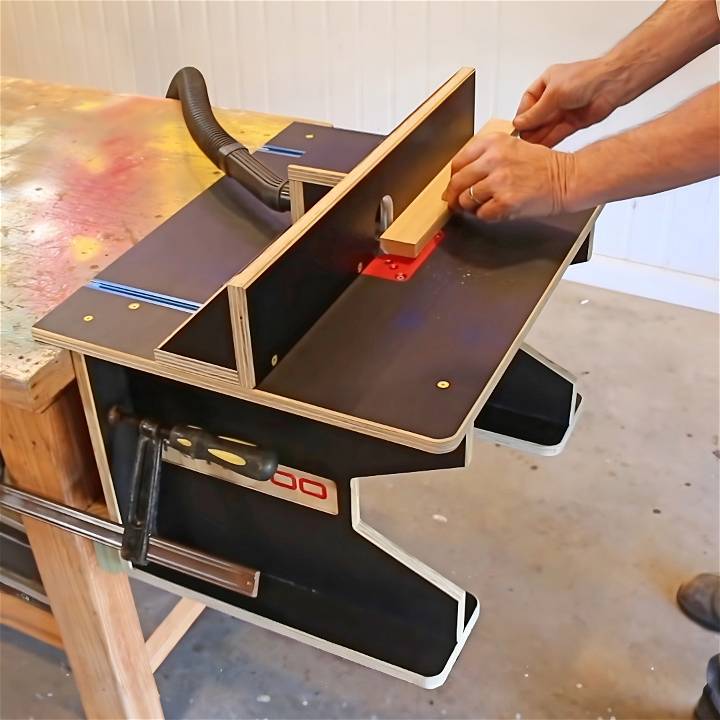
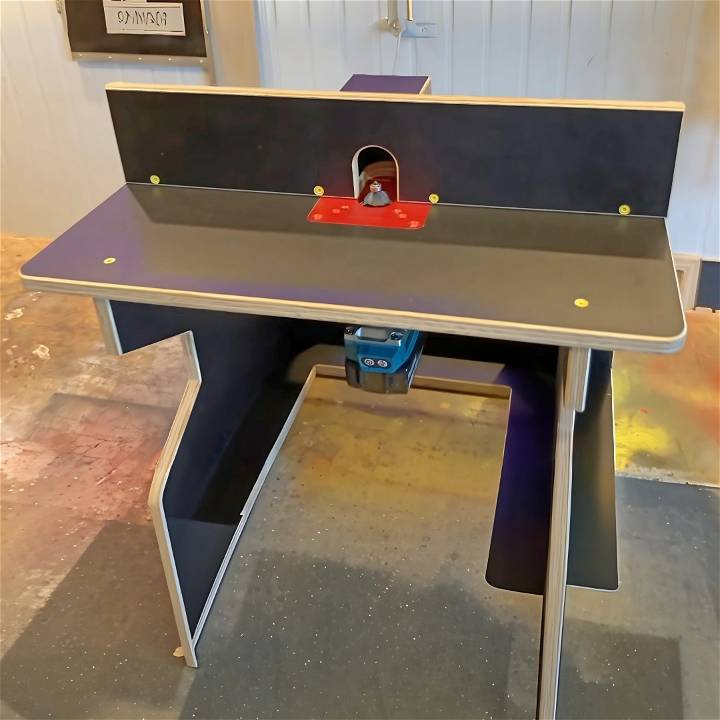
For this project, I opted for 17mm black form ply, a choice inspired by its durability and slick surface, which I learned helps to reduce friction between the wood and the table. Why does this matter? Well, reduced friction means smoother operation and less wear on both your tools and workpieces. Plus, the black surface added a sleek look to the finished project.
Step by Step Instructions
Discover how to build your own DIY router table with step-by-step instructions. From cutting pieces to final assembly, make a custom table with a personal touch.
Cutting the Pieces
Armed with a circular saw (though a table saw works too, if you have one), I cut out all the necessary pieces for the table base and top. This step required precision and patience. If you're like me and don't own a table saw, worry not—a circular saw does the job perfectly well. The key here is to measure twice and cut once to ensure all pieces fit together seamlessly.
Assembly with a Personal Touch
Before screwing the base together, I decided to 'pimp it up' a bit. Taking a cue from the original guide, I made a few cuts here and there with my circular saw and jigsaw. This wasn't just about aesthetics; these cuts were strategic, meant to break up the bulkiness of the unit and make it more appealing. Remember, creativity in woodworking isn't just about function; form plays a vital part too.
Building the Fence
The fence was next on my list. I was keen to make it not only functional but also to incorporate a dust collection feature to keep my workspace clean. So, I added a small chamfer along the bottom edge of the fence to help minimize dust buildup. For the clearance hole for my router bit, I went with a 44mm hole saw, as it was what I had on hand, though a 40mm would have been ideal.
Dust Collection System
A clean workspace is a safe workspace. That's why adding a simple box to fit my shop vac for dust extraction was a game-changer. Positioning the hole for the vacuum cleaner lower on the box made sense, as most of the dust collects at the bottom. This small tweak made a big difference in maintaining a cleaner work area.
Final Assembly: Insert Plate and T-Track
The insert plate was crucial, as it's where my router would attach to the table. Using double-sided tape as a template, I cut out just enough material so that the insert plate sat flush with the table surface. For the T-track installation, precision was key. I cut mine to 235mm in length and positioned it 90mm from the edge, ensuring the fence could smoothly slide backward and forwards.
The Moment of Truth: Testing It Out
After installing the router and giving the table a thorough once-over to ensure everything was secure, it was time for the moment of truth. The result? Smooth, even chamfers and a router table that lived up to every expectation. The insert plate and T-tracks were perfectly flush, and the shop vac kept the work area clean as a whistle.
Comprehensive Guide to Router Table Safety
When working with any power tool, safety is paramount. A router table is no exception. Here's a helpful guide to ensure you use your router table safely, avoiding accidents and injuries.
Personal Protective Equipment (PPE)
Always wear safety glasses to protect your eyes from flying debris. Use hearing protection like earplugs or earmuffs, as routers can be loud and damage your hearing over time. A dust mask or respirator is essential to prevent inhalation of sawdust, which can be harmful to your lungs.
Safe Operation Practices
Before you start, ensure the router is unplugged when changing bits. Use feather boards and push sticks to keep your hands safe from the spinning bit. Never start the router with the bit in contact with the wood. Always feed the wood against the direction of the bit's rotation for control and safety.
Emergency Procedures
Keep a first-aid kit nearby in case of minor injuries. Know the location of your workshop's emergency stop button or how to quickly power down the equipment. If you're working alone, keep a phone within reach to call for help if needed.
Regular Maintenance
Check for loose parts before using the router table. Ensure the bit is securely fastened and the fence is aligned properly. Regularly clean the table to prevent build-up of sawdust and debris, which can be a fire hazard.
Mindfulness While Working
Stay focused on the task. Avoid distractions and never rush while using the router table. If you're feeling tired or unwell, it's better to postpone your work than risk an accident.
By following these simple yet effective safety guidelines, you can enjoy woodworking with your DIY router table while keeping yourself and others safe. Remember, taking a few extra minutes to prepare and work safely can prevent accidents and ensure a pleasant woodworking experience.
Advanced Router Table Customizations
Enhancing your router table with advanced customizations can significantly improve its functionality and your woodworking experience. Here's a detailed guide to some of the most effective upgrades you can make.
Precision Lifts
Installing a precision lift allows you to adjust the height of your router bit with incredible accuracy. This is particularly useful for intricate work where depth needs to be consistent and precise.
Fence Systems
A fence system with micro-adjustment capabilities gives you control over the width of your cuts. Look for fences that are easy to set and provide reliable lockdowns to ensure your workpiece doesn't shift during routing.
Dust Collection Setups
A good dust collection system is vital for keeping your workspace clean and your air quality safe. Connect your router table to a dust extractor or install a dedicated dust port to manage sawdust effectively.
Safety Features
Consider adding safety features like a clear bit guard, which provides visibility while also protecting you from flying debris. A safety switch that's easily accessible can quickly turn off the router in case of an emergency.
Additional Accessories
Outfit your router table with accessories like feather boards, push blocks, and insert rings. These not only improve safety but also enhance the precision of your cuts.
FAQs About DIY Router Tables
Discover everything you need to know about DIY router tables with our comprehensive FAQ guide. Learn how to build, use, and maintain your own router table.
Q1: What is the best material for a DIY router table top?
A1: A 3/4-inch plywood or medium-density fiberboard (MDF) is ideal for a router table top. These materials are sturdy and provide a flat, stable surface for accurate routing.
Q2: How do I ensure my router table is stable?
A2: To ensure stability, build a solid base frame using 2x4-inch boards and secure it with wood screws. Attach the top firmly to the frame with angle brackets. For added stability, make sure the legs are cut to an even length and the table is level.
Q3: What features should a good DIY router table have?
A3: A good DIY router table should have a firm and flat surface, an adjustable fence for versatility, dust collection ports to keep the area clean, and a safety switch for quick power-offs. Storage for bits and accessories is also a useful feature.
Q4: Can I use a handheld router with a DIY router table?
A4: Yes, you can mount a handheld router upside down beneath the table. Ensure it's securely fastened and the bit is correctly protruding through the insert plate for safe operation.
Q5: How do I choose the right router bit for my project?
A5: Choose router bits based on the type of cut you need. For example, use a straight bit for grooves, a rabbeting bit for rabbets, and a roundover bit for smooth edges. Always select sharp, high-quality bits for the best results.
Final Thoughts
Building this DIY router table was not just about ending up with a new piece of workshop equipment. It was a journey filled with learning, creativity, and challenges overcome. For fellow beginners, my advice is to take your time, don't be afraid to improvise, and remember that every project is a chance to grow your skills.
In closing, I encourage you to try building your own DIY router table. The sense of pride and accomplishment in completing such a project is unparalleled. Plus, you end up with a highly useful tool that'll support countless future woodworking projects.


