Build a DIY RV carport on a budget with these easy steps. Protect your RV while saving money with affordable materials and simple construction tips. Not only does it provide essential protection for your RV, but it can also serve as a multi-purpose shelter for other vehicles or equipment. In this guide, we'll walk you through the process of building a robust RV carport designed to withstand high northern snow loads. This project, based on an actual DIY build using Versatube, takes into account extreme weather conditions, including snow loads of up to 90 pounds per square foot (PSF), and is ideal for anyone looking to take on a large-scale construction task.
Why Build an RV Carport?
Before diving into the steps, it's essential to understand the importance of building a strong RV carport, particularly in areas prone to severe weather. An RV carport:
- Protects your investment: RVs are not cheap, and leaving them exposed to the elements can lead to significant wear and tear. A well-constructed carport shields your RV from sun, rain, snow, and wind.
- Withstands heavy snow loads: In northern regions, where snow accumulation is a concern, a reinforced structure ensures your carport can bear the weight of heavy snowfall without collapsing.
- Adds value to your property: A well-designed carport can enhance the functionality and aesthetic of your outdoor space, while also adding value to your property.
Project Overview
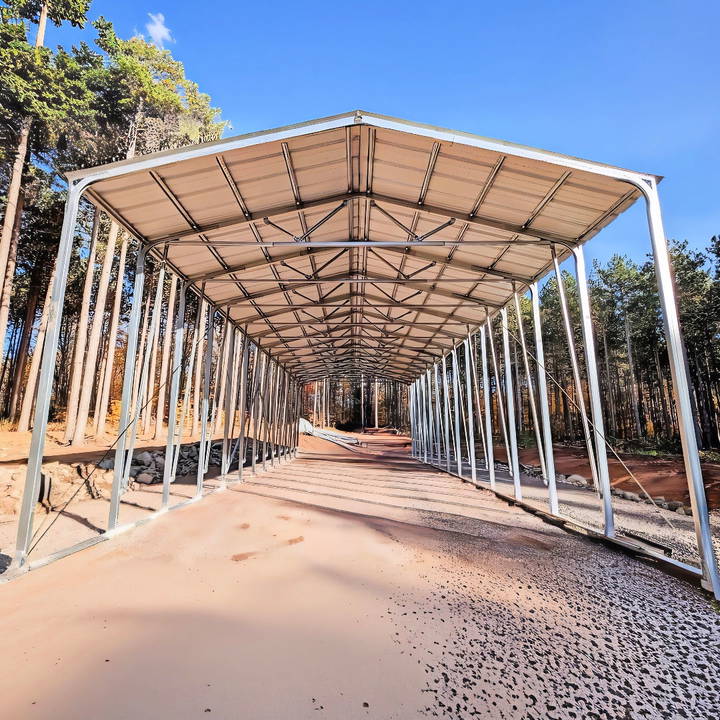
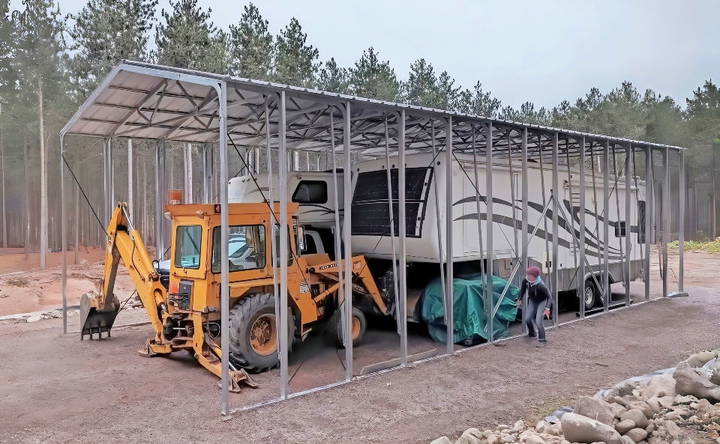
The carport project we're covering here is a 51-foot by 23-foot structure, designed to withstand snow loads of 90 PSF. The carport was built using Versatube, a company known for manufacturing durable steel frame structures. The step-by-step process includes groundwork preparation, erecting the structure, and ensuring it meets snow load requirements, making it ideal for northern climates.
Now, let's break down the steps of constructing your DIY RV carport.
Step by Step Instructions
Build a durable DIY RV carport with our step-by-step guide. Perfect for protection and customization! Start your project today!
Step 1: Ground Preparation and Unwrapping Materials
The first step in building an RV carport is to prepare the site where the structure will be erected.
Unwrapping and Organizing Materials
When your building materials arrive, take the time to carefully unwrap and organize everything. This step is crucial to ensure that all pieces are accounted for and are in good condition. The materials for this particular build were delivered in large pallets, which included the steel base rails, ground anchors, trusses, and roofing materials.
- Tip: Organizing your materials beforehand can save time and reduce stress as you move forward with the construction. Make sure to review the instruction manual provided by the manufacturer (in this case, Versatube) to familiarize yourself with the different components and how they fit together.
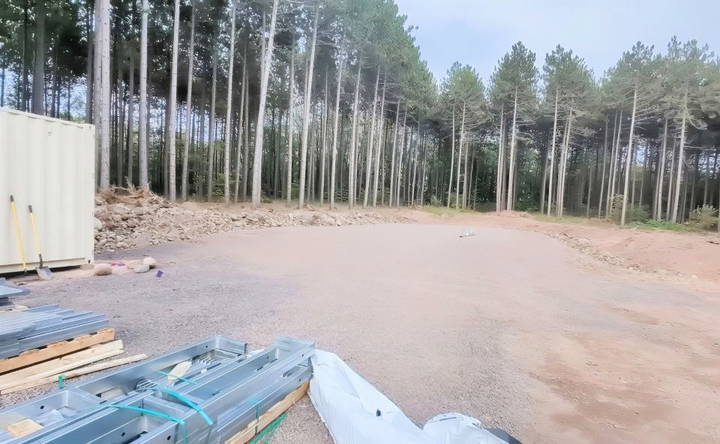
Leveling and Compacting the Ground
The next step is to prepare the foundation. Begin by leveling the ground where the carport will be built. In this project, a shipping container served as part of the foundation, and the ground around it was leveled using gravel.
Once the site is level, compact the ground to ensure a solid base for the carport. This is particularly important when constructing in areas with heavy snowfall or high winds, as a solid foundation ensures the stability of the structure.
Setting Up Base Rails
With the ground prepared, it's time to set up the base rails. These rails form the foundation of the carport, so they need to be installed with precision.
- Leveling the Rails: Use a laser level to ensure that the base rails are perfectly level. This is a critical step because any unevenness in the foundation can cause issues later on when erecting the structure.
- Marking for Anchors: After laying out the base rails, mark the spots where the ground anchors will be placed. Ground anchors are essential for securing the structure and ensuring it can withstand wind and other forces.
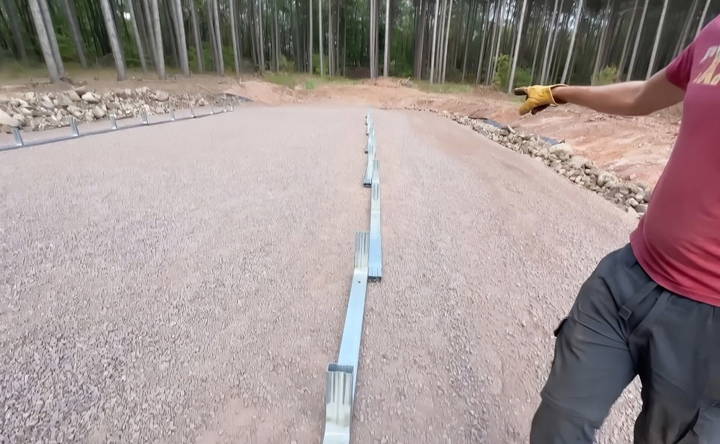
In this build, the team used an auger to drill holes for the anchors, which were then filled with concrete. This method provided a strong foundation without the need to dig below the frost line, making it a time-efficient solution.
Step 2: Ground Anchors and Concrete Work
Once the base rails are in place, it's time to focus on securing the structure with ground anchors and concrete. Proper anchoring is essential to prevent the carport from shifting or being lifted by strong winds.
Drilling and Pouring Concrete
For this project, each anchor point required a 30-inch hole filled with concrete to secure the structure. Here's how to go about this step:
- Drill Holes for the Anchors: Using an auger, drill holes at each anchor point along the base rails.
- Pour Concrete: Fill each hole with concrete, ensuring the anchors are securely embedded. Concrete provides the necessary weight and strength to keep the carport stable.
- Allow Time to Set: It's important to allow the concrete to fully cure before proceeding with the rest of the build. This can take anywhere from 24 hours to a few days, depending on weather conditions.
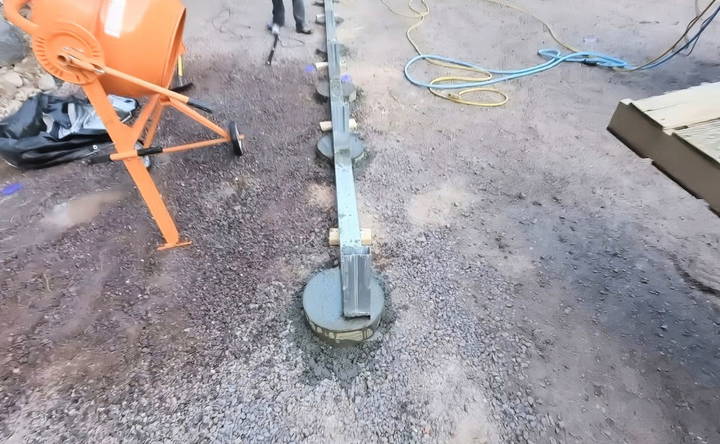
Tip: In colder climates, consider using concrete additives that speed up curing time or prevent freezing during the setting process.
Shimming and Adjustments
As the concrete sets, you may need to make small adjustments to ensure the rails are perfectly level and the anchors are set at the right height. In this project, the team buildd small “volcanoes” of concrete around the anchor points to hold the rails in place while the concrete cured.
Step 3: Assembling the Trusses
Once the foundation is complete, it's time to move on to assembling the main structure. The trusses are the backbone of the carport, providing the support necessary to hold up the roof and withstand snow loads.
Building the Trusses
The trusses are typically assembled on the ground before being lifted into place. This process can be labor-intensive, but with the right tools and techniques, it can be done with just a small team of people.
- Laying Out the Truss Components: Start by laying out the pieces of each truss on a flat surface. The team in this build used a template to ensure each truss was built to the correct dimensions.
- Bolting the Pieces Together: Once the components are laid out, bolt them together according to the manufacturer's instructions. For this project, 14 trusses were assembled, each one requiring careful attention to detail to ensure they were straight and properly aligned.
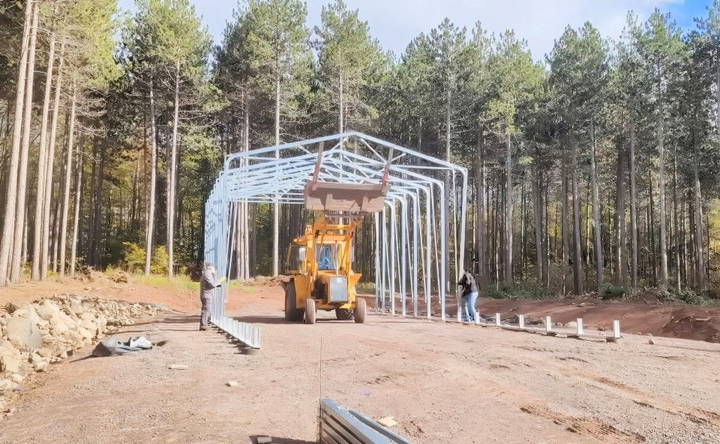
Raising the Trusses
With the trusses assembled, the next step is to raise them into position on the base rails. In this build, the team used a backhoe and ropes to lift the trusses into place.
- Positioning the Trusses: Lift the trusses one by one and position them on the base rails. Be sure to have at least two people guiding the truss to ensure it is aligned correctly.
- Securing the Trusses: Once in position, the trusses are bolted to the base rails. This step requires precision, as any misalignment could affect the stability of the entire structure.
Raising the trusses is one of the most physically demanding parts of the build, but it's also incredibly satisfying once they are all in place and secured.
Step 4: Installing Purlins and Roofing
With the trusses securely in place, it's time to install the purlins and roofing. This stage of the project involves securing sheet metal panels to the trusses to build a weatherproof roof for the carport.
Installing the Purlins
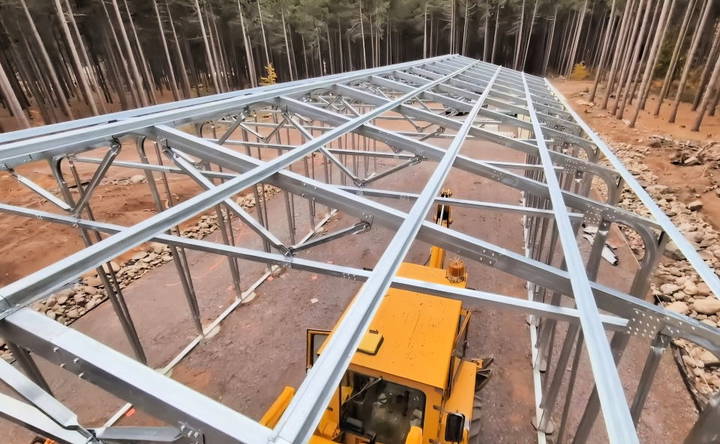
Purlins are horizontal supports that run across the trusses and provide a base for attaching the roof panels. In this build, the team installed multiple rows of purlins along the length of the carport.
- Placing the Purlins: Start by laying out the purlins on top of the trusses. Ensure that they are spaced evenly and securely attached to the trusses using bolts or screws.
- Securing the Purlins: Once in place, bolt the purlins down tightly. This step is critical to the overall stability of the roof.
Attaching the Roof Panels
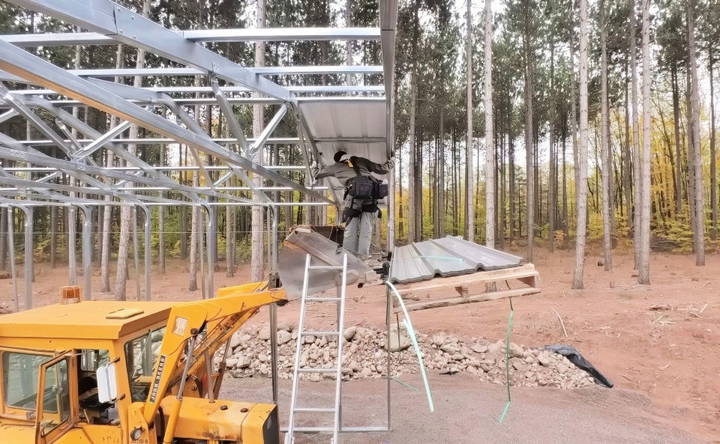
With the purlins installed, the next step is to attach the sheet metal roof panels. This part of the project can be tricky, as it often requires working at height and maneuvering large metal sheets into place.
- Positioning the Panels: Begin by lifting the first roof panel into place. Be sure to use safety equipment, such as harnesses and ropes, to prevent falls during this step.
- Securing the Panels: Once the panel is positioned correctly, secure it to the purlins using screws. Continue this process, overlapping each panel slightly to build a watertight seal.
Step 5: Securing the Structure and Final Adjustments
With the roof panels in place, the bulk of the carport's construction is complete. However, there are still a few crucial steps to ensure the structure is both secure and durable. This phase of the project involves final adjustments, bracing, and addressing any minor issues that may have arisen during the build.
Tying the Trusses Together
The trusses, now standing tall, need to be tied together to form a cohesive and stable structure. This process is critical in ensuring that the carport can withstand high winds, heavy snow loads, and other environmental stresses.
- Installing Horizontal Braces: These braces run parallel to the ground and are attached between each truss. They prevent the trusses from shifting and help distribute the weight of the roof evenly across the structure.
- Diagonal Bracing: Diagonal braces are installed to provide additional rigidity. These braces help counteract lateral forces, such as those caused by wind, and ensure the carport remains stable under pressure.
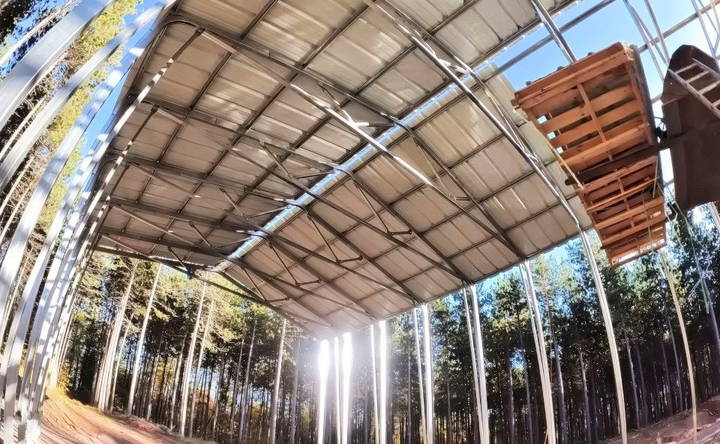
By securing the trusses with these braces, you'll be reinforcing the structure's overall integrity. This is especially important in areas prone to high winds or heavy snowfall, as it prevents the frame from shifting or collapsing under extreme conditions.
Squaring and Leveling the Structure
Before moving on to any finishing touches, it's essential to ensure that the entire carport is squared and level. This involves double-checking the alignment of the trusses, purlins, and roof panels.
- Using a String Line for Precision: A simple but effective way to check that the structure is square is to run a string line from corner to corner across the roof. This will help identify any misalignments.
- Making Adjustments: If any sections are out of alignment, adjustments can be made by loosening the bolts on the affected trusses or braces, repositioning them, and then retightening the bolts. This step is crucial for ensuring the long-term durability of the carport.
Step 6: Adding the Roof Bracing and Final Roofing Adjustments
At this stage, the majority of the structure is complete, but the final roofing touches are essential to ensure weatherproofing and structural integrity. Bracing the roof and adding any necessary reinforcements is a key step, especially in regions with significant snowfall.
Roof Bracing for Heavy Snow Loads
In northern climates where heavy snow is a concern, additional bracing may be required to ensure the roof can support the weight of accumulated snow. Snow loads of up to 90 pounds per square foot (PSF) were factored into this specific build, which required reinforcing the roof to handle such weight.
- Reinforcing the Trusses: The trusses themselves were designed to handle high snow loads, but adding extra bracing between them can further improve the structure's capacity to bear weight.
- Cross-Bracing the Roof: Installing cross-braces along the roof adds another layer of support. These braces help distribute the weight of the snow evenly across the entire roof, reducing the risk of localized stress points that could lead to failure.
Finishing the Roofing Panels
Once the bracing is complete, it's time to finish securing the roof panels. This final step ensures that the roof is watertight and ready to withstand all types of weather.
- Sealing the Gaps: Be sure to seal any gaps between the roof panels to prevent water or snow from leaking into the structure. This can be done using roofing sealant or weatherstripping designed for metal roofs.
- Checking for Proper Alignment: Double-check that all roof panels are aligned correctly and that there are no exposed areas where water or wind could infiltrate.
- Final Fastening: Ensure all screws and fasteners are tightly secured to prevent any loose panels from shifting or coming undone in the wind.
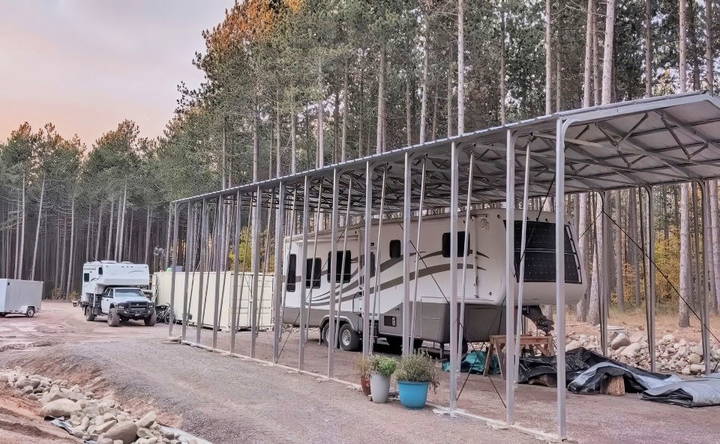
By the time you've completed this step, the roof should be fully weatherproof and capable of handling even the harshest conditions.
Step 7: Additional Features and Customization
Once the main structure of the carport is complete, you can begin to think about any additional features or customizations you might want to add. Depending on your needs, these could range from adding walls to installing lighting or even incorporating a storage area.
Adding Sidewalls for Extra Protection
In this particular build, the initial design was an open-sided carport. However, adding sidewalls can provide extra protection from the elements, particularly for wind and snow.
- Wall Materials: Metal siding can be added to the sides of the carport to enclose the structure and provide better protection for the vehicles or equipment inside.
- Partial or Full Enclosure: Depending on your needs, you can opt for partial sidewalls (e.g., covering only one or two sides) or fully enclosing the carport. This is especially beneficial in areas with high winds or blowing snow.
Installing Lighting
If you plan to use the carport as more than just a shelter for your RV, you might consider adding lighting to make it functional at all times of day.
- Solar-Powered Lighting: For those looking to keep their carport off-grid, solar-powered lights can be a great option. These lights are energy-efficient and require minimal maintenance.
- Wired Lighting: If your carport is located near an existing electrical source, you can install wired lighting for more reliable and consistent illumination.
Storage Options
For RV owners, extra storage is always a plus. Consider adding shelving, hooks, or even a small enclosed section within the carport for storing tools, spare parts, and other accessories.
Step 8: Testing and Evaluating the Structure
Once construction is complete, it's time to test and evaluate the carport to ensure everything is in working order. This includes checking the structural integrity, testing the snow load capacity, and making sure all components are functioning as intended.
Inspecting the Structure
Conduct a thorough inspection of the carport, paying particular attention to the following:
- Bolts and Fasteners: Ensure that all bolts, screws, and fasteners are tightly secured and haven't come loose during construction.
- Roof Integrity: Check the roof for any leaks or gaps where water or snow might seep in.
- Anchoring: Verify that the ground anchors are holding firm and that the concrete has fully cured.
Testing the Snow Load Capacity (Continued)
After completing the construction, it's crucial to monitor how the carport performs during its first snowfall. While it's unlikely that you'll immediately encounter extreme weather conditions, keeping an eye on the structure during moderate snowfalls is a good way to assess its performance.
- Monitor for Deflection: During heavy snow, check the roof and trusses for any sagging or deflection. A minor amount of deflection may occur naturally, but significant sagging could indicate structural weakness.
- Clearing Snow: Regularly clear snow off the roof if it becomes too heavy. You can use a snow rake or a similar tool to ensure the roof stays free of excessive snow accumulation.
In northern regions with heavy snowfalls, maintaining the roof and ensuring snow is removed regularly will prevent the buildup of potentially dangerous weight on the structure.
Step 9: Maintenance and Upkeep
Now that your carport is complete, regular maintenance will help extend its lifespan and ensure it continues to protect your RV and other vehicles. Here are some key maintenance tips:
Inspecting the Carport
Regular inspections, particularly after extreme weather events, can help you identify any damage or areas that need repair.
- Check the Roof: After each season, inspect the roof panels for any signs of rust or wear. If you notice any panels loosening, tighten the screws to prevent water from seeping in.
- Monitor the Ground Anchors: Ensure that the ground anchors remain secure, especially after periods of heavy wind or snow. If the concrete begins to crack or shift, consider reinforcing the anchors with additional concrete.
- Truss and Frame Inspections: Check the trusses and frame for signs of bending, rust, or weakness. Address any issues before they become serious problems.
Clearing Debris
Keep the carport free of debris, such as leaves, branches, and snow, that can accumulate on the roof. Regularly clearing this debris will prevent damage to the structure and reduce the weight load on the roof.
Step 10: Modifying the Carport for Year-Round Use
While the carport is functional as an open-sided shelter, you may want to consider additional modifications to improve its utility and protection throughout the year.
Adding Walls for Extra Protection
Enclosing the carport with walls is a common modification that can enhance the protection it offers, especially in harsh winter climates or regions with heavy winds.
- Metal or Vinyl Siding: You can add metal or vinyl siding to the structure to build fully or partially enclosed walls. This will help protect your vehicles from sideways rain, blowing snow, and wind-blown debris.
- Customizable Wall Heights: Depending on your needs, you can add walls of varying heights to accommodate taller vehicles or build separate storage areas within the carport.
Installing Roll-Up Doors
For a fully enclosed carport, consider installing roll-up doors on one or both ends of the structure. This not only adds protection but also increases security, especially if you store valuable items or tools in the carport.
Step 11: Future Improvements and Additions
Once your RV carport is built, there are several ways you can further enhance its functionality. These improvements can help make the space more versatile and comfortable for year-round use.
Lighting and Electrical Wiring
Adding lighting to your carport can make it much more useful during the early mornings or late evenings when natural light is limited.
- Solar-Powered Lighting: Solar-powered lights are a great option for an off-grid setup, providing sufficient light without the need for electrical hookups.
- Electrical Wiring: If you plan to use the carport as a workshop or additional storage space, consider installing electrical wiring for power tools, charging stations, or heating solutions.
Shelving and Storage Solutions
Adding shelving along the walls of the carport can help you organize tools, spare parts, and other equipment. Custom-built shelves or pre-made racks can provide valuable storage without taking up too much space inside the carport.
Step 12: The Satisfaction of DIY Success
Building a large-scale structure like an RV carport is no small task, but the satisfaction of completing the project yourself makes the effort worthwhile. With patience, planning, and teamwork, constructing a durable shelter for your RV can be both rewarding and practical.
Reflecting on the Build Process
Throughout the process, the Mortons encountered various challenges, from dealing with the initial delivery to troubleshooting how to raise the trusses. However, by using a methodical approach, they were able to overcome these challenges and complete the build with only minimal help. They emphasized that the project, while physically demanding, was straightforward thanks to the clear instructions and prefabricated materials provided by Versatube.
Key Takeaways for Future Builders
- Preparation is Key: Thoroughly planning and preparing your site is essential for a successful build. Ensuring that the ground is level and that the base rails are properly anchored will set the foundation for a stable structure.
- Use the Right Tools: While a backhoe was used to raise the trusses, tools like a scissor lift or telehandler could also make the job easier. Investing in the right equipment can save time and reduce physical strain.
- Teamwork Matters: Though it's possible to complete much of the project with just two people, having an extra set of hands for lifting and securing trusses can make the process smoother and safer.
Conclusion: Your Turn to Build
Building a DIY RV carport is an ambitious but achievable project for anyone willing to put in the time and effort. With a focus on planning, safety, and sturdy materials, you can build a durable structure that protects your RV from the elements and adds value to your property.
Whether you're dealing with heavy snowfall or just need a reliable shelter, following these steps will guide you through the process of constructing your own RV carport. With proper care and maintenance, your carport will provide long-lasting protection for your RV, vehicles, and equipment for years to come.
Ready to Get Started?
If you're ready to take on this project, be sure to gather all the necessary materials, tools, and safety gear ahead of time. With careful planning and execution, you'll soon have a carport that's as functional as it is satisfying to build!
FAQs About DIY RV Carport Construction
Explore faqs about DIY RV carport construction. Get expert tips, materials needed, and step-by-step guidance for building your own RV shelter.
The RV carport was purchased from Versatube, a manufacturer known for their durable steel structures. The Mortons chose this brand specifically because it was able to meet the high snow load requirements of their location.
The team used ground anchors, drilling 30-inch holes and filling them with concrete. This provided a secure foundation, without needing to dig below the frost line, as the structure does not include utilities.
The carport was designed to withstand snow loads of 90 pounds per square foot. This required extra trusses and reinforcements to ensure the structure could handle the weight of accumulated snow.
Individual ground anchors were chosen for simplicity and to avoid digging below the frost line. This method provided enough stability for the structure in the region's harsh weather.
A backhoe was used to lift and position the trusses. The team secured them using ropes for guidance. A telehandler or scissor lift could also have been helpful but was not used in this project.
The sidewalls are designed to be high enough to accommodate the RV and other large vehicles. However, specific measurements were not mentioned in the original video.
The project took several days, with the most time-consuming steps being the foundation work and erecting the trusses. The team worked as efficiently as possible, considering the challenges of cold weather and limited daylight.
Safety was a priority during the roof installation. Both workers used climbing harnesses and were tied in to prevent falls. A more controlled solution like renting a scissor lift was suggested by viewers but not used.
The Mortons noted that the purchasing and shipping process with Versatube went well, with the only issue being that the materials were not delivered on a flatbed, which made unloading slightly more difficult.
While the exact cost of the carport was not detailed in the original content, pricing can vary significantly depending on size, materials, and shipping. It's best to check directly with Versatube or similar providers for current pricing.


