Embarking on the van life journey, my partner and I faced the challenge of maximizing our tiny living space. We dreamed of a cozy area that could serve as both a comfortable bed by night and a functional couch by day. Drawing inspiration from various resources, we decided to tackle this project, learning and improvising along the way. Here's how we did it, hoping our experience and practical advice can guide you through making your own genius bed design for van life.
Materials Needed and Their Purpose
Discover the essential materials and their uses for building a DIY RV sofa bed.
- 12mm Baltic Birch Plywood: We chose this for its strength and lightweight. You'll need it for the bed frame and platforms.
- 500-pound drawer slides: Necessary for the bed to slide out smoothly.
- Piano Hinges and Ratchet Straps: These are for attaching the different sections of the bed and allowing for flexibility.
- Wood Glue, Screws, and L brackets: Essential for assembling and securing the bed structure.
- Leather Straps and a Piece of Scrap Wood: For the drawer pulls and the bed stopper, adding a touch of elegance and practicality.
- A full-size Futon: We opted for a Japanese Shiki Futon for comfort and ease of storage.
Step by Step Instructions
Learn how to easily build your own DIY RV sofa bed in 7 simple steps. Save space and money with this step-by-step guide.
Step 1: Designing the Frame
First, we measured our van's interior, considering the curved walls and wheel wells. We traced the arc of the van wall onto a scrap piece of wood to build a template for our bed frame's side pieces. Ensuring our bed fit snugly against the van's curved wall maximized our living space.
Step 2: Cutting and Assembling the Bed Frame
Using our plywood, we cut the pieces based on our measurements, making sure to build a middle support around the wheel well for additional strength. The bed needed to support our weight without bowing or breaking.
Step 3: Securing the Frame
We attached the frame to the van walls, using the wall battens for support.
Lesson Learned: It's better to fully assemble and square the bed outside the van to avoid alignment issues.
Step 4: Adding the Drawer Slides
Installation of the 500-pound drawer slides required precision. We ensured they were perfectly level and supported by the frame. These slides are the backbone of the bed's extendable feature; inaccuracies here would hinder the bed's functionality.
Step 5: Constructing the Bed Platforms
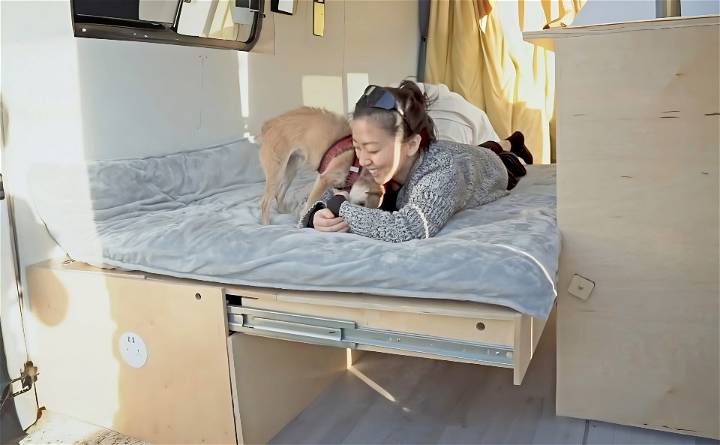
We attached the platforms to the drawer slides and frame using piano hinges for the sections that needed to fold. This allowed the bed to convert into a couch and vice versa smoothly.
Step 6: Implementing a Hinge Alternative
After encountering difficulties with the stiffness of the piano hinges, we used ratchet straps for more flexibility. The bed needed to move easily without strain on the materials, ensuring durability.
Step 7: Finalizing the Framework
We added storage drawer faces and a custom wooden stopper to prevent the bed from sliding out while driving. Maximizing storage is crucial in a small space, and safety while in transit cannot be overlooked.
Troubleshooting and Adjustments
Despite meticulous planning, we made several adjustments, especially concerning the structure's squareness and the drawer slides' positioning. Keeping an open mind and being willing to backtrack was key to addressing these unexpected challenges.
Enjoying the Multi-Functional Space
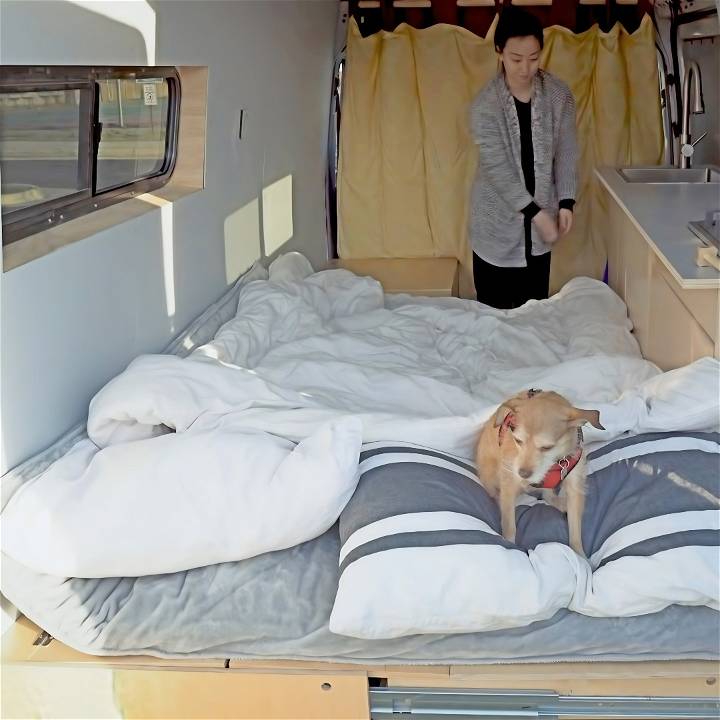
After completing the bed-couch conversion, we were thrilled with the result. Not only did it provide a comfortable sleeping and lounging area, but it also incorporated storage solutions essential for van life. Adjusting to setbacks and improvising solutions played a crucial role in our project's success.
Tips for Future Builders
- Measure Twice, Cut Once: Double-check measurements, especially in custom spaces like a van.
- Test Before Finalizing: Assemble the bed outside the van to ensure everything fits and works as intended.
- Be Flexible: Be prepared to rethink and modify your approach if something doesn't work out.
This project was a labor of love, requiring patience and creativity. We now enjoy a functional, comfortable space that meets our living and storage needs. Whether you're an experienced builder or a DIY novice, we hope our journey inspires and guides you through your van life projects.
Optimizing Comfort for Your DIY RV Sofa Bed
Building a cozy and comfortable sofa bed in your RV is essential for a pleasant travel experience. Whether you're relaxing during the day or catching some Z's at night, consider these practical tips to optimize comfort:
1. Quality Cushions Matter
Invest in high-quality foam cushions for your sofa bed. Look for options with the right balance of firmness and softness. Memory foam or high-density foam can provide excellent support while ensuring comfort. Consider the following:
- Density: Higher-density foam tends to last longer and offers better support.
- Thickness: Aim for a thickness of at least 4 inches for optimal comfort.
- Layering: Consider using multiple layers of foam (such as a base layer and a top layer) for customized comfort.
2. Lumbar Support and Ergonomics
Back support is crucial, especially during long drives or extended stays. Here's how to enhance lumbar support:
- Lumbar Pillows: Add removable lumbar pillows to support the lower back. These pillows can be adjusted based on individual preferences.
- Adjustable Backrests: If your sofa bed has an adjustable backrest, experiment with different angles to find the most comfortable position.
- Ergonomic Design: Look for sofa bed designs that prioritize ergonomic contours. A slightly curved backrest can provide better lumbar support.
3. Upholstery Selection
The choice of upholstery material significantly impacts comfort. Consider the following options:
- Breathable Fabrics: Opt for fabrics that allow air circulation. Natural fibers like cotton and linen are excellent choices.
- Easy Maintenance: Choose materials that are easy to clean and maintain. Leatherette or microfiber upholstery can be wiped down effortlessly.
- Texture: Consider the texture—smooth, textured, or quilted—based on personal preference.
4. Mattress Toppers and Protectors
Transform your sofa bed mattress with a comfortable topper:
- Memory Foam Toppers: Place a memory foam mattress topper on the sofa bed for extra cushioning. It conforms to your body shape and relieves pressure points.
- Waterproof Protectors: Protect the mattress from spills and accidents with a waterproof mattress protector. It also adds a layer of comfort.
5. Test It Out
Before hitting the road, test your DIY sofa bed thoroughly:
- Sit and Lie Down: Spend some time sitting and lying on the sofa bed. Assess comfort, support, and any pressure points.
- Adjustments: Check if the sofa bed easily converts from seating to sleeping mode. Smooth transitions are essential.
Remember, comfort is subjective, so customize your RV sofa bed to suit your preferences.
Customization Ideas for Your DIY RV Sofa Bed
Customizing your RV sofa bed allows you to tailor it to your specific needs and preferences. Whether you're a full-time RVer or a weekend adventurer, consider these creative ideas to make your sofa bed uniquely yours:
1. Built-in USB Charging Ports
- In our digital age, staying connected is essential.
- Install USB charging ports directly into the sofa bed frame.
- Charge your devices conveniently without cluttering the RV with extra cables.
2. Cup Holders and Snack Trays
- Movie nights or road trips call for snacks and drinks.
- Attach cup holders to the sofa arms or sides.
- Consider foldable snack trays that can be tucked away when not in use.
3. Integrated Reading Lights
- Cozy up with a good book or e-reader.
- Install LED reading lights near the sofa bed.
- Adjustable brightness levels ensure comfortable nighttime reading.
4. Hidden Storage Compartments
- RVs have limited storage space.
- Design your sofa bed with concealed storage.
- Store bedding, extra pillows, or travel essentials out of sight.
5. Convertible Tables
- Multi-functionality is key.
- Choose a sofa bed with a convertible table.
- Use it as a dining table, work surface, or game area during the day.
6. Personalized Upholstery
- Express your style through fabric choices.
- Opt for upholstery that complements your RV's interior.
- Consider durable materials that withstand wear and tear.
7. Removable Slipcovers
- Keep your sofa bed fresh and clean.
- Slipcovers are easy to remove and wash.
- Change them seasonally or whenever you crave a new look.
8. Adjustable Backrests
- Comfort matters whether you're sitting or sleeping.
- Choose a sofa bed with adjustable backrests.
- Customize the angle for optimal relaxation.
9. Decorative Throw Pillows
- Add a touch of coziness and style.
- Mix and match throw pillows in different colors and patterns.
- Swap them out to refresh the sofa bed's appearance.
10. Safety Features
- Safety should never be overlooked.
- Ensure secure anchoring for the sofa bed.
- Consider fire-resistant materials and childproofing measures.
Remember, your DIY RV sofa bed is more than just furniture—it's a functional and comfortable space where memories are made. Get creative, think practical, and enjoy the journey!
Conclusion:
Wrapping up, DIY RV sofa bed offers a simple yet effective way to customize your RV furniture. With these easy-to-follow steps, you can transform your space into a cozy and comfortable area for relaxation on the road.


