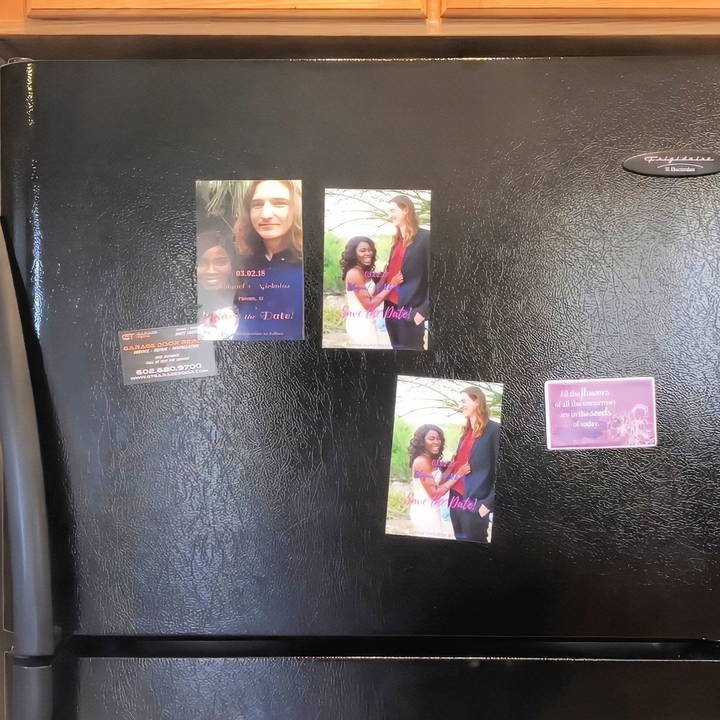
Planning a wedding is a magical experience, but it can get expensive quickly. One area I found a way to save big was with our “Save the Dates.” Rather than spend more on pre-made options, I decided to make my own DIY magnetic Save the Dates for just around $1 each. This guide will walk you through how I did it, using affordable supplies and easy methods that anyone can follow—even if you're not super crafty.
Why Magnetic Save the Dates?
Magnetic Save the Dates have become popular because they can easily stick to fridges or magnetic surfaces, ensuring your guests don't lose them. However, pre-made ones tend to be more expensive, often costing around $2 or more each. By making them yourself, you can achieve the same polished look without the added cost. Plus, it adds a personal touch, making your wedding even more special.
Materials You Will Need
Before diving into the step-by-step process, here's a quick look at the materials you'll need:
- Magnetic adhesive sheets: I bought a pack of 100 adhesive magnets from Neil Enterprises Inc. on Amazon. You can find different sizes and quantities based on your needs.
- Photos: You'll need your favorite engagement photo or a similar picture of you and your partner.
- Photo-editing software: You can use Photoshop or even free tools like Canva to add text to your photo.
- Photo printing service: I used Walgreens because they often have 40% off deals, making photo prints super affordable.
Step by Step Instructions
Learn how to make DIY save-the-date magnets with our step-by-step guide. From design to mailing, make unique keepsakes easily.
Step 1: Design Your Save the Date Photo
The first step is to choose a photo that will be the face of your Save the Date. I chose a simple selfie that my partner and I took on the day we got engaged. Many people opt for professional engagement photos, but a personal picture can also add a unique touch.
Using Photoshop (or any editing tool), you'll want to add text to your photo with all the essential details your guests need to know. Here's what I included:
- Names: I added both of our names—Abigail and Nicholas—at the top of the image in a clear, stylish font.
- Wedding date: This is the most important part! I chose to put the wedding date front and center in bold lettering.
- Location: Add the city or venue where the wedding will take place. For us, it was Phoenix, Arizona.
- "Save the Date" text: You can make this bold and prominent to grab attention.
- Formal Invitation to Follow: This lets guests know to expect a more detailed invitation later.
I used a combination of fonts: a playful one for the names and a clean, modern one for the other details. You can experiment with colors and sizes, but remember to keep the text legible.
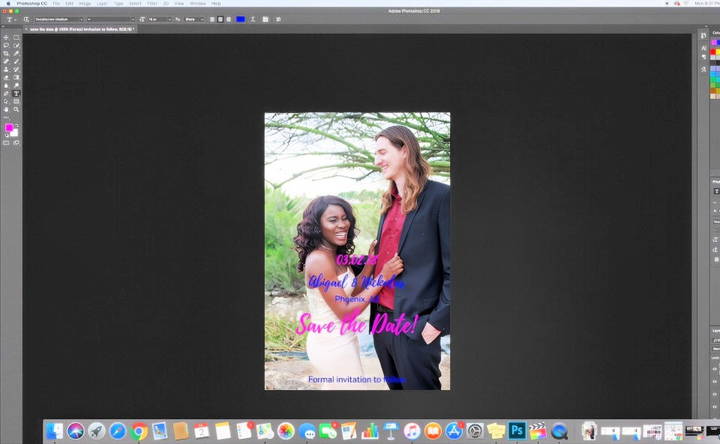
- Tip: Canva as a Free Alternative: If Photoshop isn't an option for you, Canva is a fantastic free tool with easy-to-use templates. It's a great way to get professional results without needing advanced design skills.
Step 2: Print Your Photos
Once your design is ready, it's time to print the photos. I used Walgreens because they frequently offer discounts. I printed three 4x6 photos for about 59 cents total, making each photo less than 20 cents. Printing at a local store like Walgreens or CVS is super convenient, but you can also print at home if you have the right paper.
- Tip: Always look for deals on photo printing services. Many places offer regular discounts that can save you quite a bit of money.

Step 3: Attach the Photos to Magnetic Adhesive Sheets
After getting your photos printed, the next step is to attach them to the magnetic adhesive sheets. Here's how I did it:
- Peel the adhesive backing: Take the adhesive magnetic sheet and carefully peel off the white backing to expose the sticky side.
- Align the photo: To avoid misalignment, I only peeled off half of the adhesive backing at first. This gave me more control over placing the photo.
- Stick the photo: Once the top of the photo is perfectly aligned, slowly press down, smoothing it out as you go to avoid bubbles or wrinkles.
- Tip: Take your time when aligning the photo with the magnet. Once it's stuck, it's difficult to remove without damaging it.
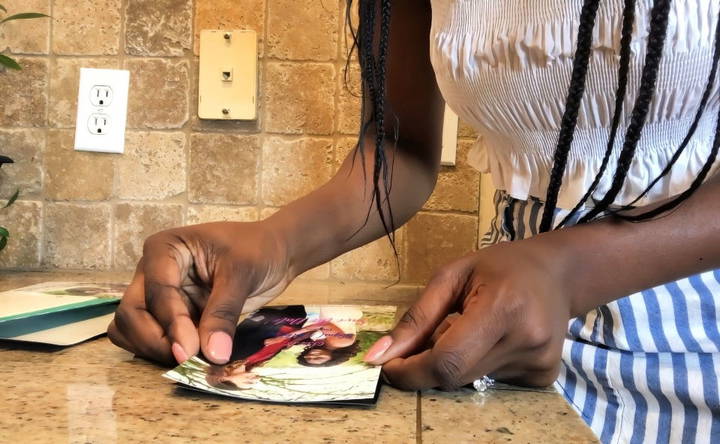
Step 4: Let the Save the Dates Set
After you've attached the photos to the magnetic sheets, press down to ensure they stick firmly. I found it helpful to let them sit for a while under something heavy (like a book) to flatten out any air bubbles and make sure they were securely adhered.
Step 5: Send Them Out
Once your DIY magnetic Save the Dates are complete, it's time to send them out! I mailed half of mine using standard envelopes and sent the other half as digital invitations. If you plan to mail them, be sure to use envelopes that fit the size of your magnet. This will ensure they arrive in perfect condition.
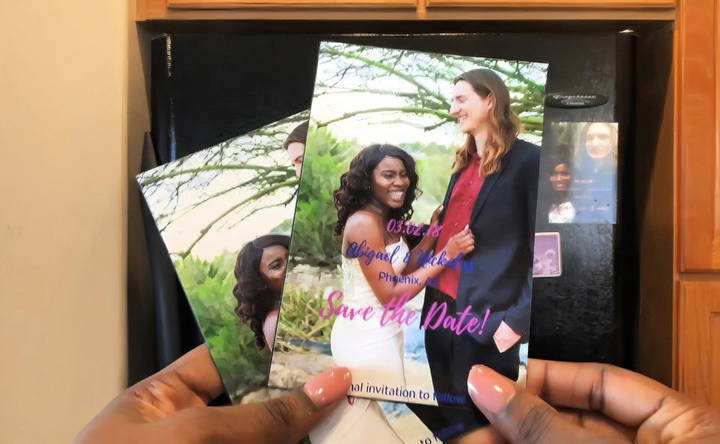
Bonus Tip: Save Even More by Doing Digital Invitations
If you're looking to cut down on costs even more, consider sending digital Save the Dates to some of your guests. It's a quick, easy, and eco-friendly way to share your wedding details without needing to spend on postage.
Personalization Tips
Personalizing your DIY save-the-date magnets can make them truly special and memorable. Here are some easy and effective ways to add a personal touch:
1. Add Photos
Including a photo of you and your partner is a great way to personalize your magnets. Choose a favorite engagement photo or a candid shot that captures your relationship. Make sure the photo is high-resolution for the best print quality.
2. Custom Fonts and Colors
Use fonts and colors that match your wedding theme. There are many free font websites where you can find unique styles. For colors, consider using your wedding palette to make a cohesive look.
3. Special Messages
Write a heartfelt message or a fun quote that reflects your personality. It could be something simple like “Save the Date” followed by your name and wedding date, or a more elaborate message that tells a bit of your love story.
4. Engraving and Handwriting
If you're using wooden or metal magnets, consider engraving them with your initials or wedding date. For a more personal touch, you can handwrite the details using a permanent marker or paint pen.
5. Decorative Elements
Add small decorative elements like ribbons, stickers, or dried flowers. These can be glued onto the magnets to give them a unique and handcrafted feel.
6. Digital Design Tools
Use online design tools like Canva to make your magnet design. These tools offer templates and easy-to-use features that can help you customize your magnets without needing advanced design skills.
7. Incorporate Your Theme
Think about your wedding theme and how you can incorporate it into your magnets. For example, if you're having a beach wedding, you could use seashells or sand in your design. For a rustic wedding, consider using burlap or lace.
8. Personalized Packaging
Don't forget about the packaging! Personalized envelopes or boxes can add an extra special touch. You can stamp your initials or use custom stickers to seal the envelopes.
9. Interactive Elements
Make your save-the-date magnets interactive by adding a QR code that links to your wedding website. This way, guests can easily access more information about your big day.
10. Guest Involvement
Consider involving your guests in the personalization process. You could send out blank magnets with a request for guests to decorate and send them back. This can be a fun and interactive way to engage your guests before the wedding.
By following these tips, you can make personalized save-the-date magnets that are not only beautiful but also meaningful.
Common Mistakes to Avoid
Making DIY save the date magnets can be a fun and rewarding project, but there are some common mistakes that can trip you up. Here are some tips to help you avoid these pitfalls and ensure your magnets turn out beautifully.
1. Using Low-Quality Materials
Using cheap or low-quality materials can result in magnets that don't look good or last long. Invest in good-quality paper, magnets, and adhesives to ensure your save the dates are durable and attractive.
2. Poor Print Quality
Printing your magnets at home can save money, but make sure your printer is up to the task. Low-resolution images or poor print quality can make your magnets look unprofessional. Consider using a professional printing service if you're unsure about your printer's capabilities.
3. Incorrect Sizing
Ensure your magnets are the right size for mailing. Too large, and they may require extra postage; too small, and they might get lost or overlooked. Standard sizes like 3.5 x 5 inches or 4 x 6 inches are usually safe bets.
4. Overcomplicating the Design
While it's tempting to add lots of details, a cluttered design can be hard to read and less appealing. Keep your design simple and focused on the essential information: your names, the date, and a brief message.
5. Ignoring the Theme
Your save the date magnets should reflect your wedding theme. Ignoring this can make them feel out of place. Whether your theme is rustic, modern, or beachy, incorporate elements that match your overall wedding style.
6. Forgetting to Proofread
Spelling and grammar mistakes can detract from the professionalism of your magnets. Always proofread your text multiple times, and consider asking a friend or family member to review it as well.
7. Not Testing Adhesives
If you're attaching magnets to paper or other materials, test your adhesives first. Some glues can cause paper to wrinkle or discolor. Double-sided tape or adhesive dots are often good choices for a clean finish.
8. Skipping a Test Print
Before printing all your magnets, do a test print to check colors, alignment, and overall appearance. This can save you from wasting materials if something doesn't look right.
9. Underestimating Time and Effort
DIY projects can be time-consuming. Make sure you allocate enough time to complete your magnets without rushing. Starting early can help you avoid last-minute stress.
10. Not Considering Postage Costs
Magnets can be heavier than regular paper invitations, which might increase postage costs. Weigh a finished magnet with its envelope to determine the correct postage and avoid any surprises at the post office.
By keeping these common mistakes in mind, you can make beautiful and professional-looking save the date magnets that your guests will love.
FAQs About DIY Save the Date Magnets
Discover answers to commonly asked questions about DIY save-the-date magnets, from design tips to material choices, in this comprehensive guide.
You can use any photo that reflects you and your partner's style. Many people use engagement photos, but casual, personal pictures work just as well.
Yes! I used 4x6 photos, but you can choose a size that fits your style and budget. Just make sure to purchase adhesive magnetic sheets that match the size of your photo.
The whole process took me a few hours, including the time spent designing the photo and sticking them to the magnets.
Absolutely! Pre-made magnetic Save the Dates can cost $2 or more each, but by making them yourself, you can cut the cost down to around $1 each, depending on where you print the photos and the materials you use.
Yes, if you have a good-quality printer and photo paper, you can print them at home to save even more.
Final Thoughts
Making your own DIY Save the Dates magnetic is a fun and simple project that saves money while adding a personal touch to your wedding. Each one cost me about a dollar, including the photo printing, magnetic sheets, and the time spent designing them. It's a small, cost-effective way to make your big day even more special.
Plus, by doing it yourself, you can ensure that each Save the Date reflects your style and personality. From choosing the perfect picture to designing the layout, every detail is in your control. I hope this guide helps you make your own beautiful Save the Dates for your wedding!
If you have any questions or if you'd like to share your own experience with DIY Save the Dates, feel free to leave a comment. I'd love to hear from you!


