When I first set out to build a homemade DIY sawmill, I had a vision of crafting something functional, compact, and built from readily available materials. The goal was to make a sawmill accessible to anyone—especially if you don't have access to steel or welding equipment. In this guide, I'll walk you through how I built my sawmill, offering insights from my experience along the way.
Materials You'll Need
- Two 2x10 lumber pieces (6 feet long): These form the base and the frame for the sawmill.
- Circular saw with chainsaw attachment: I used a beam saw attachment to enhance the functionality.
- Screws and basic tools: For assembly.
- Wood paneling or plywood: To build the track for the saw to ride on.
- Optional: Carriage bolts and additional clamps: For added strength and precision.
Step by Step Instructions
Learn how to build a DIY sawmill with step-by-step instructions, boosting efficiency and speed from frame construction to your first cuts.
Starting with the Frame
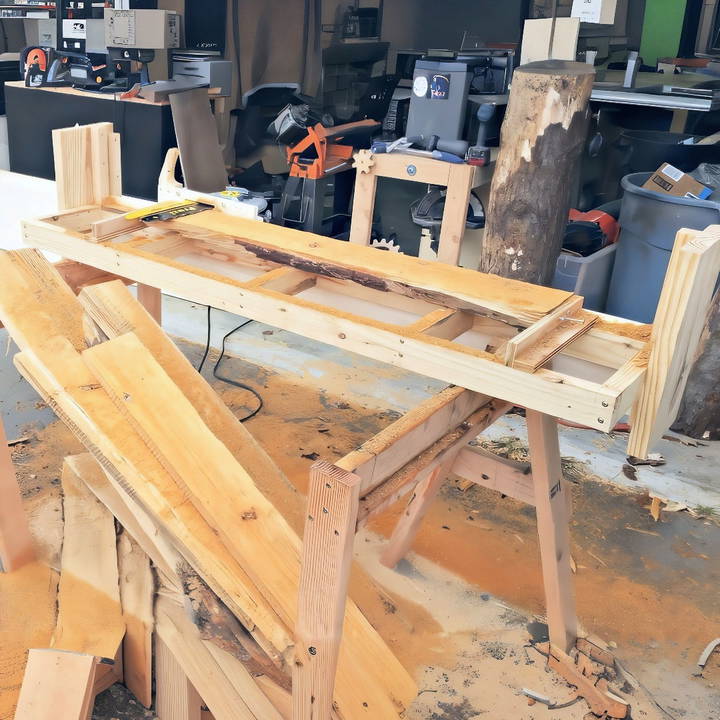
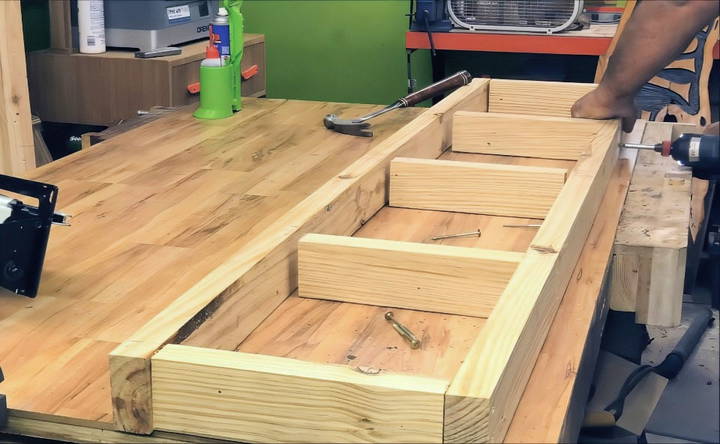
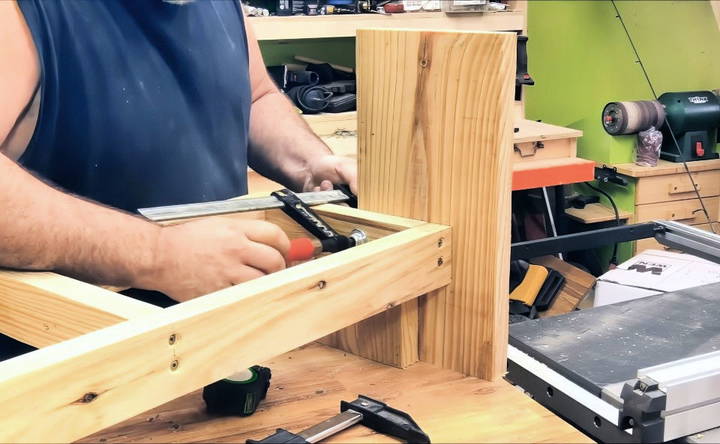
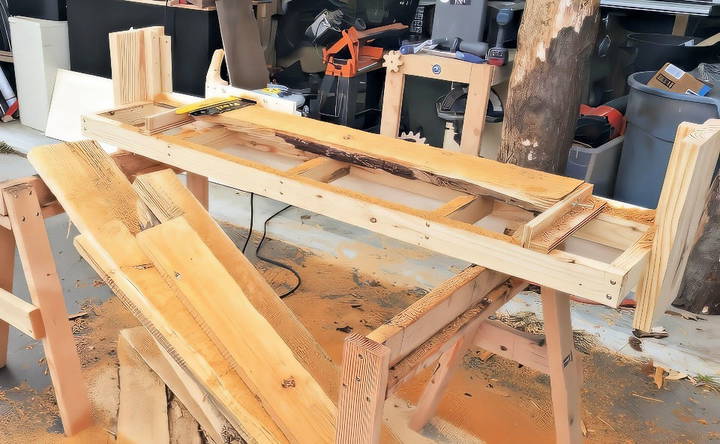
The first step was making a sturdy frame. I took two pieces of 2x10 lumber, each 6 feet long. One of these I ripped into smaller sections—each about 2¾ inches wide—then used these smaller pieces to construct a basic rectangular frame.
Having a solid frame is crucial, as this will be the foundation that supports the entire sawmill. While constructing the frame, I made sure it was level and square, ensuring stability for the upcoming steps. One thing I learned early on is to double-check the alignment—once the screws are in place, adjustments are difficult to make.
Constructing the Towers
Next, I needed to build two towers. These would help guide the saw and allow me to adjust the cutting height. I cut two 17¾-inch sections from the second 2x10 and attached them vertically to the sides of the frame.
One key detail I discovered is that these towers need to extend about five inches below the frame, with an additional 2½ inches sticking out toward the front. This positioning allowed for a wider range of motion for the saw and provided the clearance I needed when cutting thicker logs.
Building the Guide Track
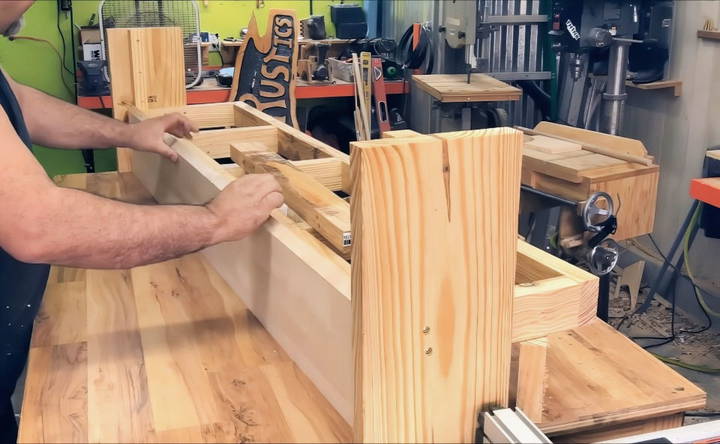
With the frame and towers in place, it was time to build the guide track. For this, I used a piece of laminated panel I had in my shop, cutting it at an angle to help guide the saw smoothly. The track was slightly narrower than the space between the towers, allowing it to move freely.
I also added a second piece to the track to build a groove, ensuring the saw remained aligned while sliding up and down. One thing I learned here was to avoid making the groove too tight—if the track doesn't move smoothly, it could lead to uneven cuts.
Attaching the Chainsaw
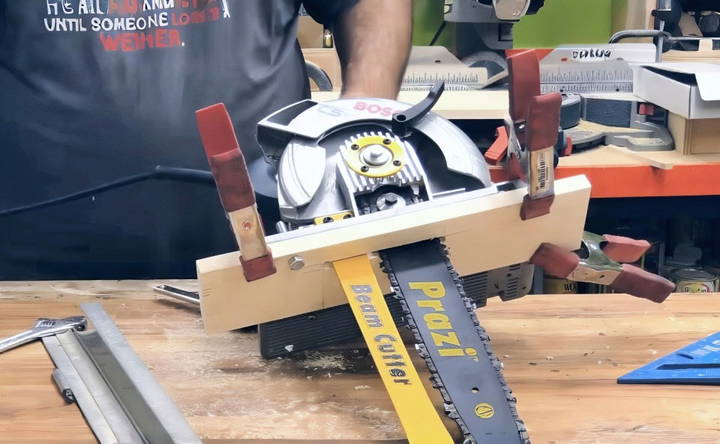
The next challenge was securing the chainsaw to the sawmill. I began by attaching a base plate with a slot cut out for the saw blade and riving knife. The angle of the base plate needed to match the top of the guide track, allowing for smooth operation.
In hindsight, using carriage bolts would have been a better choice for securing the base plate. However, I worked with what I had on hand—some ⅜-inch bolts—which held up just fine. A little trick I found was to add a wooden block under the base to eliminate any “slop” or looseness.
Reinforcing the Saw Guide
Because I used ¾-inch material for the saw guide, I noticed that it lacked rigidity when I first tested it. To fix this, I installed a 2x4 along the back of the guide, which made a significant difference in its stability. When working with heavy-duty tools like a chainsaw, ensuring stability and safety is critical.
To secure the saw in place while cutting, I added auxiliary blocks with threaded holes. I could then tighten bolts through these blocks to clamp the saw in position. This simple addition made the whole setup feel much more secure, and I didn't have to worry about the saw shifting during use.
Making the First Cuts
With the sawmill fully assembled, it was time to put it to the test. I placed a pine log on the sawmill and began cutting. One thing that became immediately apparent was the importance of oiling the chainsaw blade. The attachment I used didn't have an automatic oiler, so I rigged up a simple solution—a cup of chainsaw bar oil that I applied manually every few feet.
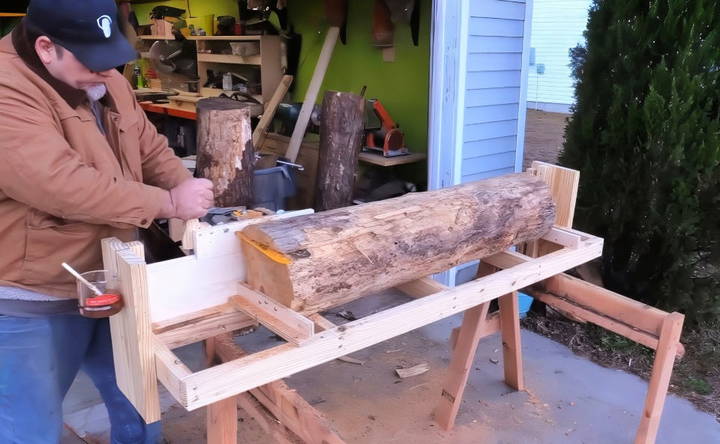
Interestingly, I noticed that the saw cut through the fresher wood in the center of the log faster than through the dry, rotted wood on the edges. This observation helped me adjust my cutting strategy to prioritize fresh, solid logs whenever possible.
Lessons Learned from the Process
One of the most surprising things I discovered during the build was just how much power my circular saw provided. Despite pushing hard on the sawmill during testing, I couldn't stall the saw. It had more than enough torque to handle logs up to 12 or even 14 inches in diameter, which exceeded my expectations.
Another helpful addition was a handle I attached to the back of the sawmill. This small modification made it much easier to control the saw and apply even pressure while cutting. If you're building your own sawmill, I highly recommend adding a similar handle to improve usability and safety.
Cutting Efficiency and Speed
Once I got the hang of the sawmill, it took me just over 20 minutes to mill a log into usable lumber. As with any project, there's a learning curve, but with a little practice, I found myself getting faster and more efficient with each cut.
To make the cutting process even smoother, I added 2-inch increment measurements along the side of the towers. This allowed me to adjust the cutting height quickly without having to measure each time.
Advanced Tips and Modifications
Learn advanced tips and custom modifications for upgrading your sawmill to enhance efficiency, improve safety, and reduce environmental impact.
Upgrading Your Sawmill
- Motor Upgrade: Consider upgrading to a more powerful motor. This can increase cutting speed and efficiency. Ensure the motor is compatible with your sawmill's design.
- Blade Selection: Use high-quality blades designed for the type of wood you are cutting. Carbide-tipped blades last longer and provide cleaner cuts.
Enhancing Efficiency
- Automated Features: Add automated features like a power feed system. This allows the sawmill to move the log automatically, reducing manual effort and increasing precision.
- Adjustable Bed: Install an adjustable bed to handle logs of different sizes. This flexibility can improve the versatility of your sawmill.
Improving Safety
- Safety Shields: Add safety shields around moving parts. This can prevent accidents and protect the operator from debris.
- Emergency Stop Button: Install an easily accessible emergency stop button. This allows you to quickly shut down the sawmill in case of an emergency.
Reducing Environmental Impact
- Solar Power: Consider using solar panels to power your sawmill. This can reduce your carbon footprint and lower energy costs.
- Waste Management: Implement a system to collect and recycle sawdust and wood chips. This can minimize waste and provide materials for other projects.
Custom Modifications
- Log Turner: Add a log turner to help rotate large logs. This can make the cutting process easier and more efficient.
- Track Extensions: Extend the track to accommodate longer logs. This modification allows you to cut larger pieces of wood.
Maintenance Tips
- Regular Lubrication: Keep all moving parts well-lubricated. This reduces wear and tear and extends the life of your sawmill.
- Blade Maintenance: Regularly sharpen and replace blades. Sharp blades ensure clean cuts and reduce strain on the motor.
User Feedback and Community Tips
- Join Forums: Participate in online forums and communities. Other users can provide valuable tips and modifications based on their experiences.
- Share Your Modifications: Document and share your modifications. This can help others improve their sawmills and foster a community of DIY enthusiasts.
Enhance your DIY sawmill's performance, safety, and efficiency with advanced tips, making it versatile and eco-friendly.
Maintenance and Troubleshooting
Get expert tips on regular maintenance, troubleshooting common issues, and preventive measures for seamless operations and longevity of your equipment.
Regular Maintenance
- Lubrication: Keep all moving parts well-lubricated. This reduces friction and wear, extending the life of your sawmill. Use a high-quality lubricant and apply it to bearings, gears, and other moving parts regularly.
- Blade Care: Regularly inspect and sharpen the blades. Sharp blades ensure clean cuts and reduce strain on the motor. Replace blades that are worn out or damaged to maintain cutting efficiency.
- Cleaning: Clean the sawmill after each use. Remove sawdust, wood chips, and debris from the cutting area and moving parts. This prevents buildup that can cause mechanical issues.
- Alignment Checks: Periodically check the alignment of the sawmill components. Ensure the blade is parallel to the bed and the guides are properly aligned. Misalignment can lead to uneven cuts and increased wear on parts.
- Belt Tension: Inspect and adjust the tension of drive belts. Proper tension ensures efficient power transfer and prevents slippage. Replace belts that show signs of wear or damage.
Troubleshooting Common Issues
- Uneven Cuts: If the sawmill produces uneven cuts, check the blade alignment and tension. Ensure the blade is sharp and properly installed. Also, verify that the log is securely positioned on the bed.
- Motor Overheating: Overheating can be caused by excessive load or poor ventilation. Reduce the cutting speed and ensure the motor has adequate airflow. Clean any dust or debris from the motor vents.
- Vibration: Excessive vibration can affect the quality of cuts and damage components. Check for loose bolts and ensure the sawmill is on a stable surface. Inspect the blade for damage and replace if necessary.
- Blade Binding: Blade binding occurs when the blade gets stuck in the wood. This can be due to a dull blade, improper feed rate, or misalignment. Sharpen the blade, adjust the feed rate, and check the alignment.
- Power Issues: If the sawmill fails to start or loses power, check the electrical connections and fuses. Ensure the power source is adequate for the motor's requirements. Inspect the wiring for any signs of damage.
Preventive Measures
- Regular Inspections: Conduct regular inspections of all components. Look for signs of wear, damage, or misalignment. Address any issues promptly to prevent further damage.
- Spare Parts: Keep a stock of essential spare parts, such as blades, belts, and fuses. This ensures you can quickly replace worn or damaged parts without significant downtime.
- User Manual: Refer to the user manual for specific maintenance guidelines and troubleshooting tips. Follow the manufacturer's recommendations for optimal performance.
- Professional Servicing: Consider professional servicing for complex issues or annual maintenance. A professional can thoroughly inspect and service the sawmill, ensuring it operates efficiently.
Keep your DIY sawmill in top condition with regular maintenance and quick issue resolution for reliable performance and longevity.
FAQs About DIY Sawmills
Learn everything you need to know with our FAQs about DIY sawmills, from setup and maintenance to cutting techniques and safety tips.
A DIY sawmill is a homemade machine used to cut logs into lumber. It allows you to process wood at home, saving money and providing custom-sized lumber for your projects.
Building a DIY sawmill can be cost-effective and rewarding. It gives you control over the lumber dimensions and quality, and it's a great project for woodworking enthusiasts.
Building a DIY sawmill requires some woodworking and metalworking skills. However, with detailed plans and instructions, it can be a manageable project for most DIY enthusiasts.
While a DIY sawmill can be used for small-scale commercial purposes, it may not be as efficient or durable as professional-grade sawmills. For larger operations, investing in a commercial sawmill might be more practical.
A DIY sawmill can cut various types of wood, including softwoods like pine and hardwoods like oak. However, the type of blade and the power of your sawmill will determine how effectively it can handle different wood types.
Final Thoughts
Building a homemade DIY sawmill was a highly rewarding experience. Not only did it save me money compared to buying a commercial mill, but it also gave me the satisfaction of making something practical from scratch. The design is simple yet effective—a sturdy frame, two towers, and a sliding guide for the saw.
Through trial and error, I learned a lot about the importance of stability, precision, and keeping the saw blade lubricated. If you're thinking about building your own sawmill, take your time with each step and make adjustments as needed. You'll be amazed at what you can accomplish with basic materials and a little creativity.


