Building a DIY shipping container roof is an excellent project that can save you time and money. With detailed shipping container roof plans, you can easily turn a simple container into a functional space. Whether it's a garage, workshop, or even a home addition, this guide walks you through each step. You'll learn key materials and tools needed, as well as safety measures to take.
This guide is designed to be understandable and practical. By following clear instructions, you'll avoid common pitfalls and achieve great results. The focus is on helping you build a sturdy, weatherproof roof that enhances your container's utility. Eager to begin? Let's dive into the detailed steps and tips in the next section.
Understanding the Basics
When embarking on a DIY project to install a roof on your shipping container, it's essential to grasp the fundamentals. Shipping containers are robust steel boxes designed for transporting goods, but they can also be repurposed into functional spaces. The roof of a shipping container plays a crucial role in its overall structure and durability.
Why is a Sturdy Roof Important?
A solid roof protects against the elements, prevents leaks, and contributes to the container's structural integrity. It's the first line of defense against rain, snow, and sun, which can cause rust and deterioration over time.
Common Challenges:
- Weather Resistance: Containers are made of metal and are prone to corrosion if not properly protected.
- Insulation: Metal conducts heat, making the interior too hot or too cold without proper insulation.
- Load-Bearing: The roof must be able to support additional weight if you plan to use it for storage or as a living space.
Key Considerations:
- Material Selection: Choose materials that are weather-resistant, such as corrugated steel, EPDM rubber, or PVC roofing sheets.
- Roof Type: Consider a pitched roof for better water runoff or a green roof for added insulation and environmental benefits.
- Insulation Options: Use foam or fiberglass insulation to maintain a comfortable interior temperature and reduce energy costs.
Mastering these basics ensures a lasting, effective container roof. Quality materials and simplicity are key. Seek professional advice if needed. A DIY roof fosters a sustainable, custom space.
Step by Step Instructions
Learn how to craft a DIY shipping container roof with our step-by-step guide, from planning and material acquisition to framing and weatherproofing.
Step 1: Planning and Material Acquisition
Learn how to plan and acquire materials for DIY projects. Understand what materials are needed and why they're essential for success.
Materials Needed:
- 2x6 Lumber: For the structural support beam along the center of the containers.
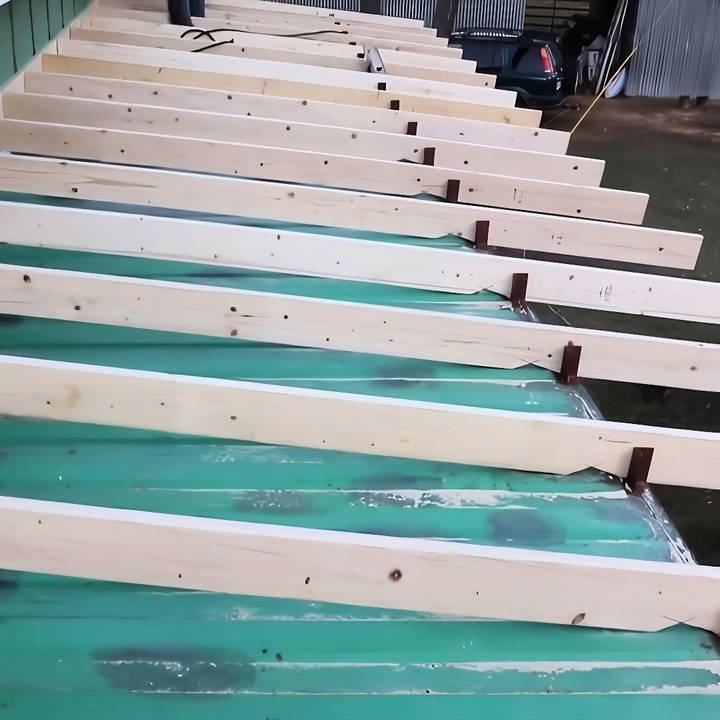
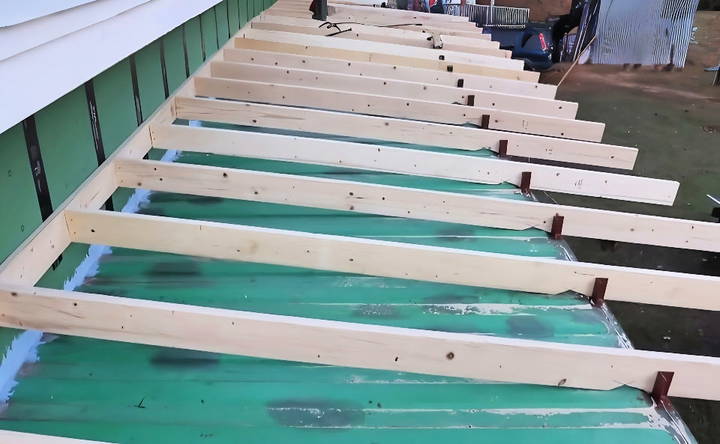
- Angle Iron: To attach the rafters from the support beam to the edge of the containers.
- Welding Equipment: Essential for securing the angle iron to the containers.
- Rafters (cut to size): These span the width of the containers to form the main structure of the roof.
Why These Materials?
- Lumber: It's sturdy and ideal for the main support beam and rafters, offering the structural integrity we needed.
- Angle Iron: It's durable and perfect for attaching the rafters securely to the shipping containers, ensuring the roof structure is solid.
Step 2: Attaching the Support Beam
We started by attaching a 2x6 lumber as a central support beam along the top edge of the containers. This beam serves as the anchor point for the rafters. It was crucial to ensure this beam was perfectly level for the roof structure to be correctly aligned.
Step 3: Prepping the Containers
Prepare containers by grinding and welding for optimal results. Discover essential tips and techniques.
Grinding and Welding:
Before installing the rafters, we prepared the edges of the containers. This involved grinding down any uneven spots and welding angle iron pieces where the ends of the rafters would rest. Welding required precision to ensure each piece was securely attached, making a sturdy base for the rafters.
Step 4: Cutting and Installing Rafters
Cutting the rafters to the correct length was a task that required accuracy. Each rafter needed to match the container's width perfectly. We then attached one end to the central support beam and the other to the welded angle iron on the container's edge. This step was challenging due to cold weather conditions, which taught us the importance of working in suitable weather or having provisions to stay warm.
Step 5: Addressing the Unexpected
Discover effective strategies for addressing unexpected hurdles and equipment maintenance in step 5 of optimizing your process. Learn solutions now!
Hurdles and Solutions:
At one point, we realized the rafters didn't clear the container's edges due to slight miscalculations. To fix this, we trimmed the rafters to ensure a snug fit. It's essential to be adaptable and ready to solve such unexpected problems.
Equipment Maintenance:
Our air compressor malfunctioned in the middle of the project. Regular maintenance checks could have prevented this, underscoring the importance of equipment upkeep in avoiding delays.
Step 6: Framing the Roof
After overcoming the hurdles and assembling all the rafters, the next step was framing the roof. This step was relatively straightforward thanks to prior planning and the creation of a template truss. Using this template, we replicated the remaining trusses ensuring uniformity. It's crucial to measure twice and cut once, saving time and materials.
Additional Materials:
- Air Compressor and Nail Gun: For securely attaching the rafters and framing.
- Paint/Primer: To protect the welded areas against rust and corrosion.
Step 7: Weather Considerations
Building in cold weather proved to be our biggest challenge. The frigid temperatures not only slowed our progress but also tested our resilience. Investing in appropriate workwear and planning the build season wisely are lessons we learned the hard way.
Advanced Customizations
Enhancing your shipping container with advanced customizations can transform it from a simple storage space into a dynamic, multi-functional environment. Here's how you can add value and utility to your container through thoughtful upgrades:
- Solar Panel Installation: Harness the power of the sun by installing solar panels on your container's roof. This eco-friendly addition not only reduces your carbon footprint but also cuts down on electricity costs. Opt for lightweight, flexible solar panels that are easy to install and maintain.
- Rooftop Gardens: A green roof or rooftop garden is not just aesthetically pleasing; it also provides excellent insulation, keeping your container cool in summer and warm in winter. Choose drought-resistant plants and ensure proper drainage to prevent water buildup.
- Rainwater Harvesting: Install a rainwater collection system to make the most of natural precipitation. This water can be used for irrigation, flushing toilets, or, with proper treatment, as potable water. It's a sustainable choice that conserves resources and saves money.
- Automated Climate Control: Consider adding a smart thermostat and automated ventilation to maintain a comfortable climate inside your container. These systems can be programmed to adjust temperatures based on the time of day or outside weather conditions.
- Enhanced Security Features: Upgrade your container's security with motion sensors, cameras, and smart locks. These technologies provide peace of mind and protect your investment from theft or vandalism.
- Interior Customizations: Inside, you can customize your container with built-in furniture, foldable workspaces, or modular storage solutions. These additions maximize space efficiency and can be tailored to your specific needs.
Upgrade your shipping container for a self-sufficient modern living or work space. Research thoroughly and consult professionals for best results.
Insulation and Weatherproofing
Insulating and weatherproofing your shipping container roof is key to making a comfortable and energy-efficient space. Here's how to tackle this important task:
Why Insulate?
Insulation keeps your container's interior temperature stable, whether it's hot or cold outside. It also reduces energy costs and prevents problems like condensation, which can lead to rust and mold.
Choosing Insulation:
There are many insulation options, each with its benefits:
- Spray Foam: Provides a tight seal and high R-value, which measures insulation's effectiveness.
- Blanket Insulation: Comes in batts or rolls and is easy to install.
- Rigid Foam: Offers good thermal resistance and can be cut to fit snugly.
- Reflective Insulation: Best for hot climates, it reflects heat away from the container.
Weatherproofing Steps:
- Seal Gaps: Use caulk or foam to seal any gaps where air or water might enter.
- Choose Durable Materials: Pick materials that withstand your local weather, like EPDM rubber for rainy areas.
- Proper Drainage: Ensure your roof design allows water to run off quickly to avoid pooling.
Maintenance Tips:
- Regular Checks: Inspect your roof periodically for signs of damage or wear.
- Clean Surfaces: Keep the roof free from debris to prevent damage.
- Treat Rust: Address any rust spots immediately to prevent spreading.
By adhering to these guidelines, you'll extend the lifespan and comfort of your shipping container. Keep in mind that a well-insulated and weatherproofed container is a content container!
FAQs About DIY Shipping Container Roof
Explore FAQs about DIY shipping container roofs, covering essential questions on materials, costs, and installation for successful projects.
Installing a DIY roof on a shipping container can provide several benefits, including enhanced protection from the elements, improved insulation, and increased structural integrity. It can also allow for additional storage or living space and can be a cost-effective alternative to traditional construction methods.
Yes, with the right tools and materials, you can install a roof on a shipping container. It's important to have a clear plan and design, and to follow safety guidelines. You may need to weld angle brackets, bolt timber cross beams, and attach joists and decking. However, for complex or large-scale projects, consulting a professional is advisable.
To waterproof a container roof, you should use quality roofing materials and ensure proper installation. This includes sealing all joints and edges, using waterproof coatings or membranes, and ensuring that the roof has a slight pitch for water runoff. Regular maintenance and inspections can also help prevent leaks.
Yes, there are innovative solutions such as no-weld brackets that allow you to connect multiple containers without welding. These brackets can be used to build a pitched roof between containers, providing a seamless and secure connection. This method is particularly useful for making larger structures like homes or garages.
Choosing the right roof kit for your shipping container involves considering the size of your container, the climate in your area, and the intended use of the container. Look for kits that offer durability and easy installation. Brands like Shield Roof Solutions provide roof kits with a 20-year guarantee made from American steel, which ensures quality and longevity. Additionally, consider the load capacity of the roof, especially if you live in an area with heavy snowfall or other significant environmental loads.
Final Thoughts
Wrapping up, building a DIY shipping container roof is a rewarding project that can enhance the functionality and appearance of your container. Using quality shipping container roof plans ensures a solid and durable structure. These plans guide you through materials selection and construction steps, making the process smoother. Investing time and effort in your container's roof builds a sheltered and secure space for various uses.


