I remember the first time I built something on my own. It was a DIY shooting bench. I'm no expert in carpentry, but it felt incredibly satisfying. Following well-laid free plans made the process straightforward. I saw every piece come together, and it gave me a sense of accomplishment. This project taught me new skills and became a personal victory.
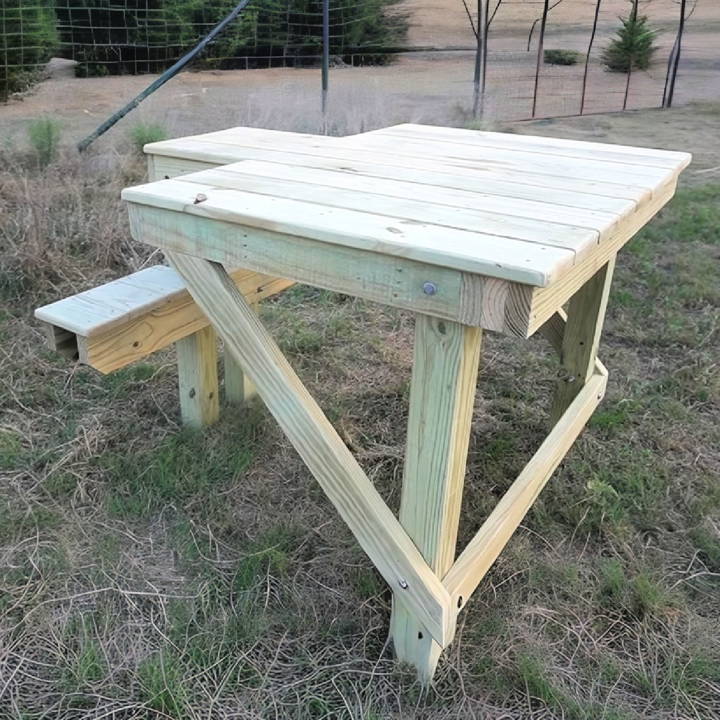
Having a shooting bench has made a big difference in my practice sessions. It's sturdy and reliable, which boosts my confidence. Investing time in building my own bench has paid off. I can now enjoy shooting more comfortably and accurately. These easy-to-follow plans can help you achieve the same.
I encourage you to get started with the content below; building your own bench can be a rewarding project.
Materials Needed and Their Purpose
Before diving into the build, I gathered all the necessary materials:
- 5 2x4x8s and 3 2x6x8s: These would form the basic frame of the bench, offering strength and support.
- 2 4x4x8s: For the legs, ensuring the bench would be sturdy enough to handle the recoil and weight.
- 5 5/4-inch 8-foot deck boards: These were chosen for the tabletop and seats, known for their durability and resistance to outdoor elements.
- 9 7-inch bolts and a multitude of 2.5-inch deck screws: For securely assembling the pieces together, guaranteeing a tight and secure fit.
Step by Step Instructions
Discover easy, step-by-step instructions for DIY shooting bench plans. Perfect for DIY enthusiasts looking to build a stable shooting platform.
Getting Started: Cutting the Wood
The first step of the process involved cutting all the wood according to the dimensions required for the bench. This preemptive measure saved me time and made the assembly process smoother.
Shaping the Bench
To add a touch of elegance, I notched the front end of the 2x6s - these would be used underneath the frame. Although I didn't obsess over precision, a 45-degree angle cut would suffice for anyone looking to replicate this.
Following the cutting, I laid out all the pieces for a dry fit. This was crucial to ensure everything lined up correctly before any permanent connections were made.
Building the Frame
Using the legs as spacers allowed me to get the exact measurements needed for the framework, which contributed significantly to the bench's stability. I was meticulous in my use of a square, ensuring everything remained aligned throughout the assembly.
The interior framework was simplified by centering the boards and evenly distributing the support. I swapped a 2x4 with a five-quarter inch deck board for the back piece of the frame for a sleeker look.
Attaching the Legs
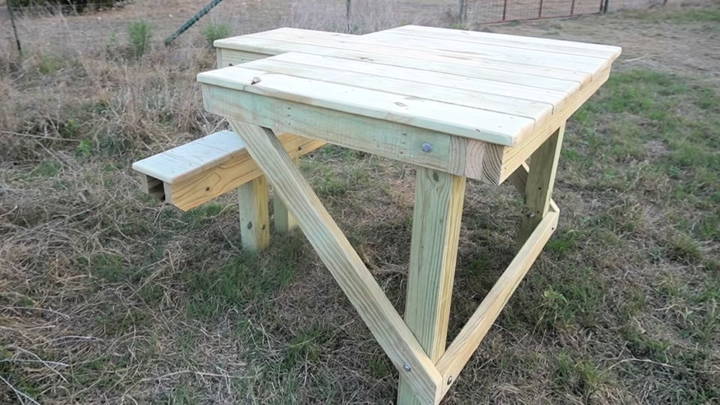
The legs were cut to 37 inches - a height that worked well for me but should be adjusted to fit your comfort. They were secured with three deck screws on each side and reinforced with bolts for extra durability.
Adding Support and Deck Boards
A cross brace was added 10 inches from the ground on the front end, using bolts on either side to ensure it remained firmly in place. This significantly contributed to the bench's overall support, which is essential for its intended heavy use.
When it came to the deck boards, starting from the middle and working outwards allowed for an even distribution and a pleasing aesthetic, with a slight overhang on each side.
Final Touches: Seats and Sanding
For the seats, I used the same deck boards, cut to a width that offered both comfort and functionality. The process was finished off with a router to smooth out the edges and a thorough sanding, moving from 80 grit up to 240 grit to ensure a smooth, splinter-free finish.
Customization Options
When building a DIY shooting bench, one of the most exciting aspects is the ability to tailor it to your specific needs and preferences. Here are some customization options that can enhance your shooting experience:
Adjustable Height and Angle
- Why it's useful: Adjustability ensures comfort for shooters of different heights and builds.
- How to implement: Incorporate telescopic legs or a hinged design to adjust the height and angle.
Seat Options
- Why it's useful: A comfortable seat can make long shooting sessions more enjoyable.
- How to implement: Add a padded, swivel chair or bench for comfort and mobility.
Left or Right-Handed Design
- Why it's useful: It accommodates the dominant hand of the shooter for ease of use.
- How to implement: Design the layout of the bench to suit left or right-handed shooters by placing the shooting rest and accessories accordingly.
Portable Features
- Why it's useful: Portability allows you to move the bench to different locations.
- How to implement: Use lightweight materials and add wheels or foldable components for easy transport.
Storage Compartments
- Why it's useful: Storage keeps all your shooting gear organized and within reach.
- How to implement: Build in drawers or shelves under the bench top for convenient storage of ammunition and tools.
Surface Material
- Why it's useful: The right surface material can affect the durability and maintenance of your bench.
- How to implement: Choose materials like treated wood or composite for weather resistance and longevity.
Gun Rests and Holders
- Why it's useful: They provide stability for your firearm and help improve accuracy.
- How to implement: Attach adjustable gun rests and holders that can accommodate different types of firearms.
Personal Touches
- Why it's useful: Personal touches make your shooting bench unique.
- How to implement: Add engravings, paint jobs, or other decorative elements that reflect your personal style.
Successful DIY projects require planning. Carefully choose customization options to fit your needs before building a functional, personalized shooting bench.
Advanced Techniques and Upgrades
For those who are experienced in DIY projects and looking to take their shooting bench to the next level, here are some advanced techniques and upgrades that can enhance functionality and performance:
Reinforced Construction
- Why it's useful: Ensures your bench can withstand heavy use and harsh weather conditions.
- How to implement: Use stronger joints like dovetail or mortise-and-tenon, and consider metal brackets for extra support.
Adjustable Windage and Elevation for Gun Rests
- Why it's useful: Allows for precise adjustments when aiming for better shooting accuracy.
- How to implement: Integrate mechanical or electronic systems that can fine-tune the position of the gun rest.
Sound Dampening
- Why it's useful: Reduces noise from the bench during shooting, which can be beneficial for concentration.
- How to implement: Add rubber padding or acoustic panels to areas where metal contacts metal or where vibrations are likely.
Integrated Cleaning Station
- Why it's useful: Provides a convenient place to clean and maintain firearms safely.
- How to implement: Designate a section of the bench with a rubber mat and compartments for cleaning supplies.
Quick-Change System for Accessories
- Why it's useful: Allows you to switch between different shooting accessories quickly.
- How to implement: Use a rail system or magnetic attachments for easy accessory changes.
Electronic Scoring System
- Why it's useful: Offers an efficient way to track shooting performance and progress.
- How to implement: Install a tablet or smartphone holder with a pre-loaded scoring app, or set up a wireless target system.
Solar-Powered Lights
- Why it's useful: Provides lighting for early morning or late evening shooting sessions.
- How to implement: Attach solar panels and LED lights to the bench, ensuring they are positioned to maximize sunlight exposure.
Weather Station
- Why it's useful: It helps you understand environmental conditions that can affect shooting accuracy.
- How to implement: Mount a small weather station to the bench to monitor wind speed, temperature, and humidity.
Modular Design
- Why it's useful: It allows for future expansions or modifications without rebuilding the entire bench.
- How to implement: Plan sections of the bench that can be easily replaced or upgraded, such as the tabletop or seating area.
With these methods and upgrades, your bench will meet current needs and future-proof your shooting.
Troubleshooting Common Issues
Building a DIY shooting bench can be a rewarding project, but it's not uncommon to run into a few hiccups along the way. Here's a guide to help you troubleshoot some of the most common issues you might encounter:
Stability Concerns
- Problem: The bench wobbles or doesn't sit flat on the ground.
- Solution: Ensure all legs are cut to equal length and check the ground for levelness. Adding adjustable feet can help achieve stability on uneven surfaces.
Material Wear and Tear
- Problem: Wood begins to rot, or metal starts to rust.
- Solution: Use treated lumber for wood components and rust-resistant coatings for metal parts. Regular maintenance and storage of the elements will also prolong the life of your bench.
Insufficient Space
- Problem: The bench feels cramped or lacks space for equipment.
- Solution: Consider the layout of your bench during the design phase. Plan for ample room for your firearm, ammunition, and accessories. Extend the tabletop or add side tables if necessary.
Difficulty in Assembly
- Problem: Parts don't fit together as intended.
- Solution: Double-check measurements before cutting and assembling. Use templates or jigs to ensure consistency and accuracy in repetitive cuts.
Comfort Issues
- Problem: The bench is uncomfortable during extended use.
- Solution: Adjust the height and angle of the bench to match your posture. Add padding to seating areas and ensure that the bench accommodates your dominant hand.
Poor Gun Support
- Problem: The firearm isn't adequately supported or is prone to slipping.
- Solution: Install high-quality gun rests and holders with non-slip surfaces. Consider adding sandbags for additional stability.
Noise and Vibration
- Problem: Excessive noise or vibration when shooting.
- Solution: Attach rubber pads or dampening materials where there is metal-to-metal contact. Ensure all bolts and screws are tightened securely.
Complexity in Portability
- Problem: The bench is too heavy or cumbersome to move.
- Solution: Use lightweight materials and modular designs that can be disassembled. Incorporate handles or wheels for easier transport.
Addressing these issues ensures your DIY shooting bench is stable, durable, and comfortable. Careful planning and maintenance are key to avoiding problems and keeping the bench in top condition.
FAQs About DIY Shooting Bench
Discover answers to common questions about DIY shooting benches, from materials to construction tips, in our comprehensive faq guide.
A DIY shooting bench is a custom-built platform designed for shooters to comfortably and stably shoot their firearms. It’s typically made from materials like wood or concrete and can be tailored to the shooter’s specific needs. Building your own shooting bench can be a cost-effective alternative to purchasing a pre-made one, and it allows for personalization in terms of size, height, and features.
The difficulty level of building a shooting bench can vary based on the design and materials chosen. There are plans available that cater to beginners, which usually require basic tools and straightforward cuts. More advanced designs might involve complex cuts and require power tools. Regardless of the plan, patience and careful following of instructions are key to a successful build.
Yes, many DIY shooting bench plans offer customization options, including making the bench portable. This typically involves adding features like folding legs or wheels. Plans that are designed to be portable will guide you through the necessary steps to ensure your bench is easy to move and set up at different locations.
For those new to DIY projects, it's important to start with a plan that matches your skill level. Look for plans with clear, step-by-step instructions and pictures. Don't rush the process; take your time to measure twice and cut once. It's also helpful to watch any available tutorial videos to understand the building process better. Lastly, consider weather-resistant materials if your bench will be exposed to the elements.
Stability and safety are paramount when constructing a DIY shooting bench. To ensure your bench is stable, use sturdy materials and follow the design specifications closely. Anchor the bench firmly to the ground if it's a permanent structure. For portable benches, ensure that the folding mechanism is secure and that the bench can support your weight and the recoil of your firearm without wobbling. Regular maintenance checks for any wear and tear or loose fittings are also crucial for long-term safety and stability.
Reflections and Advice
By taking the first step in building a DIY shooting bench, you gain more than just a piece of equipment. You learn new skills and make something useful with your own hands. Keep in mind these plans and tips are straightforward and can save you time.


