Building a DIY slide for kids can be a fun and rewarding project. I've always loved working with my hands and making something my children can enjoy. The day I decided to make a homemade slide was one of the best days. The excitement in my kids' eyes kept me motivated. This project brought my family closer together and sparked joy in our backyard.
I learned a lot from this experience and want to share simple steps that can help you, too. Here, I have kept the instructions straightforward and easy to follow. From gathering materials to the final touches, everything is detailed for you.
With a little patience and the right guidance, you can also build a wonderful DIY slide. Get ready to build something amazing!
Brainstorming and Planning
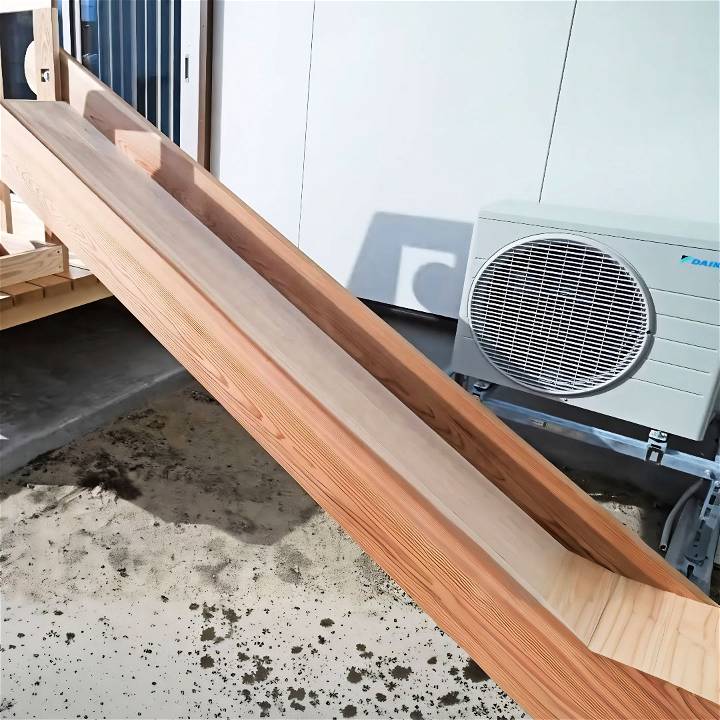
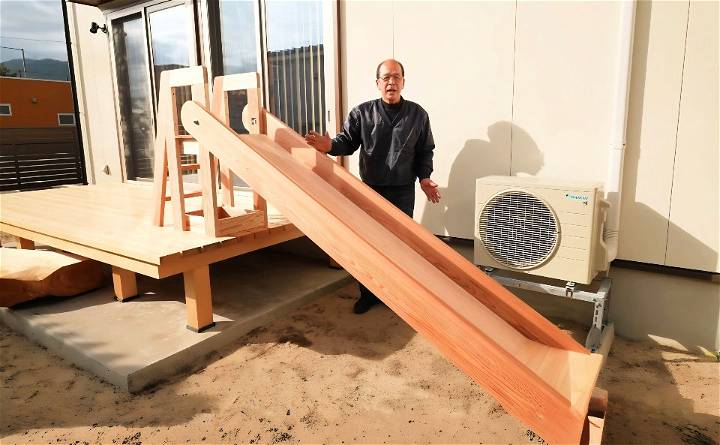
The request to build a wooden slide using Japanese cypress planks was both challenging and exciting. Given its intended use by children, the slide had to be safe, durable, and fun. The brainstorming phase was critical. I measured park slides for reference and decided on a 70% slope initially, expecting it to offer a smooth sliding experience similar to metal slides. However, this assumption was put to the test later on.
Materials Needed:
- 30mm Japanese Cypress Planks: Chosen for their durability and smooth surface, critical for a gentle sliding experience.
- Tools for Grooving and Joining: Essential for assembling the slide without visible screws or nails, ensuring a seamless finish.
Step by Step Instructions
Discover easy, step-by-step instructions for making DIY slides for your backyard. Our detailed guide will help you build fun and safety with a perfect homemade slide!
Cutting and Joining
The actual construction started by cutting the cypress planks to the desired length. I initially struggled with the curvature of the slide's top but learned that starting with a precise, straight cut was crucial. I opted for grooving the sides of the slide for easy assembly, avoiding the use of screws or nails for aesthetic and safety reasons.
Adjusting the Slope
The first test slide was too steep, posing a safety risk. Taking inspiration from airplane landings on short runways and the importance of a gentle slope, I revised the slope to 60% to match park slides. This adjustment was critical for ensuring a fun yet safe sliding experience.
Building the Tower
The tower was designed with a two-step ladder and a platform, using 106mm-wide studs for stability. Ensuring the structure could support various weights without compromising on safety was paramount. I hid the screws with tarusen plugs, adding a neat finish and highlighting the craftsmanship.
Installation and Finishing Touches
The slide was then treated with oil to ward off water damage, carefully considering the balance between water resistance and maintaining a safe level of slipperiness. The installation process included securing the slide with bolts and ensuring it was stable on the ground and ready for the children's enjoyment.
Key Considerations:
- Safety: Adjusting the slope and ensuring a smooth but not overly slippery finish were all done with the children's safety in mind.
- Durability: Choosing Japanese cypress and applying protective oil extended the slide's life, ensuring years of fun.
- Fun Factor: The design process included considerations like width and curve to maximize enjoyment without compromising safety.
Customization Ideas for Your DIY Slide
Building a DIY slide is not just about functionality; it's also an opportunity to add a personal touch and make it a unique feature in your home or garden. Here are some customization ideas to inspire you:
- Choose a Theme: Kids love themes, and so do slides! Whether it's a pirate ship, a castle, or a jungle adventure, picking a theme can make your slide a centerpiece of playtime imagination. Use colors, flags, and symbols to bring the theme to life.
- Color It Up: Bright, vibrant colors not only attract attention but can also stimulate a child's visual development. Paint the slide in your child's favorite colors or use patterns and designs for a more artistic touch.
- Add Fun Features: Consider adding elements like a water hose for a makeshift water slide during the summer or attach a climbing wall to the side to make it a multi-activity structure.
- Safety First: While customizing, never compromise on safety. Ensure that all materials are non-toxic, the edges are smooth, and the structure is stable. Safety rails and adequate padding at the bottom are a must.
- Interactive Elements: Attach a bell at the top or bottom of the slide, or use a section of the slide as a chalkboard where kids can draw. These small additions can provide hours of extra fun.
- Glow in the Dark: For an extra magical touch, use glow-in-the-dark paint or stickers to outline the slide. It will make nighttime play exciting and the slide easier to see.
- Make It Educational: Integrate educational elements like numbers or alphabets along the steps or sides of the slide. It's a great way to combine learning with play.
- Sensory Play: Attach different textures along the handrails or sides for sensory play. Materials like foam, fabric, or rubber can be both functional and fun for little hands to explore.
- Eco-Friendly Materials: If you're environmentally conscious, choose sustainable materials for your slide. Recycled plastics or sustainably sourced wood can be great options.
- Seasonal Decor: Decorate the slide according to seasons or festivals. It can be a fun family activity to redecorate the slide for Christmas, Halloween, or springtime.
The key to a successful DIY project is to ensure it's safe, fun and reflects the personality of its users.
Maintenance and Upkeep for Your DIY Slide
Keeping your DIY slide in top condition is crucial for safety and longevity. Here's a straightforward guide to maintaining your slide:
- Regular Cleaning: Wipe down the slide regularly to keep it free of dirt and debris. Use gentle soap and water for cleaning; harsh chemicals can damage the slide material.
- Check for Wear and Tear: Inspect your slide often for any signs of wear, such as cracks or rust. Address these issues promptly to prevent them from worsening.
- Secure All Connections: Make sure all parts of the slide are securely attached. Tighten any loose bolts and replace any that are worn out or rusted.
- Lubricate Moving Parts: If your slide has any moving parts, such as a ladder or swing, lubricate them periodically to ensure smooth operation.
- Protect from Weather: If possible, cover your slide during harsh weather, or consider using materials that are weather-resistant to prolong its life.
- Update Safety Features: As safety standards evolve, make sure your slide complies with the latest recommendations. This may include adding padding or adjusting rail heights.
- Involve the Kids: Teach your children to take care of the slide. Simple tasks like wiping down the slide can be made into a fun activity.
- Seasonal Checks: Before and after each season, give your slide a thorough check-up to prepare it for the coming months.
- Keep a Maintenance Log: Document each maintenance activity. This log will help you keep track of the slide's condition and any repairs made.
By following these simple steps, you can ensure that your DIY slide remains a safe and enjoyable place for children to play for years to come.
Safety Guidelines for Your DIY Slide
Ensuring the safety of your DIY slide is paramount. Here's a guide to help you build a slide that's not only fun but also secure for everyone:
- Location: Choose a level area with good visibility. Keep the slide away from fences, trees, or any other obstacles that could pose a risk.
- Materials: Use sturdy, weather-resistant materials like treated wood or commercial-grade plastic. Avoid anything that splinters or corrodes easily.
- Stability: Make sure the slide's structure is anchored firmly to the ground. If it's a wooden frame, secure it with concrete for extra stability.
- Slide Surface: The slide itself should be smooth with no sharp edges or protrusions. Regularly check for and smooth out any rough spots.
- Handrails and Barriers: Install handrails for the stairs and barriers at the top to prevent falls. Ensure they are at a suitable height for children to hold onto easily.
- Landing Area: At the bottom of the slide, build a soft landing zone. Use materials like rubber mulch or sand to cushion any falls.
- Regular Maintenance: Inspect the slide frequently for any potential hazards like loose screws or worn-out parts. Fix any issues immediately.
- Sun Protection: If the slide is outdoors, position it in a way that it's shaded during peak sun hours to prevent it from getting too hot.
- Supervision: Always have an adult supervise when children are using the slide. Set clear rules for safe use.
By following these guidelines, you can build a safe environment for children to enjoy their DIY slides. Remember, regular checks and maintenance are key to ensuring long-term safety and fun.
FAQs About DIY Slide
Get answers to common FAQs about a DIY slide, including materials needed, safety tips, and step-by-step instructions for a fun home project.
Safety is paramount when building a DIY slide. Ensure that all edges are smooth and there are no exposed screws or sharp edges. The slide should have side barriers to prevent falls, and the end of the slide should be gradual to allow for a safe exit. It’s also important to adhere to a 30-degree angle for the slide to prevent it from being too steep.
Yes, you can build a slide for both indoor and outdoor use. For an outdoor slide, you'll need to build a sturdy structure that can withstand weather conditions. For an indoor slide, you can convert a staircase by attaching a melamine-faced MDF board and foam pipe insulation for safety.
The space required for a DIY slide depends on its size and design. Generally, maintain a buffer zone of at least 12 feet around the slide structure. The actual slide will extend horizontally about 80 to 90 inches from the top of the structure.
Regular maintenance is crucial for the longevity of your DIY slide. For outdoor slides, check for wood rot, rust, and loose screws periodically, especially before heavy use. Clean the slide surface with mild soap and water to keep it slick and safe for sliding. For indoor slides, dusting and wiping down the slide regularly will suffice.
Get creative by adding fun elements to your DIY slide. Consider building a rolling pipe slide using PVC pipes for a unique rolling effect, or transform your staircase into a slide with plywood and foam insulation for safety. You can also explore cardboard slides for an easy and temporary setup that's great for parties or special occasions.
Final Thoughts
Wrapping up, making a DIY slide for kids is a fantastic project that combines fun and safety. By following our steps, you can build an enjoyable and secure homemade slide. Start your DIY slide project today and give your children a playful outdoor experience.


