Building something with your own hands brings a sense of achievement. When I built my own DIY sliding gate, I felt empowered and satisfied. It was easier than I first thought, and it didn't take many tools or materials. The process was like piecing together a puzzle, and seeing it slide smoothly afterward was the best reward.
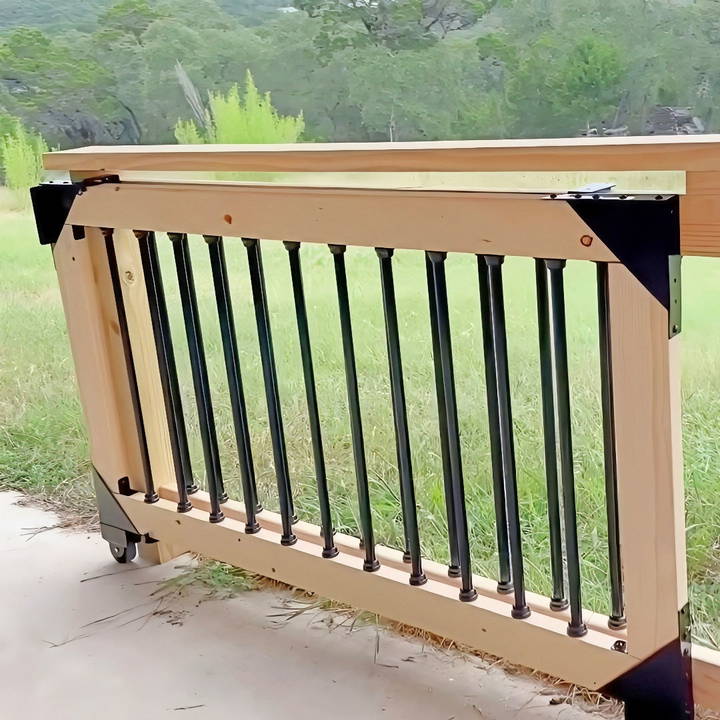
Building a sturdy wood sliding gate involves several simple steps. I started by gathering the right supplies. Measuring the opening accurately is key to getting the fit just right. Even though it might feel a bit overwhelming at first, breaking it down into smaller tasks made it manageable. You just need patience and a bit of planning. I'm here to guide you through it.
Let's begin this interesting project that can enhance your property. I believe you can handle it well, and watching that gate slide effortlessly will be your reward. Follow the upcoming steps aimed at helping you build a sliding gate with ease.
Essential Materials and Their Purpose
For my project, I needed a few key materials:
- Diagonal Brace or Turnbuckle Kit: To counteract the sagging. A diagonal brace adds structural support, while a turnbuckle kit offers a quick, adjustable solution.
- Screws or Lags: Essential for securing the turnbuckle or brace in place. Upgrading to larger screws or lags ensures the fittings handle the tension without failing.
- Corner Brackets or Gussets: Optional, for additional support and to maintain the gate's shape.
- Caster (for large gates on even ground): To support the gate's weight and facilitate movement.
- 2x4 Lumber and Corner Brackets (for Sliding Gates): The basic building blocks for constructing a new sliding gate.
Step by Step Instructions
Learn how to fix a sagging gate and build a sliding gate effortlessly with this comprehensive, step-by-step DIY sliding gate guide.
Fixing a Sagging Gate
- Inspect the Gate and Posts: Confirm where the issue lies—gate or post.
- Choose Your Solution: Depending on your preference and the gate's design, opt for a wooden diagonal brace for a more traditional look or a turnbuckle kit for an easy, adjustable fix.
- Install the Brace or Turnbuckle: If going for the brace, ensure it's placed in a compression setting, running from the bottom of the hinge side to the top of the latch side. For the turnbuckle, attach it diagonally across the gate in the opposite direction.
- Secure with Strong Fixings: Use durable screws or lags to withstand tension.
Building a Sliding Gate
- Design the Gate: Measure the desired width, remembering that sliding gates require equal clearance on one side to open fully.
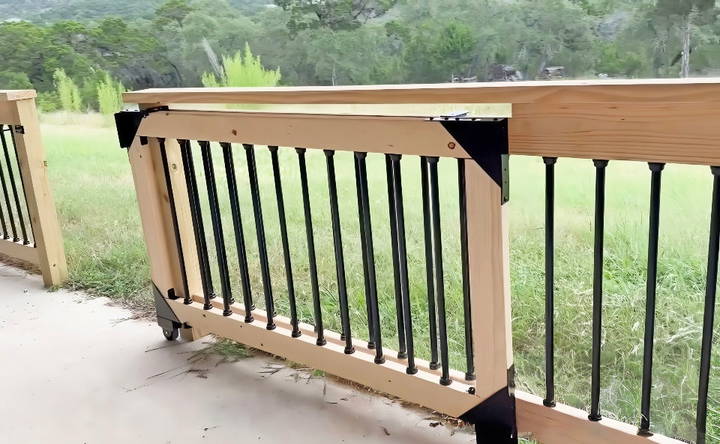
- Construct the Frame: Use 2x4 lumber to build the gate frame, securing corners with brackets.
- Add Hardware: Fix the rolling hardware at the bottom and a guide at the top to keep the gate aligned.
- Finish with Aesthetics: Customize the gate's appearance to match your taste and existing fencing.
Tips for Success
- Always Use Compression for Braces: Remember, the bottom of the diagonal brace should start at the hinge side's base, moving upwards to the opposite corner.
- Upgrade to Stronger Fixings as Needed: Don't hesitate to use heftier screws or lags for a secure installation, especially for turnbuckle kits.
- Consider the Gate's Weight: Larger gates might need a caster for support, but this requires flat ground.
- Sliding Gates Offer Convenience: If space and terrain allow, a sliding gate can be a sleek and practical choice.
Design Customization Ideas
When it comes to adding a personal touch to your DIY sliding gate, the possibilities are as vast as your imagination. Here's how you can tailor your gate to reflect your personal style:
- Choose Your Material Wisely: Start by selecting a material that not only suits your taste but also complements your home's exterior. Wood offers a classic look and can be painted or stained to match your home. Metal, on the other hand, provides a sleek, modern feel and is known for its durability.
- Color It Up: The color of your gate makes a significant statement. You can either choose a color that blends with the surroundings for a subtle look or go bold with a contrasting shade that stands out.
- Incorporate Patterns and Designs: If you're using metal, consider laser-cut patterns that can range from simple geometric shapes to intricate custom designs. For wooden gates, carved details can add a unique character.
- Add Decorative Hardware: Hinges, handles, and locks aren't just functional; they can also be decorative. Choose hardware that complements your gate's style and adds an extra element of design.
- Lighting for Aesthetics and Safety: Install lighting fixtures that not only illuminate the gate area for safety at night but also enhance the gate's appearance. Solar-powered lights are a great eco-friendly option.
- Integrate Landscaping: Surround your gate with plants and shrubs that accentuate its beauty. Climbing vines on a trellis can build a stunning natural frame for your gate.
- Automate with Style: If you're installing an automated gate, select controls that are user-friendly and visually appealing. Some systems come with stylish keypads or even smartphone integration.
- Think About the Details: Small touches like post caps, decorative scrolls, or even a custom nameplate can make your gate feel truly yours.
The key to a successful DIY project is to make it functional and reflect your style. Keep it simple, take your time, and have fun!
Advanced Features and Technology
In the realm of DIY sliding gates, technology has advanced significantly, offering homeowners a range of features that enhance convenience, security, and integration with smart home systems. Here's a look at the latest technological advancements:
- Smart Access Controls: Modern sliding gates can be equipped with biometric scanners and remote-controlled access systems, allowing for secure and convenient entry. With these systems, you can open your gate with a simple touch or from a distance, adding a layer of security and sophistication to your home.
- Smartphone Integration: Many sliding gate systems now offer smartphone-enabled controls. This means you can open, close, and monitor your gate from anywhere using your mobile device. This feature is particularly useful for those who travel often or want to let guests in while they're away.
- Automated Safety Features: Contemporary sliding gates come with built-in safety mechanisms, such as automatic obstacle detection and auto-reverse functions. These features help prevent accidents by stopping or reversing the gate if an object or person is detected in its path.
- Energy Efficiency: The use of solar panels to power sliding gates is on the rise. This eco-friendly option not only reduces your carbon footprint but also cuts down on electricity costs.
- Customizable User Settings: Advanced control systems allow you to set timer functions and automatic closing features. You can program your gate to close automatically after a set time, ensuring it's never left open by mistake.
- Integration with Home Automation: Sliding gates can now be integrated into your home's automation system. This allows for seamless operation alongside other smart home devices, such as lights and security cameras.
- Durability and Weather Resistance: With improvements in materials and construction techniques, modern sliding gates are built to withstand harsh weather conditions, providing long-lasting performance with minimal maintenance.
Adding these advanced features to your DIY sliding gate boosts functionality, security, and home value. Adopt these technologies to modernize your property.
Maintenance and Troubleshooting
Keeping your sliding gate in top condition is crucial for ensuring it operates smoothly and lasts for years. Here's a straightforward guide to maintaining your gate and solving common problems:
- Regular Cleaning: Dirt and debris can cause your gate to stick or derail. Clean the track and wheels regularly with a brush and soapy water. Make sure to remove any leaves, stones, or other obstructions.
- Lubrication: A well-lubricated gate prevents wear and tear on moving parts. Use a silicone-based lubricant on the wheels and track every few months to keep the gate sliding smoothly.
- Check for Wear: Inspect the wheels and track for signs of wear, such as cracks or uneven wear patterns. If you notice damage, replace the parts as needed to avoid further issues.
- Tighten Loose Parts: Over time, bolts and screws can loosen. Check them periodically and tighten as necessary to ensure the gate's stability and prevent rattling noises.
- Troubleshoot the Motor: If you have an automated gate and it's not working properly, first check the power supply and remote control batteries. If these are fine, the issue may be with the motor or sensors. Refer to the manufacturer's manual for troubleshooting steps or contact a professional if needed.
- Solve Noise Issues: If your gate is noisy, it might need lubrication or there could be something obstructing its path. Clean and lubricate the gate, and if the noise persists, check for loose parts or contact a professional.
- Address Slow Movement: A gate that moves slowly could be due to a lack of power or an obstruction. Ensure the power source is adequate, and the track is clear. If the problem continues, the motor may need attention.
- Remote Control Problems: If your gate doesn't respond to the remote control, try replacing the batteries. If that doesn't work, reprogram the remote or consult the manual for further instructions.
Following these tips keeps your sliding gate working well and prevents common problems. Regular maintenance extends its life and ensures it remains reliable for home security.
Safety Considerations
When installing a DIY sliding gate, safety is paramount. Here's how to ensure your sliding gate is safe for everyone:
- Sturdy Support Posts: Your gate should be held up by strong posts to prevent it from falling if a part like a roller breaks, which could cause injury.
- Secure Actuators: Actuators and limit switches define the gate's open and closed positions. They must be securely attached to avoid detachment due to vibration or contact, which could lead to the gate over-traveling.
- Reliable Physical Stops: Make sure the stops at both ends of the gate's path are strong enough to handle the gate's force without breaking. Welding, rather than screwing, end plates can provide extra strength.
- Safety Edges: Soft touch safety edges can stop the gate if something is in its path, preventing accidents.
- Fenced Areas: Consider fencing off the area behind the gate to prevent people or pets from being in the way as the gate opens.
- Regular Risk Assessments: Regularly check for potential hazards and assess risks to prevent accidents. This includes making sure the gate's path is clear and that all safety features are functioning properly.
By following these guidelines, you can build a safe environment around your DIY sliding gate, ensuring it's a secure and reliable addition to your property.
FAQs About DIY Sliding Gate
Get quick answers to FAQs about DIY sliding gates. Learn installation tips, benefits, and maintenance for your home improvement project.
Yes, you can automate your sliding gate. You can install an automatic opener with a DIY approach, which can be powered by electricity or solar energy. Make sure to follow the manufacturer’s instructions carefully for installation and safety guidelines.
To ensure smooth movement, install the gate track level on a solid foundation, like a concrete footing. Use quality gate wheels and make sure they are properly aligned. Regular maintenance, such as cleaning the track and lubricating moving parts, will also help keep the gate moving smoothly.
Regular maintenance for a sliding gate includes checking for loose hardware, lubricating moving parts, and ensuring the track is free of debris. It’s also important to inspect the gate for any signs of wear and tear and to make any necessary repairs promptly to prevent further damage.
Selecting the right motor for your sliding gate depends on the weight and size of the gate. Look for a motor with enough power to handle your gate’s specifications. It’s also important to consider the gate’s frequency of use; gates that are used more frequently will require a more robust motor. For most residential sliding gates, a motor rated for 600-1200 pounds is sufficient.
Safety is paramount when installing a DIY sliding gate. Ensure that the gate has safety sensors that can detect obstacles and stop the gate from closing if something is in the way. It's also wise to include a manual release mechanism in case of power outages or emergencies. Additionally, make sure that the gate edges are smooth and free of sharp protrusions to prevent injuries.
Conclusion
Wrapping up, making your own DIY sliding gate can be a fulfilling project that enhances your property's security and aesthetics. Building your own DIY sliding gate allows you to customize it to fit your needs perfectly. By following this guide on how to build a sliding gate, you can achieve a functional and visually appealing addition to your home. Start today and enjoy the benefits of a secure, stylish entrance.


