Jumping into a DIY slip-and-slide sounded like a fun idea. I wanted to make an exciting summer project for my friends and me. So, I gathered everything I needed: a big plastic tarp, some water, and a few simple tools. Setting it up felt like a small adventure. With a sunny day ahead, our spirits were high as we began to make our own summer fun.
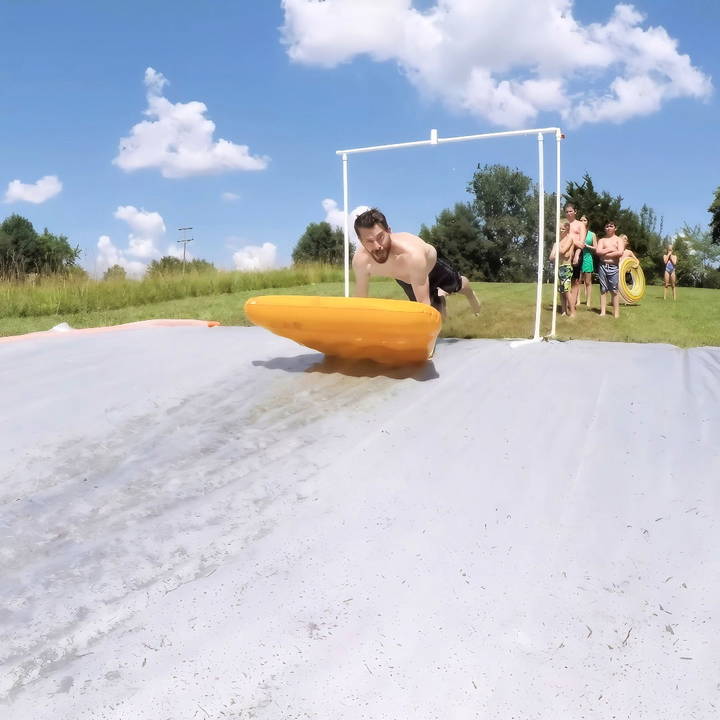
If you're looking for a summer activity, making a slip-and-slide can bring so much fun! I'm sharing my experience to help you get started on yours.
Getting Started: Find the Perfect Hill
The first step to building a massive slip 'n slide is to find the perfect location. Ideally, you want a hill with a gentle slope—not too steep, but with enough incline to allow for a thrilling slide. If you don't have a hill, consider a slightly inclined area in your backyard or a nearby open field with permission.
- Why a hill? The slope is crucial because it provides the natural momentum needed to make the slide fun without risking injury. A flat surface wouldn't offer the same excitement, and a too-steep hill could be dangerous.
- My Experience: I was fortunate to have a friend, Tony, who has an excellent hill on his property. He inspired me to make my own version, and with his advice, I learned that a hill with a 10-15 degree incline is the sweet spot.
Materials You'll Need
Before jumping into the build, gather all the necessary materials. Here's a breakdown of what I used and why:
- Heavy-duty plastic sheeting: This is the most critical component. I chose a 100 ft x 10 ft heavy-duty plastic sheeting roll. Thicker plastic (at least 6 mil) is more durable and less likely to tear.
- PVC pipes and fittings: These are used to build a spray bar to keep the slide continuously wet.
- Pool noodles: Essential for making safe bumpers along the sides of the slide.
- Landscape staples: These keep the pool noodles and plastic in place.
- Garden hose and connectors: To connect the water supply to the spray bar.
- Soap or a homemade slippery solution: To make the slide extra slick!
Pro Tip: Always opt for high-quality materials. Cheaper plastic may rip, and poor-quality fittings could leak.
Step by Step Instructions
Make your own DIY slip and slide with our step-by-step guide. Learn how to build a spray bar, make the slide slick, and enjoy safe summer fun!
Step 1: Building the Spray Bar
The spray bar is key to keeping the slide wet and slippery. For this part, I used PVC pipes, fittings, and some creative assembly.
Materials and Tools:
- PVC pipes (different sizes for the base and bar)
- T-fittings and elbow joints
- Garden hose adapter
- PVC cement and primer
- A hand saw or miter saw
Building Process:
- Cut the Pipes to Size: Start by cutting the PVC pipes to make the base and the upright pieces. I found that using a miter saw made quick work of cutting PVC, but a hand saw works too.
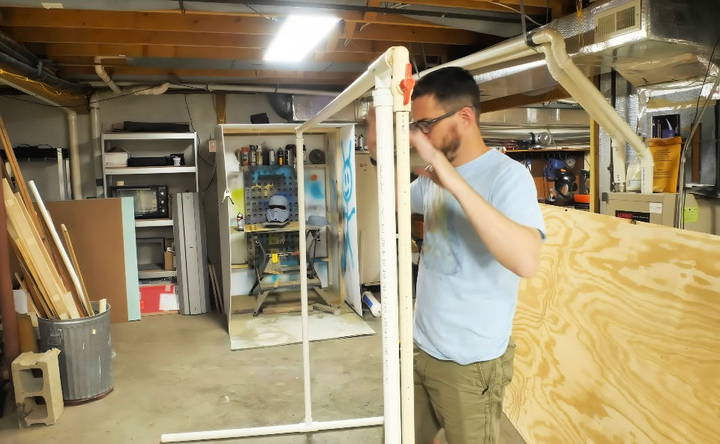
- Assemble the T-stands: The spray bar setup consists of two T-stands on either side and a connecting bar. The T-stands provide stability and can be disassembled easily for storage.
- Connect the Spray Bar: Attach a horizontal bar between the two T-stands. Ensure this bar is glued securely to prevent leaks. The goal is to make a sturdy structure that can handle water pressure.
- Drill Holes in the Spray Bar: Drill several small holes along the length of the spray bar to make water jets. I drilled mine in different directions to cover the entire slide width. You can adjust the holes based on the water flow.
- Personal Insight: The assembly process might seem complex, but it's quite straightforward. The key is to ensure that all joints are sealed tightly with PVC cement to prevent leaks. I found that using CPVC for connecting to a garden hose was much easier than standard PVC due to its fitting size compatibility.
Step 2: Making the Slide Slick and Safe
Once the spray bar is ready, the next step is to set up the slip 'n slide surface. This part is where you transform a simple hill into a slippery, thrilling ride.
Setting Up the Plastic Sheeting:
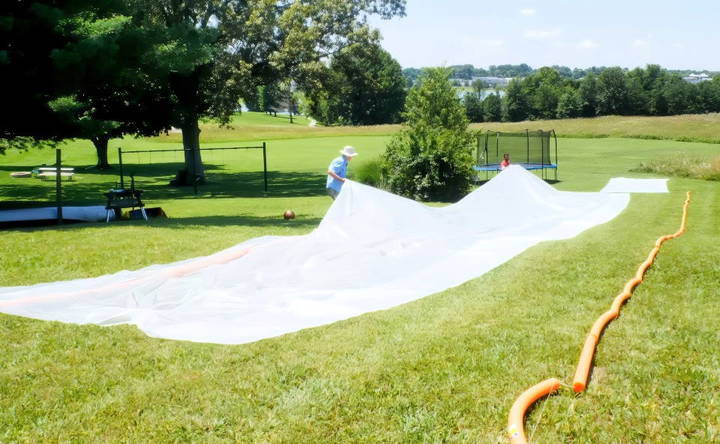
- Lay Down the Plastic Sheeting: Roll out the heavy-duty plastic sheeting from the top to the bottom of the hill. Ensure it is taut to avoid wrinkles that could cause accidents.
- Secure the Sides with Pool Noodles: I bought all the pool noodles I could find at the local dollar store. Cut them lengthwise and use them as bumpers on either side of the slide. This not only keeps the water on the plastic but also provides a soft boundary to keep sliders safe.
- Anchor the Plastic and Pool Noodles: Use landscape staples to secure the plastic and pool noodles in place. Ensure they are firmly in the ground, especially near the top where the most force will be exerted.
Soap Drip System for Extra Fun:
To make things even slicker, I devised a soap drip system using a small plastic container attached to the spray bar. Drill a tiny hole in the bottom, fill it with dish soap, and let it slowly drip down. This keeps the slide lubricated without needing to keep dumping soap manually.
- Lessons Learned: When anchoring the plastic sheeting, avoid areas with sharp rocks or roots underneath. Even with heavy-duty plastic, rough terrain can cause tears.
Step 3: Testing and Adjusting the Setup
With everything in place, it's time to test out your giant slip 'n slide!
- Turn on the Water and Observe: Start with a low water flow to ensure everything works as planned. Check for leaks in the spray bar and adjust the water jets to cover the slide evenly.
- Adjust the Soap Drip Rate: Ensure the soap drip isn't too fast; you only need a small amount to keep it slick.
- Run a Few Test Slides: I had some friends test it out first (always good to have volunteers!). This is when you can adjust water flow, spray direction, or add more sprinklers if needed.
Pro Tip: If the water doesn't reach far enough down the slide, consider adding a second sprinkler midway. It distributes water more evenly, ensuring a consistent slide from top to bottom.
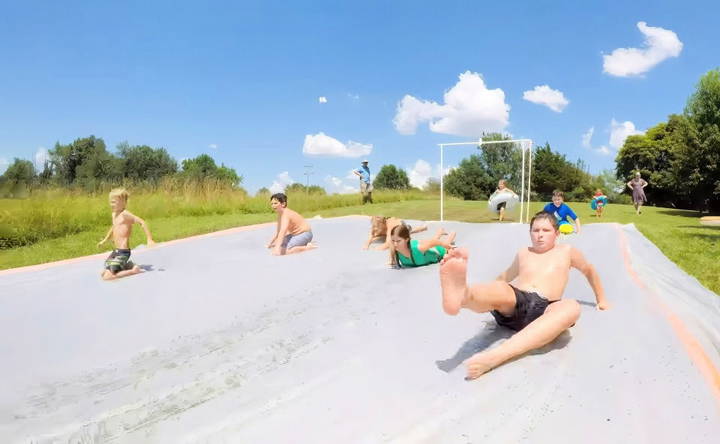
Step 4: Enjoy the Fun!
Now comes the best part—sliding down! With everything set up, invite your friends, grab some floats, and have a blast. Remember, safety first. Always have someone supervising, especially if kids are involved.
- What I Discovered: After several rounds of sliding, we noticed that the grass under the plastic began to brown due to the heat trapped by the tarp. If you plan to keep the slide up for more than a day, consider moving it periodically or watering the grass before and after setup.
Customization Ideas
Customizing your DIY slip 'n slide can make the experience even more fun and memorable. Here are some creative ideas to help you personalize your slip 'n slide:
Themes
Adding a theme can transform your slip 'n slide into an exciting adventure. Here are a few ideas:
- Pirate Adventure: Use pirate flags, inflatable swords, and treasure chests. You can even play pirate-themed music to set the mood.
- Jungle Safari: Decorate with inflatable animals, jungle plants, and vines. Encourage kids to dress up as explorers.
- Underwater World: Use blue tarps, inflatable sea creatures, and water-themed decorations. Play ocean sounds or beach music.
Add-ons
Enhance the fun with these add-ons:
- Water Balloons: Scatter water balloons along the slide for an extra splash.
- Sprinklers: Place sprinklers along the sides of the slide to keep it wet and slippery.
- Inflatable Obstacles: Add inflatable rings or tunnels for kids to slide through.
Color and Design
Make your slip 'n slide visually appealing:
- Bright Colors: Use colorful tarps or paint to make the slide stand out.
- Patterns: Make patterns with duct tape or paint, such as stripes or polka dots.
- Glow-in-the-Dark: Use glow-in-the-dark paint or tape for nighttime fun.
Interactive Elements
Incorporate interactive elements to keep everyone engaged:
- Water Guns: Provide water guns for kids to use while sliding.
- Bubbles: Set up a bubble machine at the end of the slide for a bubbly finish.
- Foam: Add a foam machine to make a slippery, foamy surface.
Safety Enhancements
Ensure safety while customizing:
- Soft Landing: Place a padded mat or inflatable pool at the end of the slide to ensure a soft landing.
- Boundary Markers: Use cones or flags to mark the boundaries of the slide area.
- Non-Slip Mats: Place non-slip mats around the slide area to prevent slipping when getting on and off the slide.
Personal Touches
Add personal touches to make the slide unique:
- Names and Messages: Write names or fun messages on the slide with waterproof markers.
- Photos and Memories: Attach waterproof photos or drawings to the slide for a personalized touch.
By incorporating these customization ideas, you can make a unique and exciting slip 'n slide experience that everyone will enjoy. Remember to prioritize safety and have fun!
Troubleshooting Common Issues
Even with the best preparation, you might encounter some issues with your DIY slip 'n slide. Here are some common problems and how to fix them:
Leaks and Tears
Problem: Small holes or tears in the plastic can cause water to leak out, reducing the slide's effectiveness.
Solution:
- Patch Kit: Use a vinyl repair kit or waterproof tape to patch small holes. Clean and dry the area before applying the patch.
- Duct Tape: For a quick fix, use duct tape on both sides of the tear. Press firmly to ensure it sticks well.
Water Flow Problems
Problem: Uneven water distribution or low water pressure can make parts of the slide dry and less slippery.
Solution:
- Sprinklers: Place multiple sprinklers along the length of the slide to ensure even water coverage.
- Hose Position: Adjust the position of the hose to cover dry spots. You can also use a splitter to connect multiple hoses.
- Water Pressure: Check for kinks in the hose that might be reducing water flow. Ensure the water source is fully turned on.
Slippery Surface Issues
Problem: The slide might not be slippery enough, causing users to slow down or stop.
Solution:
- Dish Soap: Apply a small amount of biodegradable dish soap to the slide to increase slipperiness. Avoid using too much to prevent excessive foam.
- Water Flow: Ensure there is a continuous flow of water over the slide. Adjust sprinklers or hoses as needed.
Slide Movement
Problem: The slide might move or shift during use, making safety hazards.
Solution:
- Anchors: Use tent stakes or garden staples to secure the edges of the slide to the ground. Make sure they are placed flat to avoid tripping.
- Weights: Place heavy objects like sandbags or water-filled jugs along the sides to keep the slide in place.
Surface Preparation
Problem: Uneven or rough surfaces can cause discomfort or injuries.
Solution:
- Clear Debris: Before setting up the slide, clear the area of rocks, sticks, and other debris.
- Padding: Lay down a tarp or old blankets under the slide for extra cushioning on hard surfaces.
Water Temperature
Problem: Cold water can be uncomfortable, especially for younger children.
Solution:
- Warm Water: Fill a large container with warm water and mix it with the cold water from the hose. This can help moderate the temperature.
- Timing: Set up the slide during the warmest part of the day to make the water feel more comfortable.
Safety Concerns
Problem: Safety issues can arise, especially with younger children.
Solution:
- Supervision: Always have an adult supervise the slide to ensure safe play.
- Rules: Establish and enforce rules, such as one person sliding at a time and no running on the slide.
By addressing these common issues, you can ensure a smooth and enjoyable experience for everyone using your DIY slip 'n slide.
FAQs About DIY Slip 'n Slide
Discover answers to common FAQs about DIY slip 'n slide, including setup tips, safety advice, and essential materials. Make your summer fun and safe!
Safety is important for a fun experience. Here are some tips:
Clear the area: Remove any sharp objects or debris from the slide path.
Use thick plastic: Ensure the plastic sheet is at least 6 mil thick to prevent tears.
Secure the slide: Use enough stakes to keep the plastic in place.
Supervise children: Always have an adult present to supervise the activity.
To enhance the fun, consider these additions:
Water toys: Add water cannons or sprinklers for extra excitement.
Foam pool noodles: Make arches or barriers for a more challenging slide.
Colored soap: Use colored soap for a visually appealing slide.
Yes, you can use a tarp, but there are a few things to consider:
Thickness: Ensure the tarp is thick enough (at least 6 mil) to withstand the sliding and prevent tears.
Smoothness: Tarps can have seams or textures that might not be as smooth as plastic sheeting, which could affect the sliding experience.
Size: Make sure the tarp is large enough to make a fun and safe slide.
To minimize the risk of injuries:
Inspect the area: Check the slide path for rocks, sticks, or other debris.
Use proper materials: Ensure the plastic or tarp is thick and smooth.
Supervise: Always have an adult present to monitor the activity.
Limit the number of sliders: Avoid overcrowding the slide to prevent collisions.
If your slip 'n slide gets damaged:
Patch small holes: Use waterproof tape or a patch kit to fix small tears.
Replace if necessary: If the damage is extensive, it might be best to replace the plastic sheeting or tarp.
Regular maintenance: Regularly inspect and maintain the slide to prevent damage.
Conclusion: Worth Every Minute
In the end, making a DIY slip-and-slide was more than just a project; it was a day full of laughter and memories. I encourage you to grab your supplies and get started. You'll have a blast, and it's easier than you think!
Taking the plunge to make new memories is always worth it, so go ahead and make your own slip-and-slide adventure!


