Making a DIY socket organizer was a game-changer for my garage. After years of misplacing tools, I decided to take control. I wanted everything in one place, easy to find, and neatly arranged. With a few simple materials and some creativity, I transformed my workbench into an organized workspace. Now, I never waste time searching for the right socket.
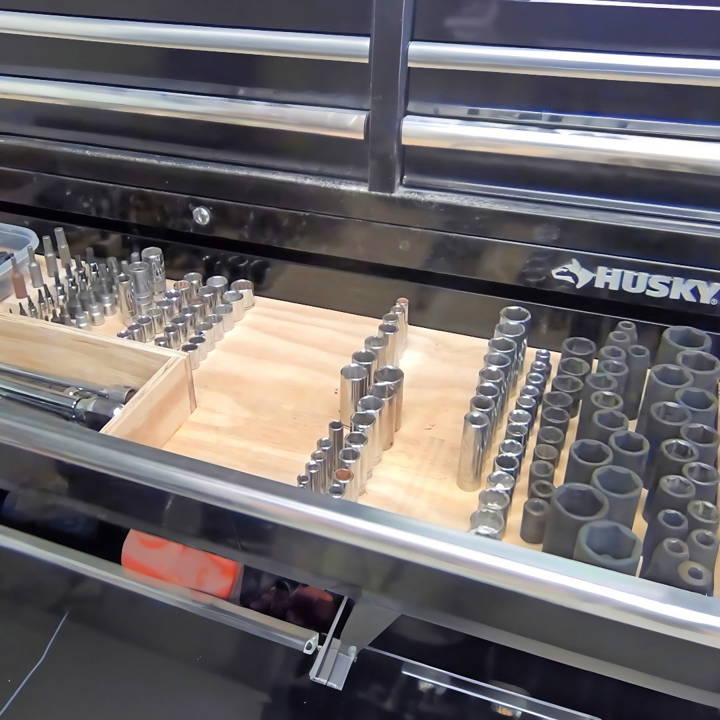
Starting your own homemade socket organizer is easier than you might think. By using basic items like wood, nails, and paint, you can design a unique holder that fits your needs. I carefully measured my sockets and cut the wood to match. After assembling and painting, my DIY project was ready. This small effort improved my efficiency a lot and kept my tools safe.
I'm sharing this guide so you can DIY your own socket organizer too and enjoy a clutter-free workspace. Follow along, and you'll find it easier to keep your sockets organized and accessible.
Materials Needed and Why
- Scrap Two-by-Fours: These provide a sturdy base for the dowels that will hold your sockets in place. You likely already have some lying around.
- Plywood: Serves as the foundation for your organizer, easily fitting into your drawer.
- Square Dowels (1/4 inch, 3/8 inch, and 1/2 inch): These are essential for making posts that your sockets will attach to. The variety in size accommodates different socket sizes.
- Wood Glue: To secure the dowels to the plywood and ensure a strong bond.
- Table Saw and Sled: For cutting the scrap wood and dowels accurately.
- Thickness Planer (Optional): Helps achieve the perfect fit for the dowels into the sockets if needed.
- Bolt or Similar Tool: Used to press the dowel into the socket and increase the glue bond.
Step by Step Instructions
Learn how to make a DIY socket organizer with our step-by-step instructions, from planning your layout to finalizing the organizer.
Step 1: Plan Your Layout
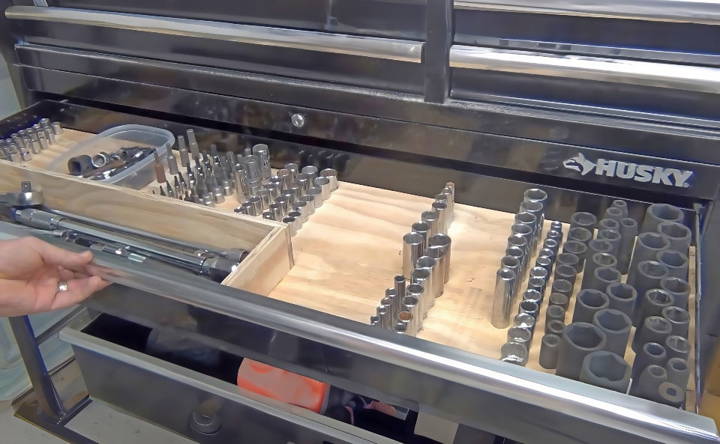
Take some time to lay out your sockets on a piece of plywood. Consider how you typically use your sockets and arrange them in a way that makes sense for your workflow. Don't forget to make a trough for ratchets and long extensions if you need them.
Step 2: Prepare Your Dowels
- Mark a little more than a quarter inch on your table saw sled.
- Slice your scrap two-by-fours into thin strips, then cut these strips again to make square dowels of varying sizes (1/4 inch, 3/8 inch, and 1/2 inch).
- If necessary, use a thickness planer to slightly reduce the dowel size for a snug fit into the sockets.
Step 3: Cutting Dowels to Length
Tape your prepared dowels together to keep them secure. Then, cut them to 3/8 of an inch long on the table saw sled. Cutting them while they are elevated ensures they fall away from the blade safely.
Step 4: Attaching Dowels to Plywood
- Lay out all of your sockets on the plywood as planned.
- Apply a dab of wood glue to one end of a square dowel and press it into the corresponding socket. Then, place the socket (with the dowel attached) back onto the plywood in its designated spot.
- Use a bolt or a similar tool to press the dowel through the socket, which helps improve the glue bond.
Step 5: Finalizing the Organizer
After the glue has dried, remove all of the sockets. You should now have a plywood base with dowels sticking up in the layout you designed. Fit this organizer into your drawer. You'll notice immediately how every socket has its place and how much cleaner and more efficient your workspace has become.
Customization Tips for Your DIY Socket Organizer
Making a DIY socket organizer is not just about storing your tools; it's about making a system that works for you. Here are some tips to help you customize your organizer for maximum efficiency and personalization:
- Choose the Right Material: While wood is a popular choice for its ease of work and customization, don't shy away from exploring metal or plastic if they suit your needs better.
- Measure Your Sockets: Before you start, lay out all your sockets and measure them. This ensures that each socket will have a snug fit in the organizer.
- Design for Accessibility: Arrange your sockets in a way that the ones you use most are easiest to reach. Consider the sequence of sizes for a logical order.
- Label Clearly: Use a label maker or a permanent marker to clearly mark the sizes on each slot or dowel. This will save you time when you're looking for the right socket.
- Incorporate Magnets: If you're using a metal tray or board, consider adding magnets to the bottom of your sockets or dowel holders to keep them in place.
- Think Vertical: If space is limited, design your organizer to hold sockets vertically. This can be a real space-saver in crowded workshops.
- Add a Personal Touch: Use a wood-burning kit or paint to add designs or color-code your organizer, making it uniquely yours.
- Plan for Expansion: Leave some room for additional sockets you may acquire in the future. It's better to have too much space than not enough.
- Safety First: Ensure that all parts of your organizer are sanded down and free of sharp edges to prevent injuries.
Follow these tips to make a socket organizer that's functional and tailored to your needs. Customize the design to fit your workflow and get creative with your DIY project.
Advanced Techniques for Your DIY Socket Organizer
When you're ready to take your DIY skills to the next level, consider these advanced techniques to make a socket organizer that stands out for its craftsmanship and utility:
- Laser Cutting for Precision: If you have access to a laser cutter, you can make precise and custom shapes for your socket organizer. Design your layout using software like Lightburn, and cut it on materials like MDF for a professional look.
- Magnetic Holders: To prevent sockets from rolling away, attach strong magnets to the base of your organizer. This will keep your sockets securely in place, even if the organizer is tipped over.
- Adjustable Dividers: Make slots in your base material that allow for adjustable wooden or plastic dividers. This way, you can reconfigure the organizer as your collection grows or changes.
- Foam Inserts: For an added touch of professionalism, cut out foam inserts that fit into your organizer. This not only looks great but also provides extra protection for your sockets.
- Dowel Angling: Angle the dowels slightly upward to make it easier to grab sockets. A 10-degree angle is subtle but effective.
- Tool Identification: Burn or etch labels directly onto the wood for a permanent and elegant way to identify socket sizes. This technique adds a custom touch that can't be achieved with stickers or markers.
- Finishing Touches: Apply a finish to the wood, such as varnish or lacquer, to protect it from wear and enhance its appearance. This will make your organizer not only functional but also a showpiece in your workshop.
Use these advanced techniques to make your DIY socket organizer both functional and a showcase of your woodworking skills. Focus on details for a successful and enjoyable project.
Troubleshooting Common Issues
When embarking on a DIY socket organizer project, you might encounter a few hiccups along the way. Here's a guide to help you troubleshoot some of the most common issues:
- Sockets Falling Off: If your sockets keep falling off the rails or dowels, it might be due to a loose fit. Ensure that the holes you drill for the dowels are not too large. If they are, you can wrap the dowel with tape to make a tighter fit.
- Difficulty in Identifying Sizes: It can be frustrating when you can't quickly identify the socket size you need. To avoid this, clearly label each socket spot on the organizer. You can use a label maker or permanent marker for visibility.
- Organizer Doesn't Fit in Drawer: If your organizer is too large for your tool drawer, measure the drawer's dimensions before you start building. This will ensure that your organizer fits perfectly.
- Mixing Metric and SAE Sockets: To prevent confusion between metric and SAE sockets, dedicate separate sections on your organizer for each type. This will save time and prevent mix-ups.
- Dowels Coming Loose: If the dowels become loose, a bit of wood glue can secure them in place. Just apply a small amount to the base of the dowel before inserting it into the hole.
- Wood Splitting: When working with wood, there's a risk of splitting when drilling holes. To prevent this, drill slowly and use a sharp bit. If the wood does split, you can use wood filler to repair it.
- Difficulty in Reaching Sockets: If the sockets are hard to reach, consider angling the dowels slightly upward. This makes it easier to grab the sockets without straining.
Keep these solutions in mind, and you'll be ready for any issues during your DIY socket organizer project. Patience and planning are key to success.
FAQs About DIY Socket Organizer
Discover answers to common questions about DIY socket organizers. Learn tips, materials, and steps to keep your tools neatly organized.
A DIY socket organizer is a homemade solution to keep your sockets neatly arranged and easily accessible. It’s a practical tool for anyone who uses sockets regularly and wants to avoid the frustration of searching through a cluttered toolbox.
Yes, one of the benefits of a DIY socket organizer is the ability to tailor it to your specific collection of sockets. You can decide the material, size, and layout to best fit your tools and workspace.
Making your own socket organizer allows for customization to fit your exact needs and often comes at a lower cost than purchasing a pre-made one. Additionally, the satisfaction of building something useful with your own hands can be rewarding.
To ensure durability, select high-quality materials like hardwood or thick plywood for the base. Use sturdy dowels or metal rods for the socket holders. If you’re using wood, sealing it with a finish can protect against moisture and wear. Additionally, using wood glue during assembly can add strength.
When designing your organizer, consider the types and sizes of sockets you own. Ensure there's enough space between holders for easy access. Think about portability; if you'll be moving it often, keep it compact and lightweight. Also, plan for future additions to your socket set by leaving extra space or making your organizer expandable.
Conclusion:
Building a DIY socket holder is a simple project that can make a big difference. Try it out, and you'll see how organized and efficient your workspace can become.


