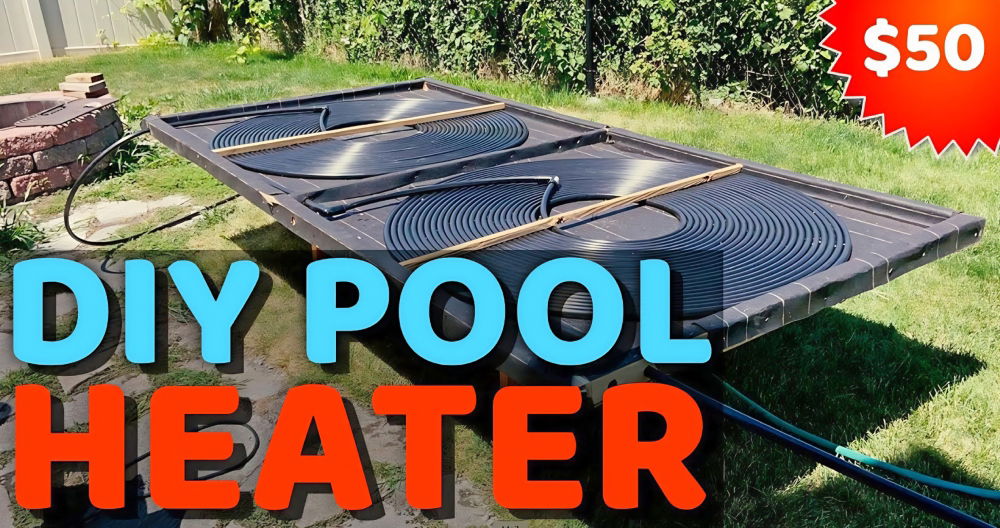
Ever since I moved into my home with a pool, I've been yearning for a way to extend the swimming season without breaking the bank. It seemed a shame to let the pool sit idle for months, especially when the sun was shining, yet the water was still too cold to enjoy. To solve this, I embarked on building a DIY solar pool heater. If you're looking to make the most out of your swimming pool like I was, follow along in this step-by-step guide to building an affordable and simple solar pool heater that can easily be assembled and disassembled.
Understanding the Need for a Solar Pool Heater
Before diving into the nuts and bolts, it's essential to understand why a solar pool heater is beneficial. In many regions, the swimming season is limited due to cooler water temperatures, even when daytime air temperatures are still quite warm. I found this particularly frustrating during spring and fall. A solar pool heater not only extends the pool usage period by warming the water but also makes it easy to store away when not needed. This DIY solution avoids the high costs linked with commercial heaters and aligns with sustainable practices by harnessing solar energy.
Gathering Materials and Tools
The first step in my DIY project was assembling all the necessary materials and tools. Each component plays a crucial role in the functionality and efficiency of the solar pool heater.
Materials List
- Pressure-treated 2x4s: I used these sturdy pieces to construct the frame. Pressure-treated wood ensures durability, especially when exposed to water and sunlight.
- 100-foot Black Garden Hose: The black hose absorbs sunlight and heats up the water efficiently as it flows through the coil.
- Screws and Clamps: Essential for securing the hose onto the wooden frame. The clamps keep the hose firmly in place.
- Submersible Pool Pump: This device helps circulate water through the solar heater, pushing it back into the pool.
- Ball Valve: I used this to control the flow rate of the water, allowing it ample time to heat up within the hose.
- Aluminum Foil or Reflective Sheets (optional): These can be used to reflect more sunlight onto the coils, increasing efficiency.
Tools Needed
- Drill and Drill Bits: For constructing the wooden frame and securing the hose.
- Saw: If you don't have pre-cut wood, you'll need a saw to cut them to the right size.
- Pipe Cutter or Utility Knife: Used for cutting the hose to the required lengths.
Step by Step Instructions
Learn how to build a DIY solar pool heater with our step-by-step guide. Save money and energy with detailed instructions and cost breakdown.
Constructing the Wooden Frame
The design of the frame is simple yet effective. Here's how I went about constructing it:
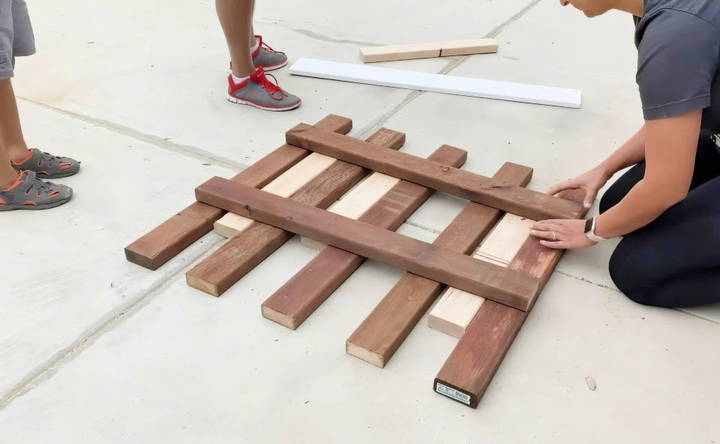
- Measure and Cut the Wood: I started by measuring the 2x4s to a length of four feet. Each piece makes the boundaries of the frame, which houses the spiral of the hose.
- Build the Frame: Using the saw, I cut the wood pieces to size and attached them to form a rectangle. For added stability, I made miter joints at the corners. It's key to ensure all parts of the frame are securely fastened with screws.
- Add Support: After the basic frame, I added additional cross pieces using 2x4s within the frame to support the weight of the coiled hose.
Coiling and Mounting the Hose
Once the frame was ready, it was time to coil the garden hose within it. This step ensures maximum exposure to sunlight for optimal heating.
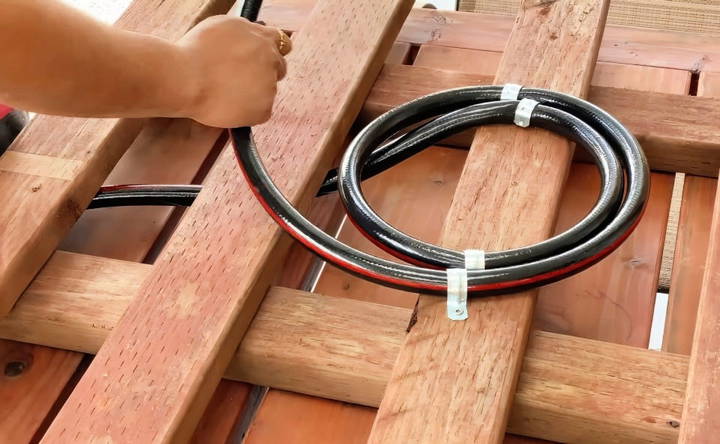
- Leave Extra Hose for Connections: I left about two feet of hose extra at both ends. These sections are for connecting to the pump and the pool.
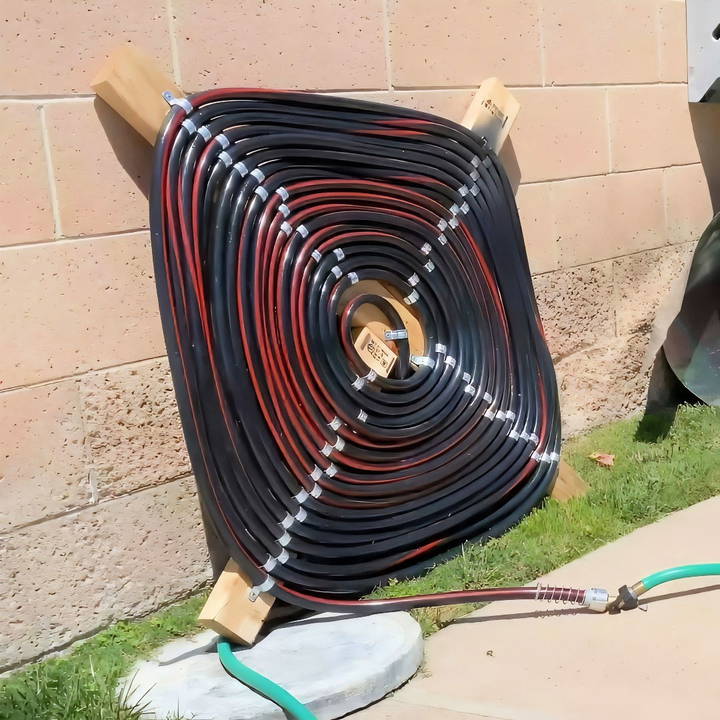
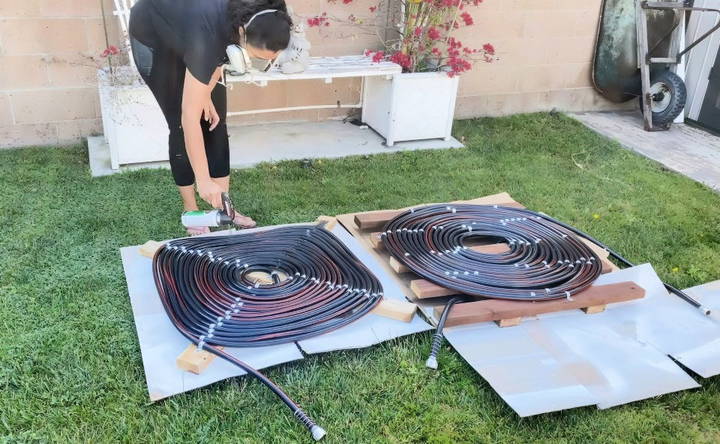
- Coil the Hose: I carefully coiled the hose around the frame, ensuring tight loops. The tighter the coils, the more hose will fit onto the frame, increasing the heating surface.
- Clamp the Hose Securely: With the hose fully coiled, I used clamps to secure it to the wooden frame, placing them at intervals to maintain the shape and position of the spiral.
Setting Up the Solar Pool Heater
With the frame built and hose coiled, the next step was setting it up to function as an effective pool heater.
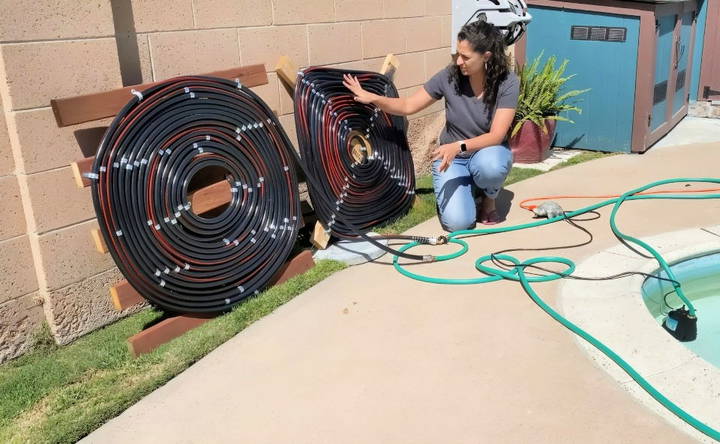
- Locate a Sunny Spot: Finding the optimal spot for the frame is crucial. I positioned it to receive maximum sunlight throughout the day, placing it at a slight angle to ensure full sun exposure.
- Connect to the Pool Pump: I used a submersible pool pump to pull water from the pool. The pump outlet was connected to the inlet of the garden hose coil, ensuring water flowed through the hose.
- Install Ball Valve: Placing a ball valve at the entrance of the coiled hose allowed me to regulate the water flow. By adjusting the valve, I could ensure the water stayed in the hose long enough to heat up before returning to the pool.
Testing the Heater and Monitoring Results
Before making any final adjustments, I turned on the system to see the initial results and ensure everything was functioning effectively.
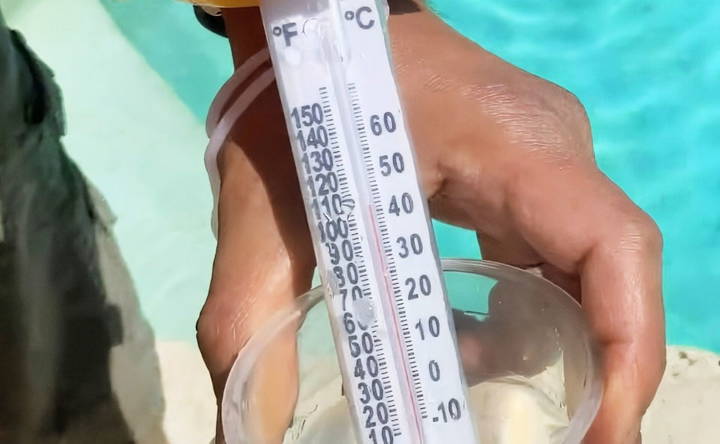
- Initial Test Run: On a warm, sunny day with a temperature of about 80 degrees Fahrenheit, I ran the system for two hours. This was to gauge the increase in water temperature.
- Temperature Check: I compared the temperature of the water before and after passing through the solar heater. Remarkably, I noticed an increase from 70 to nearly 110 degrees Fahrenheit, proving that the system was effective.
- Adjustments: If the water wasn't hot enough or the flow too weak, I made small adjustments using the ball valve and checked the coils for tightness.
Optimizing and Final Touches
To maximize efficiency and extend the lifespan of the solar pool heater, I added a few extra touches based on observations and preferences.
- Paint the Frame and Hose Black: Painting the frame and visible parts of the hose with matte black spray paint helped minimize reflection and absorb more heat.
- Add Reflectors: As an optional enhancement, I added aluminum foil beneath the hose coils. This simple reflector helped direct more sunlight onto the coils.
- Plan for Future Enhancements: Following the success of the initial setup, I planned to scale up by adding another coil for increased water flow and heating power.
Cost Breakdown and Savings
Building this solar pool heater was both cost-effective and rewarding.
- Lumber: Approximately $15 per frame using pressure-treated wood.
- Garden Hose: $35 for a 100-foot black hose.
- Clamps and Screws: $10 for securing the hose.
- Submersible Pool Pump: $40 to ensure adequate water circulation.
- Miscellaneous (Ball Valve, Paint, Reflectors): Roughly $25.
In total, each coil costs around $125. Given the cost of professional pool heaters, this DIY project offers substantial savings while also reducing energy consumption.
Advanced DIY Projects and Upgrades:
Ready to take your DIY solar pool heater to the next level? Here are some exciting upgrades you can try:
1. Build Your Own Solar Pool Cover
A simple solar pool cover helps retain heat at night and on cloudy days. Here's the basic idea:
- Materials: You'll need a large sheet of bubble wrap or a similar insulating material, plus some weights or anchors to keep it in place.
- How it Works: Just spread the cover over your pool when not in use. The bubbles trap air, making an insulating layer that prevents heat loss.
2. Add a Thermostat for Automatic Control
Want to set your ideal pool temperature and forget about it? A thermostat can automate your solar heater:
- What You'll Need: A pool thermostat compatible with your solar heater system, plus wiring and any necessary adapters.
- How it Works: The thermostat senses the water temperature and turns the pump on or off as needed to maintain your desired setting.
3. Boost Efficiency with Reflectors
Reflectors can bounce extra sunlight onto your solar collector, increasing heat gain.
- Simple Options: You can use mirrors, aluminum foil, or even white-painted boards to build reflectors.
- Placement Matters: Position the reflectors to angle sunlight towards the collector, especially during morning and afternoon hours.
4. Go Big with a Multi-Panel System
If your pool is large or you want faster heating, consider adding more solar panels.
- Plan Carefully: Calculate the additional collector area needed and ensure your pump can handle the increased flow.
- Connect in Series or Parallel: You'll need to connect the panels correctly to optimize performance.
Always disconnect power before working on any electrical components. If you're unsure about any of these upgrades, consult a qualified electrician or pool professional.
Comparison with Commercial Solar Pool Heaters: DIY vs. Buying
Deciding between a DIY solar pool heater and a commercial one? Let's break down the key points to help you make the best choice for your pool.
DIY Solar Heaters: The Pros
- Cost Savings: DIY is the budget-friendly champion. You'll save significantly on materials and installation compared to a store-bought system.
- Sense of Accomplishment: Building your own heater is rewarding! You'll gain hands-on experience and pride in your creation.
- Customization: DIY lets you tailor the system to your pool's unique size and needs.
DIY Solar Heaters: The Cons
- Time Investment: Building a DIY heater takes time and effort. You'll need to research, gather materials, and assemble everything yourself.
- Technical Skills: Some DIY projects require plumbing or electrical know-how. If you're not comfortable with those, a commercial system might be easier.
- Warranty and Support: DIY systems lack the warranties and professional support that come with commercial heaters.
Commercial Solar Heaters: The Pros
- Convenience: Commercial systems are ready-made and often come with professional installation. You'll save time and avoid potential DIY headaches.
- Performance and Efficiency: Commercial heaters are typically designed for optimal performance and may offer higher efficiency than some DIY setups.
- Warranty and Support: Most commercial heaters have warranties and access to customer support in case you encounter issues.
Commercial Solar Heaters: The Cons
- Higher Cost: Commercial systems are a bigger investment upfront, including the cost of the heater itself and professional installation.
- Less Customization: You'll be limited to the features and sizes offered by the manufacturer.
When to Choose DIY vs. Commercial
Consider these factors when making your decision:
- Budget: If you're on a tight budget, DIY is the way to go.
- DIY Skills: If you're comfortable with basic plumbing and electrical work, DIY is a great option.
- Pool Size and Needs: For larger or more complex pools, a commercial system might be a better fit.
- Time and Convenience: If you value your time and want a hassle-free installation, a commercial heater might be preferable.
No matter which route you choose, solar pool heating is a fantastic way to enjoy a warm pool while saving money and reducing your environmental impact.
Troubleshooting and Maintenance Tips: Keep Your Heater Running Smoothly
Like any DIY project, your solar pool heater might need some TLC from time to time. Let's tackle some common issues and how to fix them, along with a basic maintenance checklist to keep your system running like a champ.
Common Issues and Quick Fixes
- No Heat or Low Heat Gain:
- Check for kinks or blockages in the hoses or pipes.
- Make sure the pump is running efficiently and the water is flowing properly through the collector.
- Ensure the collector is positioned correctly for maximum sunlight exposure.
- Clean the collector surface to remove dirt, leaves, or other debris that might be blocking sunlight.
- Leaks:
- Inspect all connections and fittings for signs of leaks.
- Tighten any loose connections or replace worn-out gaskets or O-rings.
- If the leak is in the collector itself, you might need to patch or replace the damaged section.
- Air Bubbles in the System:
- Air can disrupt water flow and reduce heat transfer.
- Bleed the air out of the system by opening the air relief valve on the filter or pump.
- Check for any leaks that might be allowing air to enter the system.
Regular Maintenance Checklist
- Clean the Collector: Regularly remove any dirt, leaves, or debris from the collector surface. This ensures maximum sunlight absorption.
- Inspect Hoses and Connections: Check for cracks, leaks, or wear and tear in the hoses and fittings. Replace any damaged parts promptly.
- Check the Pump: Make sure the pump is running smoothly and providing adequate flow.
- Winterize Your System: If you live in a climate with freezing temperatures, drain the system and protect it from the elements during the off-season.
Extending the Life of Your Heater
- Use UV-Resistant Materials: Choose materials that can withstand prolonged exposure to sunlight.
- Protect from Harsh Weather: Cover or store the collector during hailstorms or heavy snowfall.
- Regular Inspections: Catch and address minor issues before they become major problems.
Take care of your DIY solar pool heater for years of warm swims. Disconnect power before electrical work, and consult a professional if unsure.
FAQs About DIY Solar Pool Heater
Discover essential FAQs about DIY solar pool heaters, including key benefits, installation tips, and maintenance advice to efficiently heat your pool.
Yes, in most cases, you can repurpose your existing pool pump for your DIY solar heater. However, it's crucial to ensure it has enough power to handle the additional flow through the solar collector. If your pump struggles, you might need to upgrade to a larger one or consider adding a booster pump specifically for the solar heater.
Algae can reduce the efficiency of your solar collector. To prevent its growth, make sure the water in your system is properly chlorinated and balanced. Regularly cleaning the collector surface and ensuring good water flow will also help keep algae at bay. If algae does appear, you can use a diluted bleach solution to clean the collector.
While solar pool heaters are most effective in sunny areas, they can still provide some benefits in cloudier climates. Consider increasing the size of your collector or adding a pool cover to maximize heat retention on less sunny days.
Absolutely! DIY solar heaters can work well with both in-ground and above-ground pools. However, you'll need to ensure the collector is positioned correctly for optimal sunlight exposure, which might involve building a support structure for an above-ground pool.
If you live in an area with freezing temperatures, winterizing your system is essential to prevent damage. Drain all water from the collector and pipes, and disconnect any hoses or fittings. Store the collector in a protected location to prevent weathering. If your system uses a pump, follow the manufacturer's instructions for winterizing it as well.
Final Thoughts and Recommendations
This DIY solar pool heater project transformed my pool usage experience. By harnessing the power of the sun, not only did I manage to extend the swimming season, but I also found a fulfilling DIY challenge that contributed to a more energy-efficient home.
With patience and meticulous attention to detail, you can build your solar pool heater. The keys are in proper planning, choosing the right materials, and a little creativity. Whether you're looking to save on costs, engage in a family project, or reduce your carbon footprint, this guide offers a practical, step-by-step path to a warmer, more enjoyable swimming pool.
As you embark on your solar pool heater journey, remember to enjoy the process and know each step brings you closer to longer, more enjoyable pool days!


