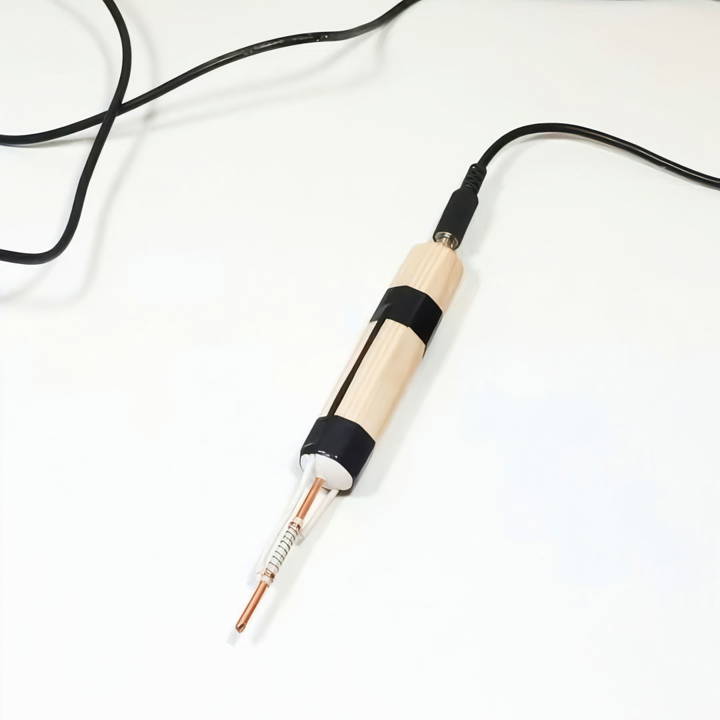
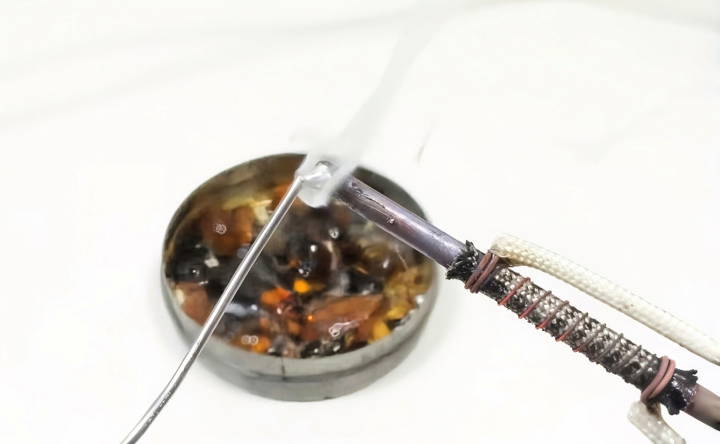
Soldering irons are essential tools for anyone interested in DIY electronics. They allow you to join components together with precision and durability. Whether you're repairing a gadget, making a new circuit, or working on a craft project, a DIY soldering iron is your go-to tool.

What is a Soldering Iron?
A soldering iron is a hand tool used to heat solder, a metal alloy that melts and flows into joints between two workpieces, making a strong electrical and mechanical connection. It's commonly used in electronics to attach components to circuit boards or wires to connectors.
How Does it Work?
The soldering iron has a heated metal tip, usually made of copper or iron coated with nickel or chromium, to prevent corrosion. When you plug in the iron and turn it on, electricity heats the tip to temperatures around 200-480°C (392-896°F). This heat is then transferred to the solder, melting it to form a bond between the parts you're joining.
Why Use a Soldering Iron?
Using a soldering iron allows for precise control over where and how much solder is applied, ensuring a clean, strong joint. It's a skill that, once mastered, opens up a world of possibilities for making and fixing electronics.
Safety is paramount when using a soldering iron. Always work in a well-ventilated area, wear protective eyewear, and never touch the heated tip. With these precautions and a bit of practice, you'll be soldering like a pro in no time!
By understanding the basics of soldering irons, you're on your way to completing successful DIY projects. Stay tuned for more sections that will guide you through the materials, construction, and maintenance of your very own soldering iron.
Materials You Will Need and Why
Before diving into the process, it's crucial to gather all the necessary materials. Here's what you'll need:
- Small Wooden Blank: This will serve as the handle of your soldering iron. Choose a piece that's comfortable to hold.
- Copper Wire (Thick): Essential for making the soldering iron tip. Copper is excellent for this purpose due to its high thermal conductivity.
- Nichrome Wire: For the heating element. Nichrome is used due to its resistance to high temperatures and its ability to heat up quickly.
- Gypsum Plaster: To fix the tip into the handle securely while providing thermal insulation.
- Fiberglass Insulation: This shields the nichrome wire, ensuring that the heat focuses on the tip where you need it.
- Copper Wire (Thin): To secure the fiberglass insulation around the tip.
- Power Supply (12 volts, 1 ampere): To power your soldering iron.
- Heat Resistant Insulation: For covering the copper wires and ensuring safety.
- Drill and Bits: For making precise holes and grooves in the wooden handle.
- Connector for the Power Supply: To attach the power supply to your soldering iron.
Each material plays a pivotal role in the construction and functionality of your DIY soldering iron, ensuring it's efficient for light soldering tasks.
Step by Step Instructions
Learn how to make your own soldering iron with our easy DIY instructions. Follow our step-by-step guide from preparation to final testing.
Step 1: Preparing the Handle
Start by marking and drilling two holes at the ends of the wooden blank. These will house the copper wire (tip) and the wires connecting to the power supply. Make sure the holes are of the correct depth to secure the components firmly.
Step 2: Grooving and Drilling
Carefully cut grooves along the base for the wires, allowing a seamless connection from the power source to the tip. Then, drill small angled holes for the copper and nichrome wires to ensure they stay in place once installed.
Step 3: Making the Soldering Tip
Cut a piece of thick copper wire to your desired length. This will act as the soldering tip. Insert it into one of the holes you've prepared in the wooden handle. Secure it using gypsum plaster for both fixation and thermal insulation, allowing it to set properly.
Step 4: Making the Heating Element
Determine the necessary length of the nichrome wire by experimenting with different lengths until you find one that heats up to a red glow without breaking. This step is crucial for ensuring your soldering iron operates at the correct temperature.
Step 5: Insulating the Tip
Slide the fiberglass insulation over the copper tip, then use thin copper wire to hold it in place. This ensures that the heat is directed outward, towards the tip, and not lost through the handle.
Step 6: Wrapping the Nichrome Wire
Wrap the nichrome wire around the tip over the insulation carefully. This will serve as your heating element. Make sure it's evenly spaced and securely attached.
Step 7: Final Assembly
Cover the exposed copper wires with heat-resistant insulation to prevent any accidental burns. Connect all the wires according to the circuit diagram (positives to positives, negatives to negatives) to the power supply connector. It's essential to ensure all connections are secure to avoid short circuits.
Step 8: Testing Your DIY Soldering Iron
Now, it's time to test your creation. Connect your soldering iron to the power supply and wait a few moments. If everything is assembled correctly, the tip should heat up, indicating your soldering iron is ready for use.
Customization Tips
Customizing your DIY soldering iron can greatly enhance its performance and make your soldering tasks easier and more efficient. Here are some practical tips to tailor your soldering iron to your specific needs:
Choose the Right Tip
The tip of the soldering iron is crucial for precise work. There are various shapes and sizes available:
- Conical tips are versatile for different soldering tasks.
- Chisel tips provide a larger contact area, which is suitable for bigger components.
- Fine-point tips are perfect for detailed work on small or delicate parts.
Temperature Control
Adding a temperature control feature can improve your soldering iron's versatility:
- Consider installing a variable temperature control knob to adjust the heat for different types of soldering jobs.
- Using a thermostat or thermocouple can help maintain a consistent temperature, which is vital for sensitive components.
Ergonomic Handle
Comfort is key when soldering for extended periods:
- Design an ergonomic handle that fits comfortably in your hand to reduce fatigue.
- Use materials like silicone or rubber for a non-slip grip.
LED Lighting
Good visibility is essential:
- Attach an LED light near the tip to illuminate your work area, which is especially useful in low-light conditions.
Safety Features
Safety should always be a priority:
- Incorporate a stand or holder for the iron to rest in when not in use, preventing accidental burns.
- Add a heat-resistant silicone pad beneath your work area to catch drips of molten solder.
Portability
If you need to solder on the go, consider making your soldering iron portable:
- Use a battery-powered soldering iron for field repairs.
- Include a compact carrying case to store the iron and accessories.
Customize your DIY soldering iron to suit you better and improve its functionality and lifespan. Make it an extension of your hand for more enjoyable and successful projects.

Advanced Modifications
For those who have mastered the basics of soldering and are looking to take their skills to the next level, advanced modifications can significantly improve the functionality and efficiency of your DIY soldering iron. Here's how you can upgrade your tool:
Enhanced Temperature Control
While basic soldering irons have a fixed temperature, advanced users benefit from precise temperature control. Consider integrating a digital temperature controller with a display to set and monitor the exact temperature needed for different soldering tasks. This allows for more consistent joints and reduces the risk of damaging sensitive components.
Improved Heat Transfer
The quality of your soldering iron's tip affects its heat transfer capabilities. Upgrading to a silver or copper tip can provide better thermal conductivity. Additionally, applying a high-quality thermal compound between the tip and the heating element can further improve heat transfer efficiency.
Customized Tips
Making custom tips for specific tasks can greatly enhance your soldering precision. You can shape copper wire into various tip profiles, such as ultra-fine points for micro-soldering or large flat edges for soldering larger areas. Always ensure the custom tip fits securely onto the iron and is properly tinned before use.
Portable Power Options
If you need to solder in locations without easy access to power, consider adding a rechargeable battery pack to your soldering iron. Select batteries that offer a balance between capacity and weight, such as lithium-polymer batteries, to maintain portability without sacrificing performance.
Smart Features
Incorporate smart features like an auto-shutoff mechanism that turns off the iron when it's not in use for a set period, conserving energy and increasing safety. You can also add an audible alert for when the iron reaches the set temperature or when it's turned off.
Soldering Iron Stand
A well-designed stand not only holds the iron safely but can also enhance its usability. Build a stand with an integrated tip cleaner, such as a brass sponge, and a holder for solder and other tools. This keeps everything you need within reach and organized.
Advanced modifications tailor your soldering iron to your needs, making it more effective and enjoyable. Prioritize safety and precision in your soldering projects.
Troubleshooting Common Issues
When working with a DIY soldering iron, you might encounter some common issues that can hinder your progress. Here's a guide to help you identify and solve these problems quickly and safely.
Soldering Iron Not Heating
If your soldering iron isn't getting hot, check the following:
- Power Connection: Ensure the iron is properly plugged in and the power source is on.
- Heating Element: Inspect the heating element for visible damage. If it's worn out, it may need replacing.
Inconsistent Heating
For issues with inconsistent temperature:
- Clean the Tip: Regularly clean the tip to remove oxidation or debris, which can affect heat transfer.
- Temperature Control: Verify the temperature setting is appropriate for the materials you're working with.
Cold Joints
Cold joints occur when solder doesn't melt completely, leading to a weak connection. To fix this:
- Reheat the Joint: Apply the iron to the joint again until the solder flows smoothly.
- Proper Soldering Technique: Ensure you're heating the joint and the solder simultaneously for a strong bond.
Overheating Components
Overheating can damage components. Prevent this by:
- Short Contact Time: Limit the time the iron is in contact with the component.
- Heat Sink: Use a heat sink to absorb excess heat from sensitive parts.
Bridging
Bridging happens when solder connects two points that shouldn't be connected. To resolve this:
- Desoldering: Use a desoldering braid or a pump to remove excess solder.
- Precision: Apply solder carefully and only where needed.
Lead Exposure
When using lead-based solder, minimize exposure:
- Ventilation: Work in a well-ventilated area to avoid inhaling fumes.
- Safety Gear: Wear gloves and a mask for protection.
Understanding common issues and addressing them improves your soldering quality and reliability. Patience, practice, organization, tool maintenance, and safety are crucial.
Electrical Safety Precautions
When making and using a DIY soldering iron, it's crucial to prioritize safety. Electrical work can be dangerous without proper precautions. Here are some key safety tips to keep in mind:
Understand Your Equipment
Before you start, get to know your soldering iron. Understand how it works and the right way to handle it. This knowledge can prevent accidents and injuries.
Work Area Setup
Choose a clean, dry, and well-lit workspace. Make sure it's free from clutter and flammable materials. A tidy space is a safer space.
Use a Grounded Outlet
Always plug your soldering iron into a grounded outlet. This reduces the risk of electrical shocks and short circuits.
Handle with Care
Soldering irons get very hot. Always hold the iron by the handle and never touch the metal parts while it's on or just after use.
Ventilation is Key
Soldering can produce harmful fumes. Work in a well-ventilated area or use a fume extractor to keep the air clean.
Protective Gear
Wear safety glasses to protect your eyes from splashes and sparks. If you're using lead-based solder, consider a mask to avoid inhaling fumes.
Electrical Tape and Heat Shrink Tubing
After soldering, cover the joints with electrical tape or heat shrink tubing. This prevents short circuits and electrical shocks.
Regular Maintenance
Keep your soldering iron in good condition. A damaged or malfunctioning iron is a safety hazard. Inspect it regularly and fix any issues promptly.
Learn First Aid
Know the basics of first aid for burns and electrical shocks. In case of an accident, this knowledge can be invaluable.
By following these electrical safety precautions, you can enjoy your DIY projects with peace of mind, knowing you're taking the right steps to protect yourself and others.
FAQs About DIY Soldering Iron
Discover FAQs about DIY soldering irons. Learn essential tips, safety measures, and expert advice to improve your soldering projects.
A DIY soldering iron is a hand tool that you can make at home for melting solder and joining components together. It works by heating a tip to a high temperature, usually using a resistor to convert electrical energy into heat.
While it can be safe, it requires careful handling of electrical components and knowledge of basic electronics. Always use materials suited for high temperatures and ensure proper insulation to prevent accidents.
A homemade soldering iron is best suited for small projects and repairs. It may not be appropriate for sensitive electronic components or large-scale work due to its variable temperature control and power output.
Yes, you can adjust the temperature by changing the power source or altering the resistance in the circuit. For example, using a variable power supply or a rheostat can allow you to control the heat output. However, precision control like in commercial soldering irons might be difficult to achieve.
When selecting materials, consider the melting point, electrical conductivity, and durability. For the tip, copper is a common choice due to its excellent thermal conductivity. The resistive wire should be able to withstand high temperatures without degrading, such as nichrome wire. Ensure all materials are safe for high-heat operation.
Conclusion
In conclusion, making a DIY soldering iron can be a rewarding and educational project. It helps you understand the basics of soldering and saves money on buying expensive equipment. Plus, making a homemade soldering iron ensures you have customized tools tailored to your needs.


