Making your own DIY speaker stands can greatly improve your listening experience. With just a few tools and materials, you can enhance the sound quality of any audio setup. These DIY speaker stands can be customized to fit your specific needs, offering flexibility and personalization. Plus, DIY speaker stands are a cost-effective solution compared to buying pre-made ones.
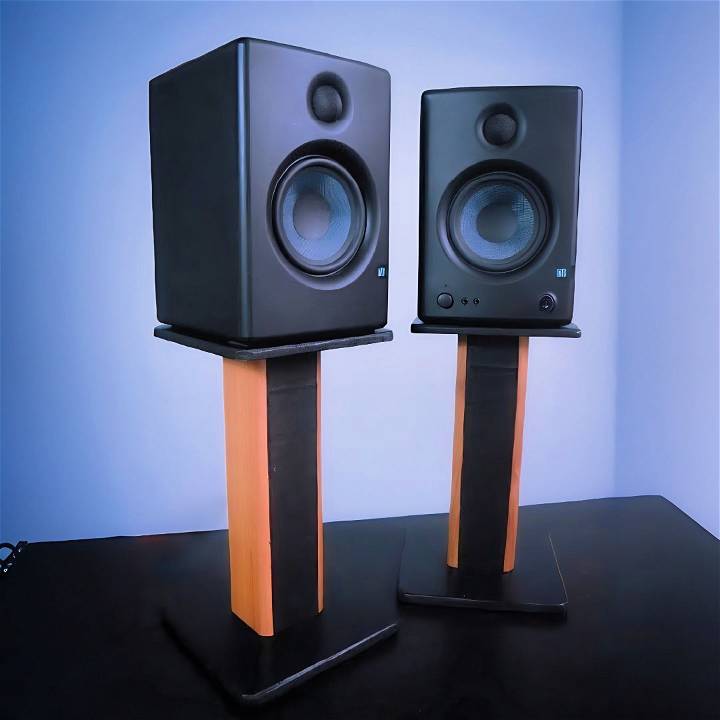
Building DIY speaker stands can also be a fun and rewarding project. You'll have the satisfaction of making something with your own hands while improving your audio experience. The steps are simple and straightforward, making it accessible for many.
Step by Step Instructions
Learn to make DIY speaker stands with our step-by-step guide. From sketching to assembly, get all materials and detailed instructions. Perfect for any skill level!
Step 1: Sketching and Planning
Every great project starts with a plan. I sketched my ideas on paper, outlining the dimensions and design I envisioned. This step is crucial as it gives you a clear roadmap and helps calculate the material needed.
Materials Needed and Why:
- 12mm MDF board: The backbone of our stands, chosen for its durability and ease of manipulation.
- Sandpaper: Sandpaper is used to smooth out any rough edges after cutting.
- Drill and Screws: To assemble the parts securely.
- Paint, Leather, and Wood Pattern Sticker: These are for aesthetics, giving the stands a sleek look and a personal touch.
- Anti-slip Sticks: To protect your floors and ensure stability.
Step 2: Cutting and Sanding
Following my plans, I cut the MDF boards to the required sizes. Remember, each speaker stand comprises several parts, so double-check your measurements. Once the cutting was done, sanding each piece until smooth was next. This step is vital for a professional finish.
Step 3: Curving and Gluing
Curving the edges of my boards was perhaps the most artistically satisfying part. I used a simple cup to trace the curved edges before cutting. These curves add an elegant aesthetic that sets DIY stands apart from the usual boxy commercial ones. With the parts cut and sanded, it was time to glue and screw them together securely, leaving space for the legs.
Step 4: Finding the Center
Ensuring the legs were perfectly centered required a bit of ingenuity. I stretched threads across the base to find the exact midpoint. This small step makes a big difference in the stability of the stands.
Step 5: Drilling and Marking
To align everything correctly, I employed a method involving cotton buds: slightly wet them, press them onto the allocated spots, and voila, you have your drill markers. This trick might seem simple, but it's effective for precision.
Step 6: Painting and Decorating
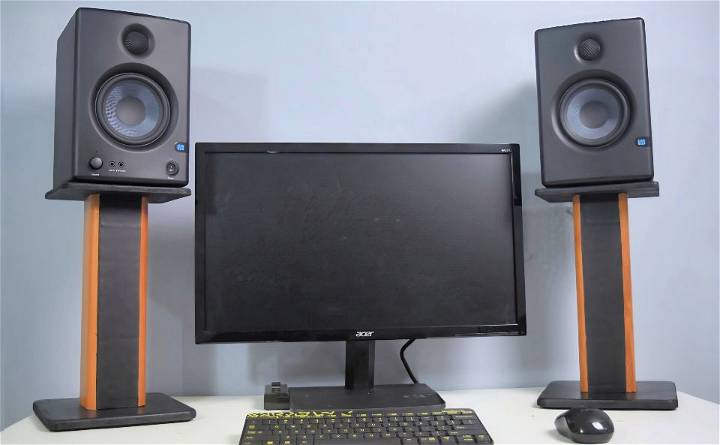
Choosing black paint for the plates and black leather for the front and back, with wood pattern stickers for the sides, was about personal preference. This combination offered a sleek, sophisticated look that contrasted beautifully with my room's d* écor. However, feel free to choose what best matches your style!
Step 7: Assembling
The final assembly was a moment of truth. This was when all the pieces came together, transforming into the stunning stands I had envisioned. Adding anti-slip sticks under the base was a final touch to ensure they stayed in place and protected my floors.
The Transformation
Replacing my old makeshift stands with these DIY creations not only improved my room's aesthetics but also enhanced my listening experience. The new stands positioned the speakers at the perfect height, directing sound straight to my ears and making every note clearer and more immersive.
I tackled this project to save costs and avoid the impersonal feel of commercial stands. It was a hands-on learning journey, and the results were very satisfying.
Customization Ideas for DIY Speaker Stands
When it comes to DIY speaker stands, customization is key to making a piece that not only looks great but also reflects your personal style. Here are some ideas to inspire your project:
- Choose Your Style: Think about the overall look you want for your speaker stands. Do you prefer a modern, sleek design or a rustic, vintage feel? Select materials and finishes that complement your home’s decor.
- Color It Up: Painting your speaker stands can make a big difference. Choose a color that matches your room, or go bold with a contrasting shade. Use paints that are suitable for the material of your stand for a long-lasting finish.
- Add Some Texture: Materials like rope, fabric, or vinyl can add texture and interest to your speaker stands. Wrap the legs in rope for a nautical touch or cover the platform with fabric for a soft, cozy look.
- Personalize with Patterns: Use stencils or masking tape to build patterns on your speaker stands. Geometric shapes, stripes, or even a chevron pattern can add a unique touch.
- Incorporate Art: If you’re artistic, hand-paint designs or illustrations on your stands. Not so confident with a brush? Decals and stickers are an easy alternative.
- Functional Add-ons: Think about adding features that enhance functionality. Hooks for headphones, a shelf for vinyl records, or a hidden compartment for cables can be both practical and stylish.
- Light It Up: LED strips or small lamps can be attached to your speaker stands to build ambiance and highlight your speakers.
- Swap Out Hardware: Changing the feet or adding decorative elements like metal corners can give your stands a professional finish.
- Experiment with Shapes: Who says speaker stands have to be square or rectangular? Try different shapes for the base or platform to make your stands stand out.
- Eco-Friendly Options: For an environmentally friendly project, use recycled or upcycled materials. Old furniture parts or reclaimed wood can be great resources.
The goal is to build speaker stands that you love and that work well in your space. Have fun with the process, and don’t be afraid to try something new!
Troubleshooting Common Issues with DIY Speaker Stands
Building your own speaker stands can be a rewarding DIY project, but it’s not uncommon to run into a few hiccups along the way. Here’s a guide to troubleshooting some of the most common issues you might encounter:
Stability Concerns:
- Problem: The stand wobbles or feels unstable, especially on soft surfaces like carpet.
- Solution: Ensure the base is wide enough, and consider adding spikes or rubber feet to improve stability. For carpeted floors, use thicker spikes to anchor the stand firmly.
Vibration and Sound Quality:
- Problem: Excessive vibrations are affecting sound quality.
- Solution: Add mass to the stands, such as sand or lead shot, to dampen vibrations. Isolation pads or discs under the speakers can also help minimize transfer of vibrations.
Height and Acoustics:
- Problem: The speakers are not at the optimal height for sound quality.
- Solution: The tweeter should be at ear level when seated. If necessary, adjust the height of the stands or add tilt to angle the speakers correctly.
Material Issues:
- Problem: The chosen material doesn’t provide the expected acoustics or durability.
- Solution: Research the acoustic properties of different materials. Dense woods or metals often yield the best results. Ensure proper sealing and finishing to protect the material.
Assembly Difficulties:
- Problem: Parts don’t fit together as intended, or the structure is not rigid enough.
- Solution: Double-check all measurements before cutting. Use strong joints like dowels or screws for a more rigid construction.
Aesthetic Flaws:
- Problem: The finish doesn’t look as expected, or the stands don’t match the room’s decor.
- Solution: Sand down any imperfections and apply a new coat of paint or stain. Consider decorative elements that can be added to better suit your style.
By foreseeing these issues and knowing their solutions, you'll be ready to make speaker stands that fit your home audio system perfectly. Patience and detail are crucial for a successful DIY project.
Maintenance and Care for DIY Speaker Stands
Taking care of your DIY speaker stands is crucial for ensuring they last a long time and continue to look great in your space. Here’s a straightforward guide to maintaining and caring for your speaker stands:
Regular Dusting:
- Why: Dust can accumulate quickly, especially on flat surfaces.
- How: Use a soft, dry cloth to gently wipe away dust. For tougher spots, slightly dampen the cloth with water or a mild cleaner.
Avoid Moisture:
- Why: Excess moisture can damage the stands, especially if they’re made of wood.
- How: Keep the stands in a dry area. If they get wet, dry them promptly with a clean towel.
Check for Wear and Tear:
- Why: Regular use can lead to scratches or loosening of parts.
- How: Inspect your stands periodically for any signs of damage. Tighten any loose screws and touch up paint or finish as needed.
Protect from Sunlight:
- Why: Direct sunlight can fade the color and weaken the material over time.
- How: Position your stands away from direct sunlight or use curtains to filter the light.
Handle with Care:
- Why: Rough handling can cause unnecessary stress on the joints and materials.
- How: When moving the stands, lift them rather than dragging to prevent damage to both the stands and your floor.
Use Protective Pads:
- Why: Speakers can leave marks on the stand surfaces.
- How: Place felt pads or foam under your speakers to protect the stand’s finish.
Refresh the Finish:
- Why: Over time, the finish can wear off, making the stands look dull.
- How: Reapply a coat of paint, stain, or sealant every few years to keep the stands looking fresh and to provide extra protection.
By following these simple maintenance tips, you can keep your DIY speaker stands in top condition, ensuring they continue to enhance your audio experience and your home’s aesthetic for years to come.
Safety Precautions for DIY Speaker Stands
When embarking on a DIY project to build speaker stands, safety should always be your top priority. Here’s a guide to help you stay safe while making your custom speaker stands:
Wear Protective Gear:
- Why: Safety gear protects you from potential hazards.
- How: Always wear safety glasses, gloves, and ear protection when cutting or drilling.
Read Instructions Carefully:
- Why: Understanding the process prevents mistakes.
- How: Before starting, read through all instructions and familiarize yourself with the steps.
Use Tools Properly:
- Why: Incorrect tool use can lead to accidents.
- How: Follow the manufacturer’s guidelines for each tool and never bypass safety features.
Keep a Clean Workspace:
- Why: A cluttered area can cause trips and falls.
- How: Regularly clear away debris and keep tools organized.
Ventilation is Key:
- Why: Some materials can release harmful fumes.
- How: Work in a well-ventilated area, especially when painting or staining.
Secure Materials:
- Why: Unsecured materials can shift and cause injury.
- How: Clamp down wood or metal when cutting or drilling to keep it stable.
Check for Electrical Safety:
- Why: Electrical tools can be dangerous if not handled correctly.
- How: Inspect cords for damage and ensure you’re using a grounded outlet.
Lifting Techniques:
- Why: Improper lifting can cause back injuries.
- How: Lift with your legs, not your back, and ask for help with heavy items.
First Aid Kit:
- Why: Accidents can happen even with precautions.
- How: Keep a first aid kit nearby in case of minor injuries.
Know Your Limits:
- Why: Taking on more than you can handle can be unsafe.
- How: If a task feels beyond your skill level, seek professional help.
By following these safety precautions, you can enjoy building your DIY speaker stands while minimizing the risk of injury. Stay safe, and have fun with your project!
FAQs About DIY Speaker Stands
Get answers to common questions about DIY speaker stands. Unlock tips, techniques, and materials to build your own high-quality audio stands.
Stability can be achieved by using a heavy base like concrete blocks or a thick wooden platform. Filling hollow stands, like those made from PVC, with sand can add weight and reduce resonance. Ensure all connections are tight, and consider using triangular shapes for better weight distribution.
The ideal height for speaker stands at ear level when you are seated, which is typically around 24 to 28 inches for most people. This height ensures the best sound balance and audio experience, as it aligns the tweeters with your ears.
Yes, some DIY speaker stands can be designed with adjustable features. Using materials like telescopic tubes or adding additional segments that can be secured allows you to change the height as needed.
Absolutely! You can build budget-friendly speaker stands using IKEA parts, like chopping boards for the base and legs, or by repurposing items like concrete blocks or wood scraps. Simple designs can be very cost-effective and still provide a stable and aesthetically pleasing solution.
Choosing the right design for your DIY speaker stands depends on your space, budget, and aesthetic preferences. Consider the size and weight of your speakers to ensure the stands are robust enough to support them. For smaller spaces, a slim, vertical design may be best, while larger rooms may allow for more creative shapes. Budget-friendly options can include repurposed materials like wood scraps or PVC pipes. For a sleek look, consider staining or painting the stands to match your decor.
In Closing
Wrapping up, building your own DIY speaker stands can be a fun and rewarding project. You get to customize your stands to match your style and needs while enhancing your listening experience. By following the steps mentioned, you can build sturdy and aesthetically pleasing stands that will complement your speakers perfectly. Start your project today and enjoy the sound quality you’ve always wanted!


