Starting my DIY speaker project was an exciting challenge. I had always wanted quality sound without spending a fortune. By building DIY speakers at home, you can customize features according to your preferences. The process is quite simple and offers a sense of accomplishment. You'll only need basic materials and some patience to get great results.
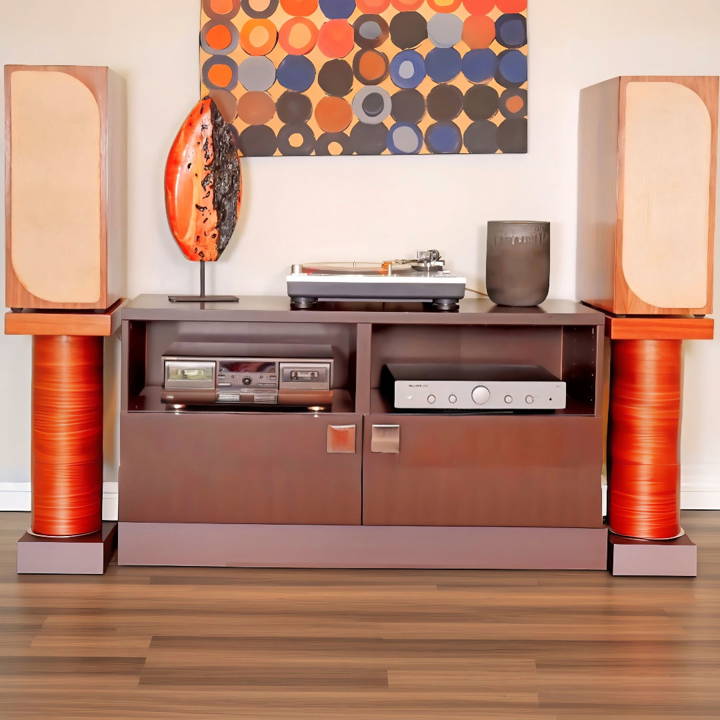
It's satisfying to see the final product and listen to your favorite music with a system you built yourself. I'm helping with this guide, which outlines the steps to make your own DIY loudspeakers.
Follow the instructions, and you'll have a great-sounding system in no time. Ready to start your DIY speaker project? Trust me, this will be a fun and rewarding experience.
Step by Step Instructions
Build your own speakers with our step-by-step instructions on DIY speakers. Learn cabinet building, aesthetics, stands, and grill construction all in one guide!
1. Getting Started: The Technical Blueprint
Learn how to get started with building cabinets. Discover essential materials and step-by-step instructions to build stunning cabinets efficiently.
Materials Needed and Why:
- 13 Ply Baltic Birch Plywood: For the speaker cabinets. Its density is crucial for minimizing vibration and ensuring sound fidelity.
- DIY Speaker Kit (CSS Audio): This kit simplifies the process, including the crossover boards which are central to distributing frequencies correctly.
- Tools for Woodworking: Such as a table saw for precision cuts, making sure our cabinets are perfect to spec.
Building the Cabinets
I chose a dense 13 ply Baltic birch plywood for the cabinets, adhering to a DIY kit from CSS Audio. The precision and rigidity it offers are unmatched, giving our sound a clean, uninterrupted platform. The kit was a godsend, simplifying the daunting task of wiring and component assembly with a puzzle-like approach. This initial technical phase taught me the importance of precision - every measurement, every cut had to be exact for the sound to be just right.
2. Aesthetics: Beauty Meets Sound
Explore the intersection of aesthetics and acoustics. Beauty meets sound: discover the finest materials in crafting exquisite exterior designs.
Materials:
- Local Walnut Wood: For that beautiful, natural finish on the outside of the speakers.
- Acrylic and Tro Lase Material: For the speaker faces, offering a modern finish and durability.
Crafting the Exterior
The beauty of walnut wood isn't just in its look but in the warmth it adds to the sound. Cutting 45-degree miters for each piece, I pieced together an exterior that was as pleasing to the eye as I hoped the sound would be to the ears. The addition of colored acrylic gave it a contemporary edge. This level was about marrying form and function, illustrating that speakers could be as visually stunning as they are acoustically effective.
3. The Stands: Functional Elegance
Discover the perfect blend of functionality and style with the stands: functional elegance. Learn about materials and how to design and build stand foundations.
Materials:
- Sheet Metal and Square Tubing: For the core structure, ensuring stability and durability.
- Walnut Veneer: To cloak the metal, complementing the speaker cabinets aesthetically.
Designing and Building Stand Foundations
My aim with the stands was twofold: they needed to look great and minimize bass energy transfer to the floor. Using metal for the core and cladding it with walnut allowed me to achieve both. The process taught me the balance between stability and aesthetics, ensuring the stand supports the speaker both physically and visually.
4. The Speaker Grills: A Controversial Choice
Discover the pros and cons of the speaker grills: a controversial choice. Learn about materials and construction methods. Find out more here.
Materials:
- Speaker Grill Cloth: For acoustically transparent protection.
- Wood Veneer: For the frame, providing a high-end finish that matches the overall design.
Constructing the Grills
I wanted the speakers to maintain their aesthetic without compromising on sound quality whenever the grills were in place. Building a framework from wood veneer, I stretched the cloth tightly across, ensuring it was acoustically transparent yet visually cohesive. This part of the project reminded me that in the world of high-fidelity audio, every detail matters, even those that seemingly play a minor role.
Customization Tips
Building your own DIY speakers is not just about the sound—it's also about making them a reflection of your style and preferences. Here are some tips to help you customize your speakers and make them truly unique.
- Choose Your Materials Wisely: The materials you use for your speaker cabinets can greatly affect both the sound and the look of your speakers. Common materials include wood, MDF (Medium-Density Fiberboard), and even concrete for those looking for a modern touch. Each material has its own acoustic properties, so consider what kind of sound you're aiming for.
- Color Your World: Paint or stain your speaker cabinets to match your room's decor or to stand out as a statement piece. If you're feeling adventurous, try custom designs or patterns.
- Grill Design: The speaker grill, which covers the front of the speaker, can be a great place to add a personal touch. Use different fabrics or patterns to build a look that's all your own.
- Size It Right: Tailor the size of your speakers to fit your space. If you're short on room, consider compact designs that can still deliver quality sound.
- Accessorize: Add LED lights, adjustable feet, or handles to enhance both the functionality and appearance of your speakers.
- Fine-Tune Your Sound: Experiment with internal damping materials like foam or fiberglass to fine-tune how your speakers sound. Changing these materials can affect the bass response and overall clarity.
- Connectivity Options: Consider adding Bluetooth or Wi-Fi capabilities to your speakers for wireless streaming. This adds convenience and modern functionality to your DIY project.
- Personal Touches: Don't forget the small details that make your speakers truly yours. This could be anything from a signature carved into the cabinet to a custom nameplate.
The beauty of DIY is that there are no rules. Let your creativity flow, and build speakers that not only sound great but also tell a story about who you are.
Advanced Techniques
For those who have ventured into the realm of DIY speaker building and are looking to elevate their craft, advanced techniques can enhance both the performance and precision of your speakers. Here's a guide to some sophisticated methods that can take your speakers to the next level.
- Acoustic Measurement: Understanding how your speakers interact with the room is crucial. Use a microphone and software to measure frequency response, distortion, and room acoustics. This data can help you make informed decisions on how to improve your speaker's performance.
- Crossover Optimization: The crossover is the electronic circuit that divides the audio signal into different frequency bands for each driver. Experiment with different types of crossovers, like passive, active, or digital, and adjust the crossover points to achieve a balanced sound.
- Driver Matching: Pair drivers that complement each other in terms of sensitivity, frequency response, and power handling. This ensures a cohesive sound across the different drivers in your speaker system.
- Cabinet Tuning: The shape and volume of your speaker cabinet affect the sound. Try different internal bracing patterns and port designs to control resonance and enhance bass response.
- Damping Material Experimentation: The type and placement of damping materials inside the cabinet can reduce unwanted vibrations and reflections. Experiment with various materials and configurations to find what works best for your setup.
- Bi-Wiring and Bi-Amping: These techniques involve separate connections for the woofer and the tweeter. Bi-wiring uses one amplifier but separates the wires for the low and high frequencies, while bi-amping uses two amplifiers. Both can potentially improve sound clarity and detail.
- Digital Signal Processing (DSP): DSP allows for precise control over the audio signal. Use it to apply equalization, time alignment, and room correction to optimize the sound for your listening environment.
- Listening Tests: Trust your ears. After making adjustments, critical listening tests with various types of music will be conducted to evaluate the changes. Take notes on what you hear and continue to refine.
Using these advanced techniques, you can enhance your DIY speakers' sound quality and understand the science of sound better.
Troubleshooting Common Issues
Building your own speakers can be a rewarding project, but sometimes, you might run into a few hiccups along the way. Here's a helpful guide to troubleshooting common issues that DIY speaker enthusiasts often encounter.
- No Sound: If your speakers aren't making any noise, check all connections first. Ensure that wires are properly connected to the drivers and the amplifier. Also, check for any loose strands that might cause a short circuit.
- Distortion: Distorted sound can be due to a damaged driver or an issue with the audio source. Inspect the speaker cones for any visible damage. If they're intact, try a different audio source to see if the problem persists.
- Uneven Sound Levels: If one speaker is louder than the other, double-check the balance settings on your amplifier. Also, ensure that both speakers have the same length and gauge of wire for consistent signal strength.
- Buzzing or Humming: This is often caused by a ground loop. Make sure all your audio components are grounded properly. If the issue continues, a ground loop isolator might be necessary.
- Weak Bass: If the bass isn't as strong as expected, verify that the speaker enclosure is sealed correctly. Any air leaks can significantly reduce the bass response. Also, consider the placement of your speakers; corners can amplify the bass.
- Muffled Sound: Muffled audio might indicate that there's too much damping material inside the speaker cabinet or the material is blocking the back of the driver. Adjust the amount and position of the damping material to clear up the sound.
- High-Frequency Hiss: A hissing sound usually points to an issue with the amplifier or interference from other electronic devices. Try using a different amplifier to determine if it's the source of the problem.
- Bluetooth Connectivity Issues: For speakers with Bluetooth, ensure the device is within range and not obstructed. If pairing issues arise, reset the Bluetooth connection on both the speaker and the audio source.
By addressing these common issues, you can ensure your DIY speakers perform at their best.
FAQs About DIY Speakers
Find answers to all your questions about DIY speakers in our FAQs. Get tips, tricks, and expert advice for building your own speaker system today!
Building your own speakers can be a rewarding experience. It allows you to create a sound system tailored to your preferences and often at a lower cost than purchasing pre-built options. Plus, it’s a fun project for those who enjoy woodworking and electronics.
The essential components for DIY speakers include drivers (woofers, tweeters, and possibly mid-range), a crossover network to direct the right frequencies to each driver, and a well-constructed enclosure. You’ll also need some basic tools and supplies for assembly.
Yes, with careful selection of components and attention to detail in construction, you can build high-quality speakers. While you may not reach the quality of extremely high-end commercial speakers on your first try, you can certainly build something that rivals more expensive options.
Choosing the right drivers involves considering the size of the room, the type of sound you prefer, and the design of the speaker. It’s important to select drivers that work well together to ensure a balanced sound. Online forums and guides can be helpful resources for recommendations.
While not strictly necessary, a subwoofer can greatly enhance the bass response of your system. For very low bass frequencies, subwoofers can appear omnidirectional and add depth to the sound. However, for frequencies above 80 or 100Hz, the directionality becomes more apparent, and it's important to have a good crossover to blend the sounds smoothly.
Final Thoughts:
Having completed my homemade DIY speakers, I now enjoy a superior audio experience within budget. Give it a try; these guidelines will help you succeed.


