Spray foam insulation is a modern solution for keeping your home warm in the winter and cool in the summer. It's made by mixing two materials, polyurethane and isocyanate, which expand into a foam that can fill gaps and make an effective barrier against heat loss or gain.

Benefits of Spray Foam Insulation
- Energy Efficiency: It can significantly lower your energy bills by reducing the need for heating and cooling.
- Air Sealing: It fills cracks and crevices, preventing unwanted air flow into or out of your home.
- Moisture Barrier: It helps to keep moisture out, reducing the risk of mold and mildew.
- Longevity: Once installed, it can last for many years, making it a cost-effective choice.
Types of Spray Foam Insulation
There are two main types of spray foam insulation, each with its own set of benefits and ideal uses.
Open-Cell Spray Foam
- Lightweight: This foam has a lower density, making it less rigid.
- Soundproofing: Its structure is great for reducing noise.
- Cost-Effective: It is generally less expensive than closed-cell foam.
Closed-Cell Spray Foam
- Higher R-Value: This means it provides better insulation per inch of thickness.
- Moisture Resistant: It makes a strong barrier against moisture and air.
- Durable: It is more rigid and stable, offering a longer lifespan.
By understanding these two types of spray foam insulation, you can make an informed decision about which one is best for your home.
How to Insulate Your Home - Step by Step
Insulating the shed ceiling with spray foam saves headaches. A step-by-step guide with personal experiences.
Preparing for the Insulation
The journey kicked off when I discovered the importance of temperature on spray foam insulation's effectiveness. To achieve optimal results, both canisters and spray surface should meet specific temperature criteria:
- Canisters: Optimal between 75* °F and 85°F.
- Spray Surface: Ideally around 70* °F.
Materials Needed:
- Spray Foam Insulation Kit: I went with the Tiger Foam system for its straightforward setup.
- Heating Solution: A makeshift hot box kept my canisters at the right temperature.
- Electric Heaters: Necessary to warm the shed to the optimal surface temperature.
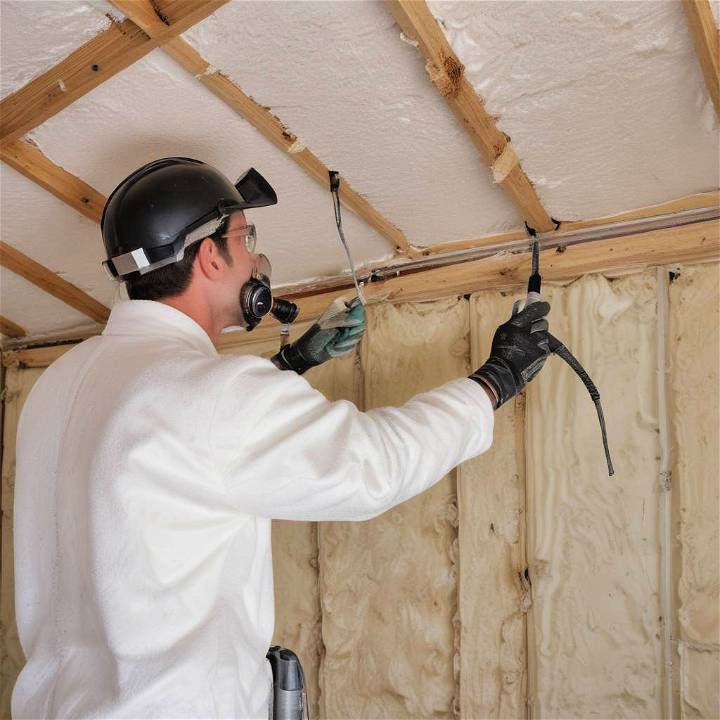
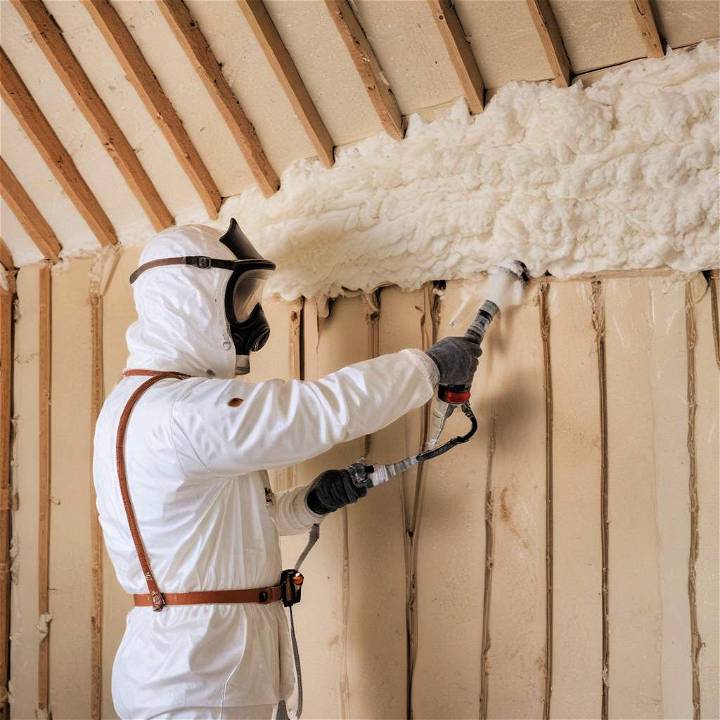
- Protective Gear: A Tyvek suit, full respirator, eye protection, and rubber gloves are non-negotiable.
Each material played a critical role, setting the stage for a smooth application.
The Application Process
With temperatures in check, I embarked on the actual insulation process, which unfolded as follows:
- Preparing the Canisters: Upon ensuring the canisters were within the desired temperature range, I gave them a solid shake for about a minute, aiding the chemical readiness for spraying.
- Getting Dressed: Dressed in my protective gear, I felt like an astronaut embarking on a space mission but in the confines of my own shed.
- Initiating the Spray: A quarter squeeze on the trigger was all it took to start, ensuring both ingredients were mixing well.
- Choosing the Right Tip: Although the kit came with both cone-shaped and fan-shaped tips, my choice landed on the fan-shaped tip for a wider, more even spread.
- First Spray: Imagine my surprise when I realized that full pressure from the get-go wasn't the best approach—a rookie mistake. A gentle trigger pull was the secret to a consistent spray.
The Nitty-Gritty of DIY Spray Foam
Here's where my journey took the path less traveled, stumbling upon nuances that no guide mentioned:
- Canister Management: As canisters deplete unevenly, monitoring their output becomes crucial. Switching to a new kit before one runs dry ensures a balanced mix and proper curing.
- Tip Management: Those tips aren't just extras; they are lifelines. The foam hardens quickly, making swift changes necessary. I found myself wishing for more fan-shaped tips.
- Cleanup and Prep Work: My biggest oversight was underestimating the mess. Protective floor coverings and securing loose items would have saved a day's worth of cleanup. My advice? Cover everything.
Tips and Tricks
- Temperature Sensing Tips: If they turn blue, stop! Your setup needs a temperature adjustment.
- Keep Moving: Once you start spraying, continuous motion ensures even coverage. Pausing results in build-up and uneven insulation.
- Budgeting: Yes, spray foam insulation is pricey. My project tallied up to around $1100. Weigh the cost against your needs. In my case, the vapor barrier it maked was worth it, eliminating the need for roof venting.
Safety Precautions for DIY Spray Foam Insulation
When it comes to DIY spray foam insulation, safety is paramount. The chemicals involved can be hazardous if not handled correctly, so it's essential to take the proper precautions to protect yourself and others.
Personal Protective Equipment (PPE)
- Wear a Respirator: Protect your lungs from fumes with a quality respirator.
- Safety Goggles: Keep your eyes safe from accidental splashes.
- Gloves: Use gloves to prevent skin contact with the foam.
- Coveralls: Wear a full-body suit to protect your clothing and skin.
Ventilation and Evacuation
- Well-Ventilated Area: Ensure the space is well-ventilated to avoid inhaling fumes.
- Evacuate Non-Workers: Anyone not involved in the installation should leave the area.
Handling and Disposal
- Follow Instructions: Always adhere to the manufacturer's guidelines for mixing and application.
- Proper Disposal: Dispose of any waste material according to local regulations.

Common Mistakes to Avoid in DIY Spray Foam Insulation
DIY projects can be rewarding, but when it comes to spray foam insulation, certain mistakes can lead to less-than-desirable results. Here are some common pitfalls to avoid:
Inadequate Surface Preparation
- Clean Surfaces: Ensure the area is free of dust and debris for proper adhesion.
- Dry Conditions: Apply foam only to dry surfaces to prevent mold growth.
Rushing the Process
- Take Your Time: Rushing can lead to uneven application and poor insulation.
- Layering: Apply foam in layers, allowing each to expand and cure before adding more.
Ignoring Manufacturer's Instructions
- Read Carefully: The manufacturer's instructions are there to ensure optimal performance and safety.
- Proper Mixing: Incorrect chemical ratios can lead to ineffective insulation and health hazards.
By following these guidelines and avoiding common errors, you can ensure a successful and safe DIY spray foam insulation project.
FAQs About DIY Spray Foam Insulation
When embarking on a DIY spray foam insulation project, it's natural to have questions. Here's a helpful guide addressing some of the most common inquiries homeowners have.
What is the difference between open-cell and closed-cell spray foam?
- Open-Cell: Lighter, more flexible, ideal for interior walls, and provides sound dampening.
- Closed-Cell: Denser, higher R-value, moisture-resistant, suitable for exterior applications.
Can I apply spray foam insulation myself?
Yes, with the right tools and safety precautions, you can apply spray foam insulation. However, it's crucial to follow the manufacturer's instructions closely to ensure a safe and effective application.
How much does DIY spray foam insulation cost?
The cost varies depending on the size of the area you're insulating and the type of foam you choose. Generally, DIY can be more cost-effective than professional installation for small areas.
What safety gear do I need?
You should wear a respirator, safety goggles, gloves, and coveralls to protect yourself from the chemicals in the spray foam.
How do I prepare the area for insulation?
The surface should be clean, dry, and free of debris. Ensure the area is well-ventilated and that non-workers are evacuated from the space during application.
How long does spray foam insulation last?
When properly installed, spray foam insulation can last for decades, providing a long-term solution for energy efficiency and comfort in your home.
By addressing these FAQs, you can approach your DIY spray foam insulation project with confidence, knowing you're well-informed and prepared.
Wrapping Up: To Foam or Not to Foam?
The result? A well-insulated shed ready to face the elements. Was it challenging? Absolutely. Yet, the satisfaction of a job well done and the hands-on knowledge gained was unparalleled. If you're considering spray foam insulation, remember, preparation is your best friend and protective gear is a must.
For those in similar projects, I'd say: Go for it, with the caveat of understanding the complexity and cost involved. It's not just about filling in gaps; it's about making a stable, energy-efficient environment, something I learned every step of the way.
Join me next week as I tackle the walls with traditional insulation and a vapor barrier, continuing this journey of shed transformation. Until then, may your DIY projects be successful and your learning endless.


