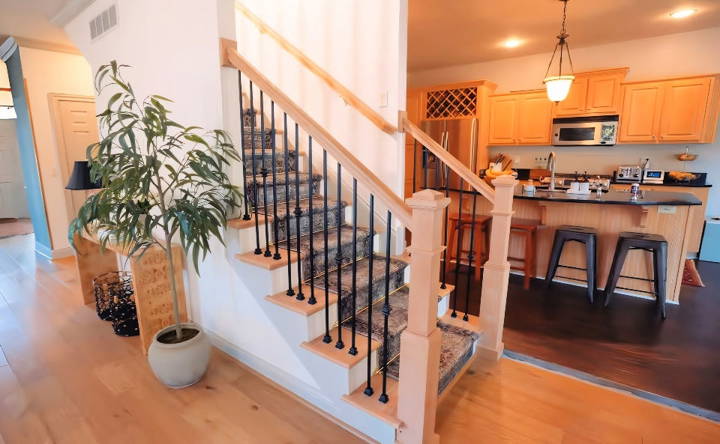
Installing a DIY stair runner was one of the best decisions I made for my home. It was quite simple and added a beautiful touch to my staircase. I started by measuring the steps and cutting the runner to fit. I made sure to secure each section with a staple gun, ensuring the runner was tightly fixed and wouldn't slip.

Throughout the process, I learned some essential tips, like using double-sided tape to keep the runner in place before stapling. This simple trick made the installation much easier. My staircase now looks fantastic and feels much safer.
I'm sharing this experience to help you install your own DIY stair runner confidently. Follow the steps below, and you'll have a stunning staircase in no time.
What You'll Need:
- Stair Runner Rugs: Choose the design that best suits your staircase and home d* écor.
- Rug Pads: Essential for adding extra cushioning and preventing slippage.
- Pneumatic Staple Gun & Half-Inch Staples: For securing the runner to the stairs.
- Painters Tape: To mark measurements and ensure straight, aligned installation.
- Sandpaper (120 grit): To prep the stair treads if necessary.
- Wood Filler & Rubio Monocoat: For touching up stairs before installation.
- Sharpie (color matching the rug): To make staples less noticeable.
- Brass Stair Rods (optional): For an elegant finish.
Step by Step Instructions
Learn how to install a DIY stair runner with our step-by-step guide. Preparation tips are included for a professional finish. Follow our instructions today!
Preparation:
- Evaluate the Stairs: If your wooden stairs have seen better days like mine, a good sanding might be necessary. After sanding down the treads with 120 grit sandpaper, I wiped everything down to ensure a clean surface. If you notice any nail holes, now is the time to fill them in and touch up as necessary.
- Measure and Cut Rug Pads: Measure your stairs and cut rug pads to fit each tread. These pads not only increase comfort but drastically reduce the likelihood of the runner slipping. Place and staple a pad on each tread.
Installing the Runner:
- Positioning: Start by positioning your runner to ensure it's centered. An easy trick I found helpful was aligning the runner to one side, marking the opposite side's position with painters tape, and then, adjusting the rug to center it based on those marks.
- Start from the Top or Bottom?: After much consideration, I decided to start from the top, working my way down. This approach helped maintain alignment, ensuring the runner looked evenly placed from every angle.
- Stapling: Using a pneumatic staple gun, I began stapling the runner under the nose of the top stair and along the point where the riser meets the tread. Placing staples every two to three inches or so provided a secure and tight fit. For aesthetics, I colored the staples with a Sharpie to blend them into the rug's pattern.
- Cutting and Fitting: Depending on your staircase, you might need to cut the runner to fit perfectly. I did—aiming for a seamless look by ensuring pattern continuity, which sometimes meant cutting and adjusting as I went along. The goal was to make it appear as one long, continuous piece.
- Finishing Touches: Those optional brass stair rods? They were indeed the cherry on top. Cutting and fitting each one gave my staircase that polished, professional look I was dreaming of.
The true testament to the project's success was seeing Watson navigate the stairs with newfound ease. No hesitance. No slipping. Just a happy pup confidently trotting up and down. This alone made the entire effort worth it.
Design and Aesthetics
Stair runner trends in 2024 combine style and practicality. These runners are statement pieces that reflect personal style and enhance home interiors.
- Bold Patterns: This year, bold patterns are in vogue. Geometric shapes, stripes, and animal prints are making a significant impact in home decor. These patterns are not only visually striking but also serve a practical purpose. For instance, striped runners can cleverly disguise signs of wear and tear, ensuring your staircase always looks pristine.
- Textured Designs: Textured designs, such as striated and herringbone patterns, are also trending. They add visual depth to your space and can enhance the overall color scheme of your home. Textures can also contribute to the safety of your stairs by providing better grip, which is an essential consideration for households with children or elderly members.
- Material Matters: Wool is a popular choice for stair runners due to its durability and comfort underfoot. It's also a sustainable option, aligning with the growing preference for eco-friendly home furnishings. Other materials like sisal offer a natural look and are highly durable, making them suitable for high-traffic areas.
- Color Choices: In terms of color, 2024 sees a shift towards earthy tones and cooler shades. Beige, blues, and greys are favored for their calming effect and ability to blend seamlessly with various interior styles. However, for those looking to make a bolder statement, rich reds and deep browns are also on the palette.
- Practical Considerations: When selecting a stair runner, consider its practicality. It should be stain-resistant, easy to clean, and durable enough to withstand the daily foot traffic. The width of the runner is also crucial; it should be proportional to the size of your staircase to achieve a balanced look.
- Installation Insights: Installing a stair runner can be a DIY project, but it requires precision and patience. If you're not confident in your skills, it's worth considering professional help to ensure a flawless finish.
Choosing the right pattern, material, and color for your stair runner can make your staircase a stylish, functional focal point. Let it reflect your personal taste and current trends.

Safety Considerations
Ensuring the safety of your stair runner is paramount, not only for the well-being of your family but also to make a secure environment for visitors. Here's how you can prioritize safety while maintaining the aesthetic appeal of your stair runner:
- Choose the Right Material: Select materials that offer good traction and are not too slippery, especially if you have children or elderly individuals in your home. Wool and nylon are excellent choices as they provide a balance of comfort and safety.
- Proper Installation: A stair runner must be installed correctly to prevent it from becoming a tripping hazard. Make sure it is securely attached to each step, and there are no loose edges.
- Appropriate Width: The runner should not cover the entire width of the stairs. Leave enough space on either side for a secure footing on the bare stair, which can be crucial for balance.
- Visible Step Edges: Choose a runner color that contrasts with the stairs to clearly delineate where the edge of each step is. This visual cue helps prevent missteps.
- Handrails and Balustrades: Ensure that your staircase has sturdy handrails or balustrades that people can hold onto for added stability. This is especially important in homes with floating staircases, where the steps are not connected to the wall.
- Regular Inspection: Check your stair runner periodically for signs of wear and tear. Any damage should be repaired promptly to avoid accidents.
- Lighting: Good lighting is essential for stair safety. Consider installing motion-activated lights that illuminate the stairs as someone approaches, reducing the risk of falls in low-light conditions.
- Non-Slip Pads: Use non-slip pads underneath the runner to prevent it from moving. These pads also add an extra layer of cushioning, which can soften falls should they occur.
Ensuring these safety measures makes your stair runner a beautiful and secure home addition. Prioritize safety to achieve peace of mind and style.
FAQs About DIY Stair Runner Installation
Discover essential FAQs about DIY stair runner installation, covering everything from materials to techniques for a flawless finish.
First, measure the depth of one stair tread and the height of one riser. Multiply the depth by the number of treads and the height by the number of risers, then add these two totals. For the width, it depends on your staircase width and desired coverage. A common runner width is 27 inches for a 36-inch staircase. Remember to add at least 10% to your length for adjustments and waste.
Mark the treads 1-inch narrower than the runner to keep the padding hidden. For stairs with nosing, cut the pad 3-inches longer than the tread depth. For stairs without nosing, cut it 1/2-inch shorter. Use the first pad as a template for the rest.
Begin at the top edge of the first riser. Attach the carpet padding first, then align the runner starting the top. Use double-sided tape or staples to secure the runner at the bottom of the riser. Continue attaching the runner, making sure it’s centered and straight as you progress down the stairs.
Yes, here are a few tips:
Keep it tight: Ensure the runner is pulled tight and free of wrinkles as you attach it.
Stay centered: Use a straight edge to keep the runner centered on each step.
Secure edges: Staple under the stair nose and at the bottom of each riser.
Finishing touches: After installation, tuck in any loose edges and inspect for evenness.
Yes, you can install a stair runner on stairs with turns or landings. For turns, you'll need to make precise cuts and possibly use additional staples or tack strips to keep the runner in place. For landings, measure the area as a separate section and consider it as an additional step in your overall measurements. Ensure the pattern matches at the seams for a continuous look. It may be helpful to consult a detailed guide or seek professional advice for complex stair layouts.
Final Thoughts:
With these practical tips, you'll find installing a DIY stair runner both enjoyable and rewarding. Give it a try and transform your staircase yourself.


