Building a DIY steel target range at home can be a rewarding project that combines my love for shooting and my passion for DIY. The journey of building my own range was not only thrilling but also cost-effective. It allowed me to tailor the setup to my personal needs and shooting preferences. What follows is a step-by-step guide on how I built my at-home range, complete with practical advice, insights, and a touch of personal experience aimed at helping others pursue similar projects.
Why Build a Steel Target Range at Home?
Having a steel target range right at home offers several advantages. Not only does it provide me the convenience of shooting without the need to travel, but it also allows for a customized experience. I can choose the distances, angles, and positions that best fit my training goals. This setup also saves on range fees and offers the flexibility to practice at any time, making it perfect for honing firearm skills in privacy.
Gathering Materials
Here's a breakdown of the materials required and why each piece is necessary. I chose materials that would ensure durability while keeping the budget low.
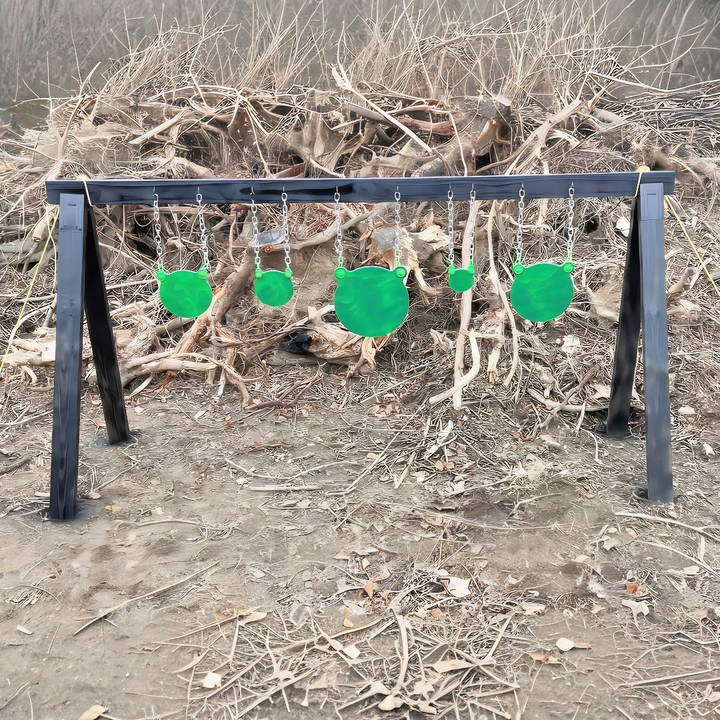
- Treated Lumber (2x4s): Three eight-foot-long treated lumber 2x4s are the backbone of the structure. Treated lumber is resistant to rot and insects, which adds durability and longevity.
- Brackets: Two 2x4 brackets were used to build a sturdy sawhorse design for the legs. The brackets add stability to the structure, ensuring the target stands firm during shooting sessions.
- Chain: I purchased chains cut into one-foot lengths. These are crucial for hanging the targets, allowing them to swing when hit, which absorbs the impact and prolongs the life of the targets.
- Bolts, Nuts, and Washers: Ten 3/8" bolts and matching nuts, along with lock washers, were used to securely attach the chains to the targets and frame. Washers ensure even distribution of pressure, which helps in maintaining a secure hold.
- Steel Targets: I found AR500 half-inch thick steel plates online. Steel targets are crucial as they provide instant feedback with a satisfying 'ping' sound and are durable under repeated use.
- Spray Paint: Basic outdoor spray paint in black and bright colors like green for the targets. Painting provides weather protection and makes targets more visible.
Step by Step Instructions
Learn how to build a DIY steel target stand with our detailed step-by-step instructions, from preparing the lumber to painting targets and safety considerations.
Step 1: Preparing the Lumber
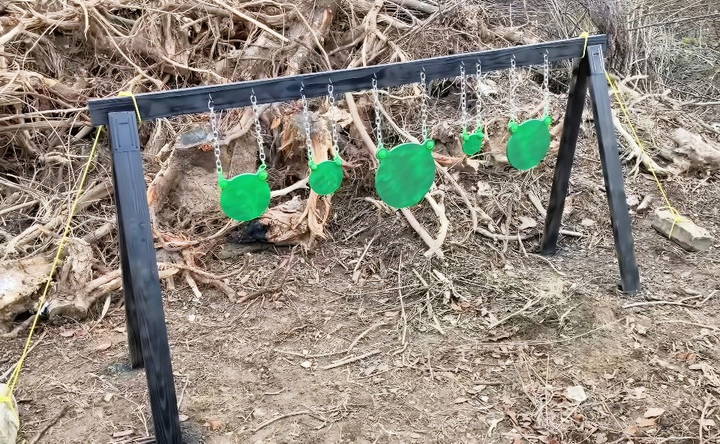
Firstly, I decided not to cut the top 2x4, leaving it at eight feet for a wider span. This allows for multiple target placements without crowding. I then cut the remaining 2x4s into four-foot sections for the legs.
Step 2: Assembling the Frame
Using the purchased brackets, I connected the cut legs to the top 2x4. The sawhorse design provided stability. The brackets made assembly straightforward and are easy to replace if needed in the future.
Step 3: Attaching the Chains
I measured and marked the positions for the chains on the top 2x4, ensuring even spacing for all targets. Bolting the chains to the frame was simple due to the pre-cut lengths. This design allows for easy removal and weather protection when needed.
Setting Up the Targets
Learn how to set up shooting targets with our guide. Secure steel plates and expertly paint targets for optimal visibility.
Step 4: Securing the Steel Plates
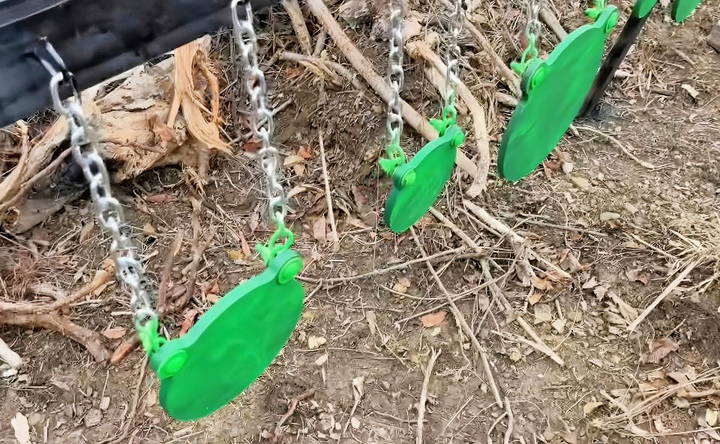
Using the previously attached chains, I hung the steel targets, ensuring they were free to swing. The swinging motion compensates for bullet impact, reducing damage to both the target and supporting structure.
Step 5: Painting the Targets
I opted for a bright green hue initially, enhancing visibility against varied backgrounds. While black paint was applied to the frame for protection, the bright colors on the targets stand out and aid in improving shooting accuracy.
Considerations for Location and Safety
- Choosing the Location: I cleared an area on my property that provided a natural backstop. This ensures maximum safety by catching stray bullets.
- Ensuring a Safe Environment: It's vital to clear the area of potential hazards and to notify family or neighbors of shooting times to maintain a safe environment.
- Room for Future Improvements: I left space to expand or modify the range in the future, be it for longer distances or additional targets. Flexibility in design ensures adaptability for future needs.
Cost Breakdown
The entire project amounted to about $150, with the steel plates being the most expensive component. Despite this, the plates are crucial for their durability and safety features. Here's a quick cost breakdown:
- Steel Targets: $95
- Treated Lumber and Brackets: $15
- Chains and Hardware: $20
- Spray Paint and Miscellaneous: $20
Personal Insights and Tips
- Portability: The easy-to-assemble structure means I can quickly dismantle and store the setup during inclement weather or when not in use.
- Noise Considerations: Steel targets can be quite loud, so considering noise levels and potential disturbances is crucial. I positioned the range in an area where noise impact is minimal.
- Maintenance: Over time, some components may require replacement. Particularly, keeping an eye on chains and bolts will ensure continued safe operation.
- Customize and Adapt: Factors such as paint colors for visibility and target positions for training variety can be adapted based on personal preferences and needs.
Customization Options
Customizing your DIY steel target stand can enhance its functionality and make it more suited to your specific needs. Here are some practical customization options:
Adjustable Stands
- Height Adjustment: Make a stand with adjustable height to accommodate different shooting positions. Use telescoping legs or add multiple holes along the legs to insert locking pins at various heights.
- Angle Adjustment: Design the stand so the target angle can be changed. This can help with different shooting drills and improve safety by directing bullet fragments downward. Use hinges or adjustable brackets to achieve this.
Portable Designs
- Foldable Stands: Make your stand foldable for easy transport and storage. Use hinges at the joints so the legs can fold inwards. Ensure the hinges are strong enough to support the weight of the steel target.
- Detachable Parts: Design the stand with detachable parts. This makes it easier to disassemble and carry. Use quick-release pins or bolts for easy assembly and disassembly.
Target Mounting Options
- Interchangeable Targets: Make a system that allows you to easily swap out different targets. Use hooks or brackets that can hold various target shapes and sizes. This adds versatility to your shooting practice.
- Reactive Targets: Add reactive targets that move or make noise when hit. This can make shooting practice more engaging and provide instant feedback. Use springs or chains to mount these targets.
Durability Enhancements
- Weatherproofing: Protect your stand from the elements by applying a weatherproof coating. Use rust-resistant paint or galvanize the steel parts. This will extend the life of your stand.
- Reinforcements: Strengthen the stand by adding extra supports or braces. This is especially useful if you plan to use heavier targets. Ensure all joints and connections are secure.
Safety Features
- Bullet Traps: Incorporate bullet traps to catch and contain bullet fragments. This can be done by adding angled steel plates or sandbags behind the target. It enhances safety by reducing the risk of ricochets.
- Stability Enhancements: Improve the stability of your stand by adding wider bases or ground stakes. This prevents the stand from tipping over, especially when using larger targets.
Aesthetic Customizations
- Paint and Finish: Customize the look of your stand with different paint colors or finishes. This can make your stand more visually appealing and help it blend into its surroundings.
- Personalization: Add personal touches like your initials or a logo. Use stencils and spray paint to build these designs.
By incorporating these customization options, you can build a steel target stand that is not only functional but also tailored to your specific needs and preferences.
Common Mistakes to Avoid
When building and using a DIY steel target stand, there are several common mistakes that can compromise safety and effectiveness. Here are some key pitfalls to watch out for:
Safety Mistakes
- Ignoring Safety Distances: Always maintain a safe distance between the shooter and the target. For steel targets, a minimum distance of 10-15 yards for handguns and 100 yards for rifles is recommended. This helps prevent ricochets and injuries.
- Improper Target Angling: Ensure the target is angled downward. This directs bullet fragments toward the ground, reducing the risk of ricochets. A slight forward tilt of 15-20 degrees is usually sufficient.
- Using the Wrong Steel: Not all steel is suitable for targets. AR500 or AR550 steel is used for rifle targets, and AR400 is used for handgun targets. Softer steel can dent or deform, increasing the risk of ricochets.
Construction Errors
- Weak Joints and Connections: Ensure all joints and connections are secure. Use strong bolts and welds to prevent the stand from collapsing. Weak connections can lead to instability and accidents.
- Inadequate Base Support: A narrow or unstable base can cause the stand to tip over. Use a wide base or ground stakes to ensure stability, especially in windy conditions or on uneven ground.
- Incorrect Measurements: Measure twice and cut once. Incorrect measurements can lead to parts not fitting together properly, resulting in a weak or unstable stand. Double-check all measurements before cutting.
Usage Mistakes
- Overloading the Stand: Do not exceed the weight capacity of your stand. Overloading can cause the stand to collapse or become unstable. Check the weight limits of your materials and design accordingly.
- Neglecting Maintenance: Regular maintenance is crucial for the longevity of your stand. Clean and inspect the stand after each use. Look for signs of wear, rust, or damage and address them promptly.
- Improper Storage: Store your stand in a dry, sheltered area to prevent rust and weather damage. If the stand is portable, disassemble it and store the parts properly to avoid damage.
Shooting Mistakes
- Shooting at Damaged Targets: Do not shoot at targets that are cracked, pitted, or damaged. Damaged targets can cause unpredictable bullet fragments and increase the risk of injury. Replace damaged targets immediately.
- Using Inappropriate Ammunition: Use the correct ammunition for your targets. Avoid using armor-piercing or steel-core rounds on steel targets, as they can cause excessive wear and increase the risk of ricochets.
Assembly Mistakes
- Skipping Instructions: Follow the assembly instructions carefully. Skipping steps or improvising can lead to an unstable or unsafe stand. If you're unsure about any step, seek guidance or refer to tutorials.
- Rushing the Process: Take your time during assembly. Rushing can lead to mistakes and overlooked safety issues. Ensure each step is completed correctly before moving on to the next.
By avoiding these common mistakes, you can build a safe and effective steel target stand that will provide years of reliable use. Always prioritize safety and take the time to do things right.
FAQs About DIY Steel Target Stands
Discover answers to FAQs about DIY steel target stands, including materials, safety tips, and setup instructions for your shooting needs.
Safety is crucial when building and using a steel target stand:
Use AR500 steel for the targets, as it can withstand high-impact shots.
Angle the targets downward to deflect bullets safely into the ground.
Secure the stand firmly to prevent it from tipping over.
Maintain a safe distance (at least 10 yards for pistols and 100 yards for rifles) to avoid ricochets.
To keep your steel target stand in good condition:
Inspect regularly for any damage or wear.
Repaint the targets and frame to prevent rust.
Tighten bolts and nuts periodically to ensure stability.
Store indoors or cover when not in use to protect from the elements.
Yes, you can customize your steel target stand to suit your needs:
Adjust the height and width of the stand.
Add multiple targets for varied shooting practice.
Use different shapes and sizes of steel plates.
Incorporate moving targets for an added challenge.
Choosing the right steel thickness is essential for safety and durability:
For pistols, use 3/8-inch thick AR500 steel.
For rifles, use 1/2-inch thick AR500 steel.
Consider the caliber and velocity of the bullets you'll be using. Higher calibers and velocities require thicker steel to prevent damage and ensure safety.
Yes, steel target stands can be versatile:
Pistol shooting: Ensure the targets are at a safe distance and angled downward.
Rifle shooting: Use thicker steel and maintain a greater distance.
Shotgun shooting: Steel targets can handle birdshot and buckshot, but avoid using slugs as they can cause damage.
Conclusion
Making my own low-cost DIY steel target range was an enriching project from start to finish. With some planning, investment, and safe practices, I managed to set up a personalized shooting range that saves time and money in the long run. This setup provides me with the convenience of practicing in my backyard while enjoying my hobby. I hope this guide proves useful to anyone looking to build their own shooting range at home.


