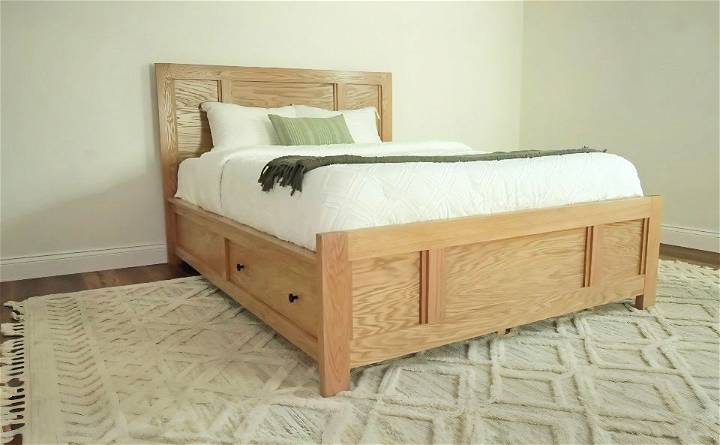
Building a storage bed with built-in drawers has been one of the most rewarding DIY projects I've embarked on. Not only did it solve my storage issues, but it also added a personal touch to my bedroom decor. If you're looking to build a functional yet stylish storage bed, follow this guide where I'll walk you through the process step by step.
Materials Needed and Why
- Plywood or Solid Lumber (Red Oak, Pine, etc.): I used Red Oak for its grain, but Pine or Birch plywood is more cost-effective and easier to work with.
- 1x3s for Trim: Either made from plywood strips or bought as solid pieces, these add structural support and aesthetic detail.
- 2x4s: These provide a sturdy framework for the drawers.
- Drawer Slides: Essential for smooth-operating drawers.
- Pocket Hole Screws, Dow Pins, and Glue: For joining pieces securely.
- Edge Banding (if using plywood): Gives the plywood edges a finished look.
- Finish (Stain, Paint, or Clear Coat): Protects the wood and adds beauty.
Step by Step Instructions
Discover how to build your own DIY storage bed with our easy step-by-step instructions. Save space and add style to your bedroom today!
Part 1: Building Side Rails with Drawers
1. Prepare the Wood
Rip two 13in wide strips of your chosen wood to use for the side rails. If using plywood, consider the finish and whether you'll stain or paint the bed, as this might influence your wood choice.
2. Trace and Cut Drawer Openings
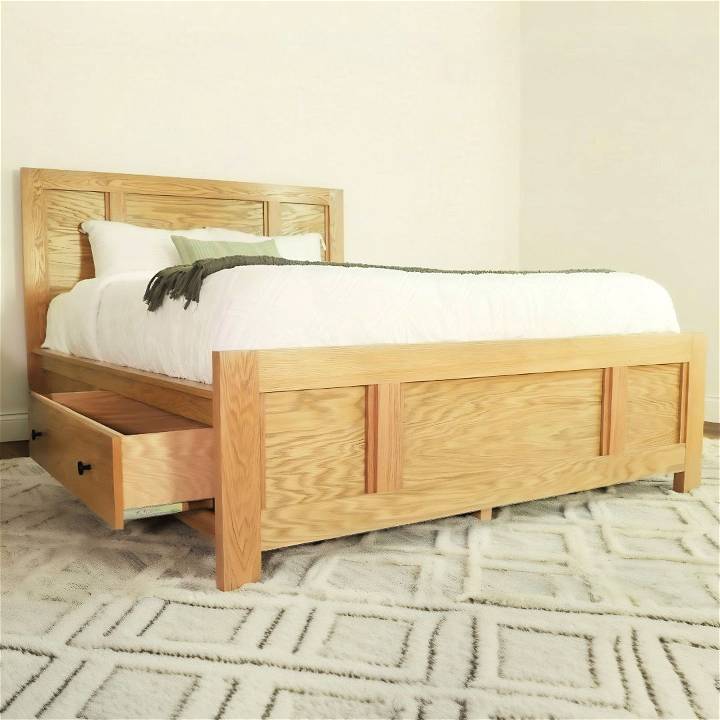
Mark where the drawers will go on the side rails. Use a jigsaw to cut these openings, saving the cut-out pieces for the drawer fronts later. This step is crucial for customizing the size of your drawers.
3. Add the Trim
Glue and clamp 1x3s along the top, bottom, and sides of the side rails. This not only frames the drawers but also strengthens the bed's structure.
4. Build the Drawer Frame
Using 2x4s, build a U-shaped frame that will support the drawer. Attach this inside the rails, ensuring it's secured with pocket holes and screws.
5. Install Drawer Slides
Attach the drawer slides inside the side rails, making sure they align perfectly for smooth operation.
Part 2: Assembling the Headboard and Footboard
1. Build the Frames
Cut the pieces for the headboard and footboard from your wood. I used a simple dowel joinery technique for assembly, reinforcing the structure with glue.
2. Insert Plywood Panels
Fit the cut plywood panels inside the frames and secure them with pocket holes and screws. These panels add visual interest and additional support.
3. Add Detail with Trim
To hide imperfections and add character, I glued trim pieces to the panel fronts. This step also provided an opportunity to cover any gaps seamlessly.
Part 3: Final Assembly
1. Use Bed Brackets
These brackets are lifesavers for attaching the bed's sides to the headboard and footboard securely. They make assembly (and disassembly) a breeze.
2. Support the Drawer Frames
A simple 2x4 block screwed into the back provides necessary support for the drawer frame. This removable support is essential for transportation ease.
3. Lay Down the Slats
I opted for pre-primed 1x4s for the slats, reinforcing them with 2x2s in the middle to prevent sagging. This method proved simpler and less labor-intensive than building a middle support beam.
Finishing Touches
After thorough sanding, I applied Minwax Weathered Oak stain for a subtle, natural finish, and sealed it with a clear coat for durability. Finally, I attached knobs to the drawers, adding a functional finishing touch.
Reflections and Additional Tips
- Patience is Key: This project tested my patience, especially during the cutting and assembly phases. Take your time for the best results.
- Measure Twice, Cut Once: Accurate measurements are critical, especially when cutting drawer openings and panels.
- Customization: Feel free to modify the design to fit your space. Adding more drawers or adjusting the size is straightforward if you plan accordingly.
- Finishing: Experiment with finishes on scrap wood before committing. It can significantly alter the bed's look.
Building this storage bed took time, effort, and attention to detail, resulting in a custom piece of furniture that perfectly fits your needs. Whether you're a seasoned woodworker or a beginner, this project enhances your skills and living space.
Customization Ideas for Your DIY Storage Bed
When it comes to building a DIY storage bed, customization is key. This section will guide you through various ideas to tailor your storage bed to your personal needs and preferences, ensuring that the end result is not only functional but also a reflection of your style.
Choose the Right Size
First, consider the size of your room and the amount of storage you need. Measure your space and decide whether you want a single, double, queen, or king-sized bed. Remember, the larger the bed, the more storage you'll have.
Selecting Materials
Select materials that match your decor and are durable enough to withstand daily use. Common choices include solid wood for a classic look, MDF for a budget-friendly option, or metal for a modern industrial aesthetic.
Designing the Storage
Decide on the type of storage that would be most useful. Drawers under the bed are perfect for clothes and bedding, while open shelves can display books and collectibles. Consider adding hidden compartments for valuables or items you don't use often.
Color and Finish
Choose a color and finish that complements your bedroom. You can paint the wood to match your walls, stain it to highlight the natural grain, or even add decorative knobs and handles to the drawers for a personal touch.
Headboard and Footboard
Think about whether you want a headboard or footboard. These can add style and character to your bed. They can also be functional, with built-in shelves or reading lights.
Making It Mobile
If you like to rearrange your room frequently, consider adding casters to the bottom of your bed. This will make it easy to move without emptying the drawers.
Safety Features
Safety is important, especially if children will be using the bed. Ensure all edges are smooth and rounded, and the structure is stable and secure.
Eco-Friendly Options
For those environmentally conscious, look for reclaimed wood or sustainable materials. You can also use non-toxic paints and adhesives.
By following these customization tips, you can make a storage bed that is practical, space-saving, and reflects your style. Keep it simple, focus on function, and add your personal touch. Your DIY bed will be both comfy and stylish.
Troubleshooting Common Issues
Building a DIY storage bed can be a rewarding project, but it's not uncommon to encounter a few hiccups along the way. This section will help you troubleshoot some of the most common issues you might face, ensuring that your project stays on track.
Problem: Wood Pieces Don't Fit Together
Solution: Double-check your measurements and cuts. If pieces aren't aligning, it may be due to inaccurate cutting. Use a sandpaper to gently adjust the edges for a better fit.
Problem: Drawers Stick or Won't Slide
Solution: Ensure that the drawer slides are installed correctly and that they're the right size for your drawers. Lubricating the slides with a silicone-based product can also help.
Problem: Bed Frame Feels Unstable
Solution: Check all connections and make sure they're tightened properly. Adding corner braces can also increase stability.
Problem: Screws or Nails Split the Wood
Solution: Pre-drill holes for screws to prevent splitting. For nails, blunt the tip by tapping it with a hammer before using it to reduce the risk of splitting.
Problem: Wood Surface is Rough or Uneven
Solution: Sand the wood thoroughly before and after assembly. Start with a coarse grit and work your way up to a fine grit for a smooth finish.
Problem: Paint or Stain Doesn't Look Even
Solution: Apply a primer before painting, and always sand between coats. For staining, use a pre-stain wood conditioner to ensure even absorption.
Problem: Mattress Doesn't Fit
Solution: Measure your mattress before building the bed frame to ensure a proper fit. Leave a little extra room for bedding.
Problem: Storage Space Isn't Enough
Solution: Consider adding shelves above the bed or using storage containers that can slide under the bed for additional space.
By anticipating these common problems and knowing how to solve them, you'll be better prepared to tackle your DIY storage bed project with confidence.
FAQs About DIY Storage Beds
Get answers to all your FAQs about DIY storage beds, including materials, steps, and tips. Find everything you need to know right here!
How can I ensure my storage bed is sturdy?
To ensure sturdiness, use quality materials and make sure all joints are properly secured with screws or bolts. Adding extra support beams or legs can also help, especially for larger beds.
Can I build a storage bed if I have limited woodworking experience?
Yes, you can build a storage bed with limited experience by following a detailed guide or plan. Start with a simple design and take your time to measure and cut accurately. Don't hesitate to ask for help when needed.
What kind of storage options can I incorporate into my bed?
Common storage options include drawers, shelves, or cubbies. You can also consider using a lift-up mattress mechanism for access to a larger storage area underneath the bed.
How can I customize my DIY storage bed?
Customize your storage bed by choosing different materials, finishes, or paint colors. You can also design the layout of drawers and shelves to suit your storage needs and add unique handles or knobs for a personal touch.
Are there any safety concerns I should be aware of when building a storage bed?
Always prioritize safety by wearing protective gear and ensuring your workspace is well-ventilated. Be cautious when using power tools, and secure all heavy materials properly to prevent accidents.
By addressing these FAQs, you'll be better prepared to tackle your DIY storage bed project with confidence and build a functional, stylish piece of furniture for your home.
Conclusion:
Wrapping up, building a DIY storage bed can be a practical and stylish way to maximize space in your bedroom. With a bit of creativity and some basic woodworking skills, you can customize a bed that fits your needs perfectly. Happy crafting!


