Building a storm shelter at home can save lives during severe weather. I remember when my friend and I first decided to construct a DIY storm shelter in my backyard. With just simple tools and materials, we started our project. The process was detailed, but we learned a lot along the way and felt more secure.
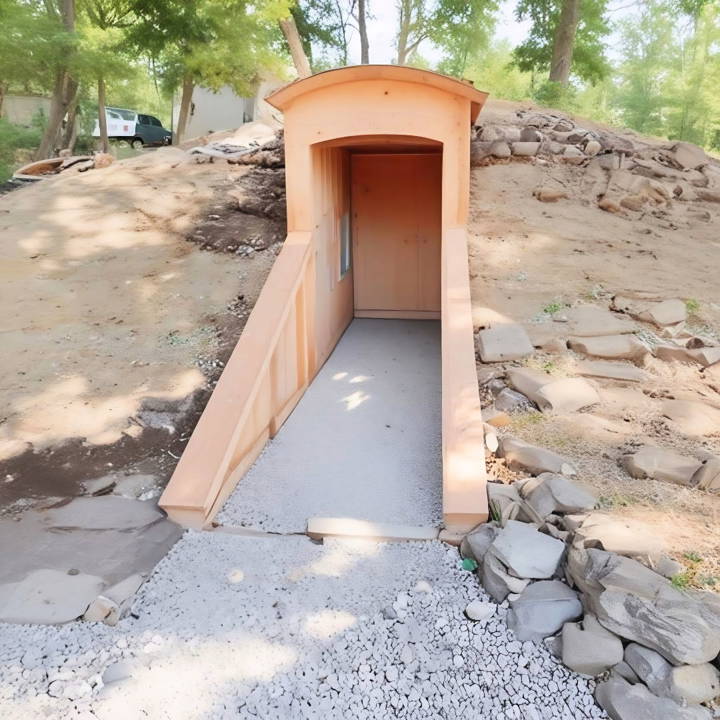
As we followed each step carefully, we also understood the importance of making a safe space. With some help from guides and videos, we completed our homemade storm shelter. Now, I feel confident that it will protect us during any future storms.
I'm sharing this to encourage you all to take the first step and build your own storm shelter using the tips provided here.
Step by Step Instructions
Learn how to build a DIY storm shelter with our step-by-step guide. From planning to finishing touches, ensure safety with detailed instructions.
Step 1: Plan ning and Preparation
Before breaking the ground, we spent days going over designs, securing permits, and gathering the necessary materials. Here's what we used and why:
- Excavation Equipment: Essential for removing topsoil and digging the hole for the shelter. We used a combination of rented heavy machinery and shovels for finer control.
- Gravel and Fabric: To ensure proper drainage within and around the shelter, keeping it dry and preventing water damage.
- Vapor Barrier: This keeps moisture out of the shelter, protecting it and its contents from damp.
- Pressure-Treated Timbers: For the structure. We chose Southern yellow pine for its durability and treated it further by torching (more on that later).
- Galvanized Nails and Timber Spikes: To assemble the frame securely.
- Manufactured Sand (Turkey Grit): It's spread below and above the vapor barrier to protect it from punctures.
- Propane Weed Burner: For torching the timber, an ancient method of wood preservation that helps protect against rot and decay.
Step 2: The Excavation
Removing the topsoil and digging down was an arduous process. We encountered water pooling, which necessitated making a trench for drainage. This hiccup was a hard lesson in assessing the land's drainage before starting.
Step 3: Laying the Foundations
We laid down gravel and fabric at the bottom of our dig. This layering was crucial for ensuring that water wouldn't pool underneath or inside the shelter, potentially compromising its structure and integrity.
Next, we placed a vapor barrier to protect from moisture. Covering the vapor barrier with turkey grit was something we hadn't planned initially but found necessary to prevent the sharp edges of gravel from tearing the barrier.
Step 4: Erecting the Structure
My wife and I cut and prepared the pressure-treated timbers. We decided on a rectangular structure with a pitched roof for our shelter.
Here's why:
- Rectangular Shape: Maximizes space and is easier to construct.
- Pitched Roof: Helps with water runoff, lessening the likelihood of leaks.
To preserve the wood, we torched it using a propane weed burner. This method is effective and straightforward and gives the timber a rustic, aged look.
We secured the structure with galvanized nails and timber spikes, then erected the framework, ensuring it was level and solid.
Step 5: The Roof and Waterproofing
After assembling the walls, we focused on the roof. We chose a simple, sturdy framing covered with a durable, waterproof material.
Layering more gravel on the roof before waterproofing added extra protection and helped with thermal insulation. We left the implementation of the roof until after adding the gravel to make the process easier and avoid moving the gravel by wheelbarrow, a little trick that saved our backs and time.
Step 6: Finishing Touches and Considerations
We applied a spray foam insulation on the interior walls for thermal insulation. Additionally, we installed a sturdy door, equipped with locks for safety.
Customization Tips for Your DIY Storm Shelter
When it comes to building a DIY storm shelter, customization is key to meeting your specific needs. Here are some tips to help you tailor your storm shelter to your preferences while keeping it functional and safe:
- Size and Capacity: Consider the number of people who will use the shelter. A good rule of thumb is to allow at least 3 square feet per person. If space allows, plan for extra room for comfort and storage of emergency supplies.
- Interior Layout: Design an interior layout that maximizes space efficiency. Include seating that doubles as storage, fold-down tables, and wall-mounted organizers. Ensure there is enough room to move comfortably.
- Accessibility: Make sure the entrance is easily accessible for all family members, including those with mobility issues. Consider installing a door that opens inward to prevent debris from blocking the exit.
- Ventilation: Proper ventilation is crucial. Install a ventilation system that can withstand strong winds and keep the air inside fresh. Regular vents, air filters, or even a small, battery-operated fan can make a difference.
- Lighting: Equip your shelter with a reliable lighting system. LED lights are energy-efficient and have a long lifespan. Have backup lighting, such as battery-powered lamps or glow sticks, in case of power failure.
- Power Sources: Include multiple power sources. Solar panels can provide energy independence, while battery backups ensure power during outages. Keep a portable charger and spare batteries for electronic devices.
- Comfort Measures: Add comfort features to make the shelter more livable. Cushioned seating, blankets, and pillows can ease the stress during a storm. Consider soundproofing to reduce noise from the outside.
- Safety Features: Install a first-aid kit, fire extinguisher, and emergency tools like a whistle, multi-tool, and a hand-crank emergency radio. Secure heavy items to prevent them from moving during a storm.
- Personalization: Personal touches can make the shelter feel less intimidating. Decorate with durable, cheerful materials and include books, games, and activities to keep everyone occupied.
- Communication Tools: Have a dedicated method to communicate with the outside world. A battery-operated radio is essential to receive updates, and a charged cell phone with emergency numbers is also important.
Customizing your DIY storm shelter ensures safety and comfort, making a secure space during storms. Balance practicality with personal needs for the best shelter.
Maintenance and Upkeep of Your DIY Storm Shelter
Regular maintenance is crucial for ensuring your DIY storm shelter remains a safe haven during severe weather. Here's a straightforward guide to keeping your shelter in top condition:
- Inspection Schedule: Set a routine to inspect your shelter at least twice a year. Check after any major storm for damage. Look for cracks in the walls, ceiling, and foundation.
- Door and Hinges: Ensure the door seals tightly and locks securely. Oil the hinges to prevent rusting and check that the door swings freely without obstruction.
- Ventilation System: Clean the vents to remove dust and debris. This ensures fresh air circulation and prevents blockages that could impede airflow.
- 4. Interior Cleanliness: Keep the interior of your shelter clean and dry. A damp environment can lead to mold growth, which is a health hazard.
- Emergency Supplies: Regularly update your emergency kit. Replace expired items like food, water, batteries, and medications. Ensure all electronic devices are functioning.
- Structural Integrity: Look for any signs of wear and tear. Repair any minor issues promptly to prevent them from becoming major problems.
- Weatherproofing: Check the weatherproofing elements, such as seals and waterproof coatings. Reapply or replace them as needed to prevent leaks.
- Pest Control: Inspect for signs of pests or rodents. Seal any gaps or holes and consider safe pest control measures to keep the shelter free of infestations.
- Communication Devices: Test communication devices like radios and ensure they are in working order. Keep an updated list of emergency contact numbers.
- Comfort Items: Refresh comfort items periodically. Replace used or outdated books, games, and other materials with new ones to keep the environment comforting.
Maintain your storm shelter regularly to ensure it remains safe and reliable for years. Routine upkeep preserves its structure and assures you're ready for any storm.
Safety Checklists for Your DIY Storm Shelter
Being prepared is crucial when it comes to storm safety. Here are some easy-to-follow checklists to ensure you and your loved ones remain safe before, during, and after a storm:
Before the Storm
- Inspect Your Shelter: Make sure your storm shelter is clean, dry, and free of any obstructions.
- Check Supplies: Verify that your emergency kit is stocked with fresh water, non-perishable food, batteries, and a first-aid kit.
- Test Communication Devices: Ensure that your radio and cell phones are working and fully charged.
- Review Your Plan: Go over the family emergency plan so everyone knows what to do and where to go when a storm is approaching.
During the Storm
- Stay Informed: Keep a battery-powered radio tuned to a local station for updates.
- Stay Inside: Remain in your shelter until authorities declare it's safe to leave.
- Keep Calm: Use breathing techniques or distraction strategies to stay calm, especially if you have children with you.
After the Storm
- Assess the Situation: Carefully check the area around your shelter for hazards before exiting.
- Report Damage: If your property is damaged, take photos for insurance purposes and report it to the authorities.
- Reach Out: Contact family and friends to let them know you are safe.
Maintenance Checklist
- Regular Checks: Perform a thorough inspection of your shelter every six months.
- Seal Checks: Ensure that the door and ventilation seals are intact and functioning.
- Supply Rotation: Replace any supplies that are close to their expiration date.
Follow these checklists to stay ready for any storm. Safety comes from preparation and being informed.
FAQs About DIY Storm Shelter
Discover essential FAQs about DIY storm shelters, covering safety, construction tips, costs, and materials to build your own secure refuge.
When planning a DIY storm shelter, the primary considerations include safety standards, location, materials, and ventilation. Ensure the design meets the International Code Council’s Standard for the Design and Construction of Storm Shelters (ICC 500). Choose a location that is easily accessible during a storm but also away from areas prone to flooding. Use reinforced concrete or steel to withstand high winds and debris. Ventilation is crucial to ensure a breathable atmosphere during prolonged stays.
Yes, you can retrofit a storm shelter into your existing home by reinforcing an interior room or constructing a separate structure within your garage or basement. Follow FEMA’s guidelines and local building codes to ensure it provides adequate protection.
The cost varies based on size, materials, and whether you do it yourself or hire professionals. A basic shelter can range from a few thousand dollars to over ten thousand. Prefabricated units may offer a cost-effective alternative.
Regular maintenance includes checking for cracks, leaks, and ensuring the door and ventilation systems function correctly. It’s also important to keep the shelter stocked with emergency supplies and to periodically clean and inspect the interior for mold or pests.
There are several DIY-friendly designs, including wood/steel combinations, prefabricated units, and even modified septic tanks. These designs should be built to withstand extreme conditions and follow the specifications described in FEMA's publications.
Conclusion:
Building a DIY storm shelter at home can be easy and rewarding. These tips will guide you through it.


