If you're tired of stuffed animals cluttering the floor and want a fun and functional way to organize them, making a DIY stuffed animal zoo might be the perfect solution. This simple project is a great way to keep your kids' stuffed animals off the floor and give them a cozy “home.” With some basic tools and materials, you can build a sturdy, cage-like storage structure that keeps toys organized and easily accessible. Let's dive into how to make this zoo, covering everything you need to know from materials and tools to detailed steps and tips.

Materials You'll Need for the Stuffed Animal Zoo
Building a DIY stuffed animal zoo is a straightforward project, with most supplies available at any hardware store. Here's a list of everything you'll need:
Wood Boards
- 2x2 Boards: Get two boards that are 6 feet long and one that's 2 feet long.
- 1x2 Boards: Two 8-foot boards, ideally pre-primed and pre-sanded if you want to save some finishing time.
- Masonite or Hardboard: One 4x8 foot sheet, cut down to 2x4 and 2x6 foot sections for the zoo's walls.
Stretch Cord or Elastic Bungee Cord
- Choose a durable, stretchy cord to act as the “bars” of the zoo, keeping the animals in but still allowing easy access.
Additional Supplies
- Paint (if you'd like to add color to the wood)
- Wood screws (around 2.5 inches)
- Wood glue
- Nails
- Clamps (for holding pieces together while assembling)
Tools Needed:
- Drill (with bits for both screws and making holes for the stretch cord)
- Saw (if you need to cut your boards to size; many hardware stores offer cutting services)
- Measuring tape
- Sandpaper (optional but recommended for a smoother finish)
- Square tool for accuracy
Step by Step Instructions
Learn how to build a DIY stuffed animal zoo with easy step-by-step instructions. Make a fun and organized storage solution for your child's plush toys!
Step 1: Prepare the Wood
- Cut the Wood to Size: If your boards haven't been cut yet, measure and cut them. The 2x2 boards should be six feet and two feet in length, while the 1x2 boards will form the shorter sides of the frame at two feet each.
- Sand the Edges: Lightly sand any rough edges for a smooth, safe finish. Sanding also makes it easier to apply paint later on.
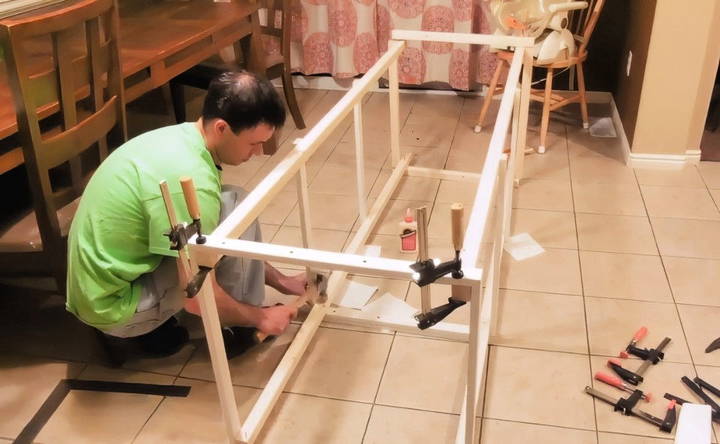
Step 2: Assemble the Frame
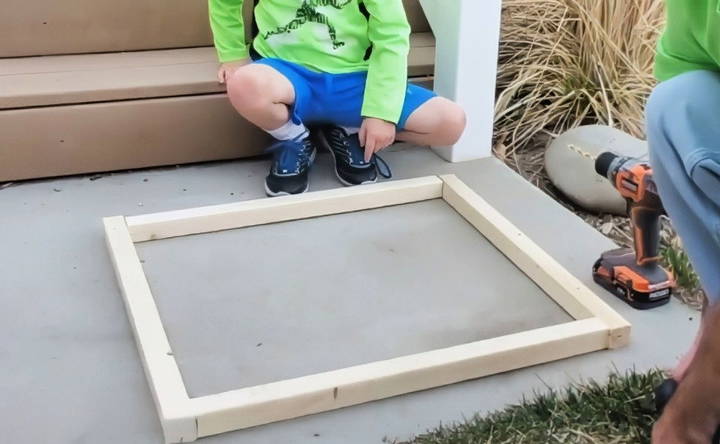
- Lay Out the Frame: Begin by arranging the 2x2 and 1x2 boards in a rectangular frame on the floor. The 6-foot boards will form the vertical sides, while the 2-foot boards build the top and bottom.
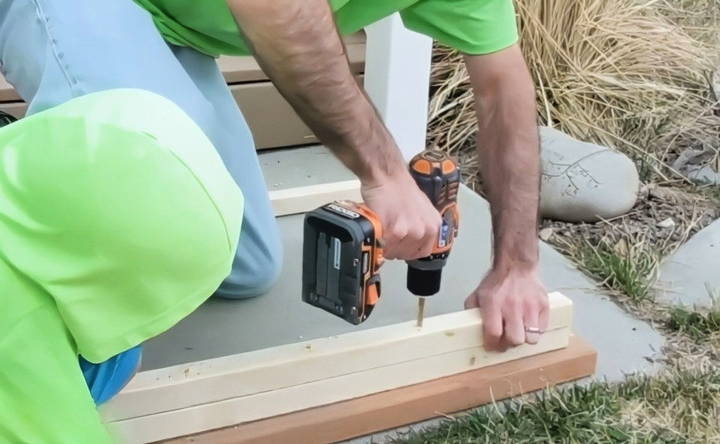
- Drill Pilot Holes: To avoid splitting the wood, drill pilot holes where the screws will go.
- Screw the Boards Together: Use wood screws to secure the boards in place. For added stability, apply wood glue at each joint before screwing them in.
- Check for Square Alignment: Use a square tool to ensure that all corners form 90-degree angles. Clamps can help hold pieces together while you work.
Step 3: Add the Cross Supports
- Place Cross Beams: Install cross beams between the vertical sections to add stability. These cross beams will help the zoo hold its shape, especially when it's loaded with stuffed animals.
- Secure with Screws and Glue: Use wood glue and screws to attach the cross beams securely. You can nail them in place and clamp them while the glue dries.
Step 4: Drill Holes for the Stretch Cord
- Mark Your Drill Points: Measure the sides of the zoo to place holes at even intervals. Common spacing is around three, nine, fifteen, and twenty-one inches along each side, but you can adjust based on the size of your stuffed animals.
- Drill Holes: Carefully drill holes at each marked point. These will serve as the entry points for the stretch cord.
Step 5: Paint and Finish (Optional)
- Paint the Frame: If you want a colorful stuffed animal zoo, now's the time to add a coat of paint. Choose non-toxic, child-safe paint, and apply it evenly over the wood.
- Let Dry Completely: Allow the paint to dry thoroughly before moving on to the next steps to avoid smudges or damage.
Step 6: Install the Stretch Cord Bars
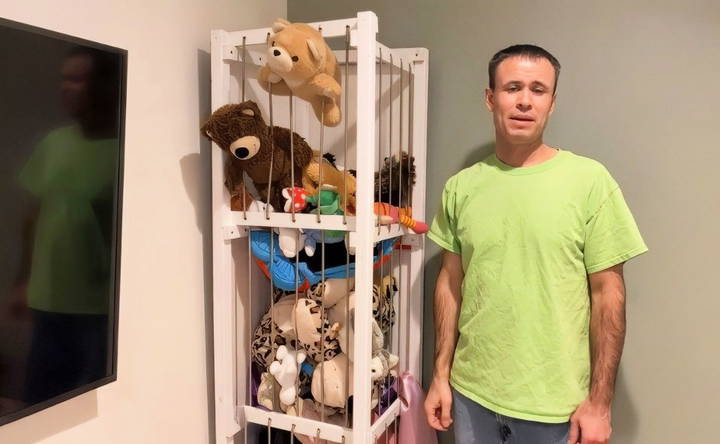
- String the Cord: Begin threading the stretch cord through the holes you drilled, making the vertical “bars” of the zoo. These bars keep the animals contained but flexible enough to let kids reach inside.
- Secure with Knots: Tie knots at the ends of each cord segment to hold it securely in place. Pull the cord tight as you work to maintain tension.
- Add Additional Cord if Needed: If you want extra security, you can add more rows of cord by drilling additional holes closer together.
Step 7: Attach the Back Panels
- Measure and Cut the Hardboard: If not pre-cut, measure and cut the hardboard to fit the back and side panels of the zoo.
- Attach with Screws or Nails: Secure the hardboard panels to the frame using screws or nails. This will provide a solid back and keep the structure stable.
Tips for Building Your Stuffed Animal Zoo
- Use High-Quality Stretch Cord: Investing in durable, stretchy cord ensures that it holds up against frequent use.
- Test the Structure's Stability: Once assembled, gently shake the zoo to ensure it feels sturdy. Add more cross beams or screws if it feels wobbly.
- Make It a Fun Family Project: Involve your kids in the painting process or let them choose the colors to make the project even more enjoyable and personalized.
Benefits of a DIY Stuffed Animal Zoo
Building a stuffed animal zoo is a great way to keep toys organized in a fun, accessible way. Here's why it's such a fantastic addition to any playroom:
- Decluttered Space: With a designated home for stuffed animals, there's less clutter on the floor, making a cleaner, safer space.
- Encourages Responsibility: Children will learn to put their toys away after playing, fostering responsibility and organizational habits.
- Saves Time: A zoo-style toy organizer is easy to clean up—kids can just toss their toys back in!
- Customizable: Choose colors, wood finishes, and cord spacing to suit your space and style.
- Cost-Effective: Making your own zoo is usually cheaper than purchasing large, pre-made toy storage solutions.
Common Issues and How to Avoid Them
- Wood Splintering: When drilling or cutting, take your time and avoid pressing too hard to prevent splintering.
- Stability Problems: If the structure feels unstable, double-check that all screws are tight and consider adding more cross beams.
- Loose Cord Bars: For the best security, keep the cords taut and ensure knots are tight. Use more cord rows if you find stuffed animals slipping through.
Additional Customization Ideas
- Personalized Colors: Let your kids pick the colors to make the zoo feel more like theirs.
- Add Labels: Paint or stencil “Zoo” on the front or add labels to sections if you want to categorize toys.
- Top Shelf for Small Toys: Attach a small shelf on top for smaller toys or favorite stuffed animals that deserve a spotlight.
Maintenance Tips
Once you've built your stuffed animal zoo, it's easy to maintain. Here are a few tips:
- Regular Tightening: Check the stretch cords periodically and tighten them if they begin to loosen over time.
- Clean the Wood: Occasionally dust or wipe down the wood, especially if it's painted. This helps keep it looking fresh and minimizes allergens.
- Inspect for Wear and Tear: Check for loose screws or cracked wood and address these issues as they come up to keep the zoo safe.
Final Thoughts
A DIY stuffed animal zoo is a fantastic way to add functionality and fun to your child's room. This project is not only an excellent solution for toy organization but also a great way to build a unique, personalized storage space that your children will enjoy using. It's a manageable project for any DIY enthusiast, and with a bit of time and effort, you'll have a long-lasting toy zoo that keeps the playroom tidy.
Whether you're new to DIY or a seasoned pro, this stuffed animal zoo is a great project to tackle. Get the materials, follow the steps, and watch as your kids delight in their very own zoo for all their favorite stuffed animals!
FAQs About DIY Stuffed Animal Zoo
Discover essential FAQs about making a DIY stuffed animal zoo, including materials, steps, and tips for a fun, organized play space.
The cord can be finished by tying it off tightly at the ends or using small clamps for added security. Whichever method you choose, ensure the knots or clamps are secure to prevent loosening with use.
Fifty feet of paracord is typically enough for two sides. If you plan to add cords to all four sides, it’s recommended to get two 50-foot sections to avoid running out mid-project.
A 1/4-inch paracord is a suitable choice as it provides the necessary strength and elasticity to contain the stuffed animals while being durable enough for frequent use.
Absolutely! Adjusting the size to fit your available space or the number of toys you have is a great idea. Just ensure the frame remains stable by adding extra cross-supports if you scale up the size.
To clarify, you’ll need two 6-foot 2x2 boards for the sides and 2-foot lengths of both 2x2 and 1x2 boards for the frame top and bottom. Adjust these as needed based on your room’s dimensions.
While a stuffed animal zoo makes it easy to store and access toys, it may allow collections to grow without the need to downsize often. However, it's a great way to keep everything organized while maintaining easy access.
Use wood glue and screws at each joint and secure the frame with cross-supports. Checking for square alignment and clamping sections while gluing also helps maintain stability.
Yes, but painting before assembly can help achieve a cleaner finish. Use non-toxic, child-safe paint and allow it to dry fully before adding cords or loading with toys.


