Constructing an underground greenhouse can be a fantastic way to maximize your harvest. I built mine last year, sinking it slightly below ground to utilize the earth's natural insulation. The DIY sunken greenhouse project needed careful planning, but the results were worth it. Access to fresh vegetables all year round has been an incredible benefit.
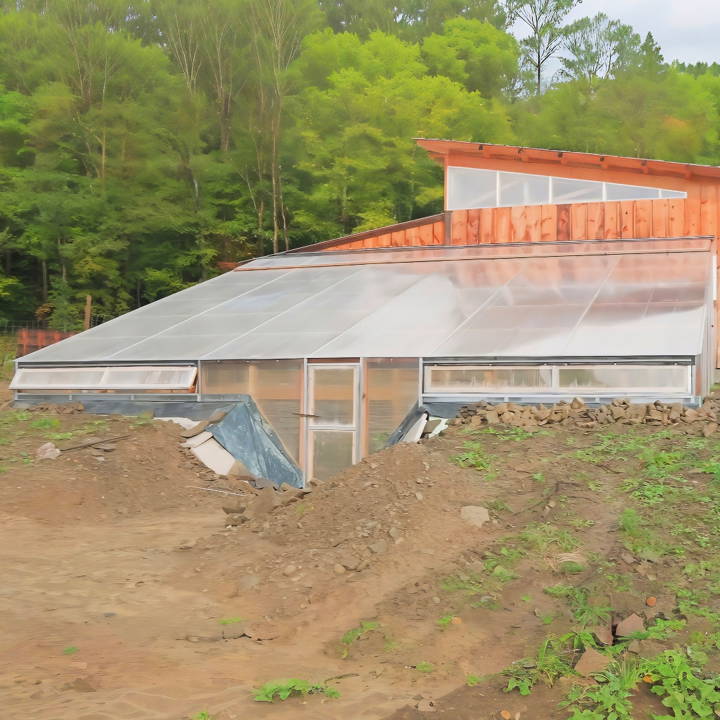
Digging into the ground for my sunken greenhouse was quite a task, but it allowed me to protect my crops from harsh weather. With lower temperature fluctuations, plants thrived. I even used solar power to maintain a consistent climate. If you're eager to grow more produce efficiently, these tips can surely help.
Get started with constructing your own in-ground greenhouse to enjoy a bountiful harvest. These tips will be incredibly useful.
What is a Sunken Greenhouse?
A sunken greenhouse is essentially a garden space that is dug into the ground. It is covered with a transparent material, like glass or plastic, which allows sunlight to enter and warm the space. The key feature of this design is its ability to harness the consistent temperature of the earth, which is warmer than the air above during winter and cooler during summer. This builds an ideal growing condition for a wide variety of plants.
Benefits of Sunken Greenhouses
The benefits of sunken greenhouses are numerous:
- Extended Growing Season: By maintaining a more consistent temperature, these greenhouses can extend the growing season, allowing gardeners to grow plants throughout the year, even in colder climates.
- Energy Efficiency: They require less heating in the winter and less cooling in the summer, reducing energy consumption and costs.
- Protection from Elements: Plants are protected from harsh weather conditions, such as frost, snow, and strong winds.
- Sustainable Gardening: Sunken greenhouses can contribute to sustainable gardening practices by reducing the need for artificial heating and cooling systems.
Historical Background
The concept of sunken greenhouses isn't new. It has historical roots in indigenous Bolivian agriculture and Victorian-era Britain, where similar structures were used to grow tropical plants in colder regions. The modern version, known as the walipini, was developed in the 1990s in Bolivia to help local farmers extend their growing seasons.
How Does it Work?
The sunken design utilizes the thermal mass of the earth. During the day, the sun heats the air and soil inside the greenhouse, and this heat is retained by the earth's mass, keeping the greenhouse warm at night. In the summer, the earth acts as a cooling mass, preventing the greenhouse from overheating.
Is it Right for You?
If you're considering a sunken greenhouse, think about your local climate, the type of plants you want to grow, and your commitment to maintaining the structure. While they can be more labor-intensive to build, the long-term benefits of energy efficiency and an extended growing season make them an attractive option for many gardeners.
Step by Step Instructions
Discover easy, step-by-step instructions for building a DIY sunken greenhouse. From location evaluation to final irrigation touches, get started today!
Step 1: Evaluating the Location and Gathering Materials
Choosing the right location was pivotal. I opted for a spot near my house, benefiting from proximity and natural shelter. The area had to accommodate a 25 by 36-foot structure, enough to house my desired plant varieties and provide ample thermal mass. I meticulously gathered materials with a focus on cost-efficiency and sustainability. Salvaged rocks from the property became the foundation of the walls, serving both as a natural insulator and a cost-saving measure. For the transparent roofing, double-wall polycarbonate panels were chosen for their durability and superior insulation capabilities compared to traditional polyethylene.
Step 2: Constructing the Framework and Walls
Constructing the greenhouse began with excavating the chosen site, which I aimed to bury about four feet deep. This depth ensured that the structure would benefit from the earth's consistent temperature, moderating the internal climate. Assembling the gabion walls from the collected rocks not only provided a sturdy barrier but also optimized the thermal mass that would store heat during the day and release it slowly at night.
Step 3: Installing the Roof and Ventilation System
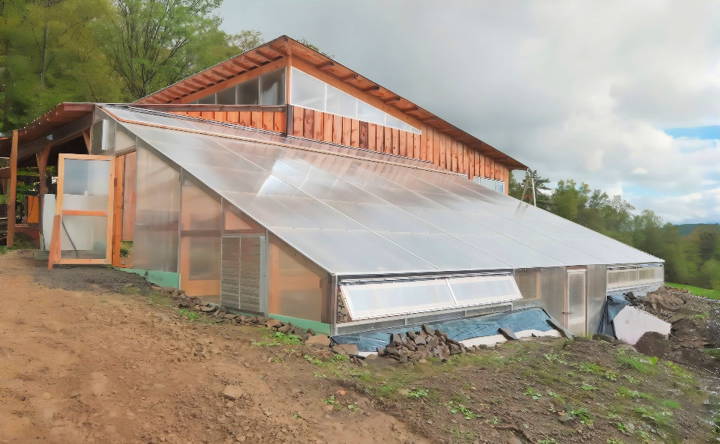
The most challenging aspect was managing the 24-foot long polycarbonate panels. Despite the daunting size, my partner and I, drawing courage from the couple's journey I watched, managed to secure them atop the structure. Their installation marked a significant milestone, as it brought the greenhouse closer to its final form. Ventilation was a critical component I couldn't overlook. I installed manual and automatic vents to ensure adequate air circulation, crucial for maintaining an optimal growing environment.
Step 4: Addressing Insulation and Internal Setup
To further insulate the greenhouse, I used rigid foam insulation around the perimeter, building a barrier that minimized heat escape. Inside, I planned for concrete walkways and designated areas for my figs and other plants that would benefit from the stable conditions. The inclusion of a heated propagating area for seedlings and sensitive plants during the colder months was an essential feature that mirrored the practicality of the couple's structure that inspired me.
Step 5: Irrigation and Final Touches
An efficient irrigation system was vital for the greenhouse's functionality. Drawing from the couple's setup, I installed a drip irrigation system, ensuring that all plants had access to the water they needed without manual intervention. As the greenhouse neared completion, I reflected on the journey – from gathering rocks to meticulously installing each panel, every step taught me the value of perseverance and sustainable living.
Technology Integration in Sunken Greenhouses
Integrating tech into sunken greenhouses boosts efficiency and productivity by optimizing plant growth, saving time, and reducing labor. Here's how tech enhances sunken greenhouse operations:
Automated Watering Systems
Automated watering systems are a game-changer for sunken greenhouses. They deliver water directly to the plants' roots through drip lines or misters, ensuring that each plant receives the exact amount of water it needs. These systems can be programmed with timers to water plants at specific intervals, which helps prevent overwatering or underwatering.
Climate Control Technologies
Maintaining the right temperature and humidity levels is crucial for plant health. Automated climate control systems use sensors to monitor the greenhouse environment and adjust heaters, fans, and vents accordingly. This ensures that the plants are growing in optimal conditions at all times, without the need for constant manual adjustments.
Soil Monitoring Sensors
Soil sensors measure moisture, pH levels, and nutrient content, providing valuable data that can be used to adjust watering schedules and fertilizer application. This technology helps in maintaining the perfect soil conditions for plant growth, leading to healthier plants and better yields.
Smart Lighting Solutions
Sunken greenhouses rely on natural sunlight, but during shorter days or cloudy weather, additional lighting may be necessary. LED grow lights can supplement natural light and are energy-efficient. Some smart lighting systems can even mimic the natural light spectrum, which is beneficial for plant growth.
Robotic Assistance
Robots and automated machinery can assist with repetitive tasks such as planting, weeding, and harvesting. This not only saves time but also reduces the physical strain on gardeners. Robotic systems can be particularly useful for large-scale sunken greenhouses where manual labor would be intensive.
Data Analytics and AI
Artificial intelligence (AI) and data analytics can process the information collected by various sensors to make predictions and provide insights into plant health and greenhouse conditions. This can help in identifying potential issues before they become problems, optimizing resource use, and improving overall productivity.
Connectivity and Remote Management
With the integration of Wi-Fi or other wireless technologies, gardeners can monitor and control their sunken greenhouse from a distance. Mobile apps can provide real-time data and alerts, allowing for remote adjustments to watering schedules, climate settings, and more.
Embracing technology helps sunken greenhouse owners garden more productively and sustainably, merging precision with nature's rhythms.
Troubleshooting and Maintenance for Sunken Greenhouses
Maintaining a sunken greenhouse requires regular attention to ensure that it remains a productive and efficient space for growing plants. Here are some troubleshooting tips and maintenance practices to keep your sunken greenhouse in top condition:
Regular Inspections
Check your greenhouse structure regularly for any signs of wear or damage. Look for cracks in the walls, leaks in the roofing material, and ensure that doors and windows close properly to maintain an airtight environment.
Managing Temperature and Humidity
Keep an eye on the temperature and humidity levels inside your greenhouse. If plants are showing signs of stress, such as wilting or yellowing leaves, it may indicate that the environment is too hot, cold, or humid. Adjust ventilation, heating, or cooling as necessary.
Ventilation
Proper ventilation is crucial to prevent the buildup of excess heat and humidity. Ensure that your greenhouse has adequate airflow by checking that vents and doors are functioning correctly and are free from obstructions.
Watering Systems
Automated watering systems should be checked for clogs or leaks. Regularly clean filters and nozzles to ensure even water distribution. Monitor soil moisture levels to avoid overwatering or underwatering your plants.
Soil Health
Test your soil periodically to check for nutrient deficiencies or pH imbalances. Amend the soil as needed to provide the best growing conditions for your plants.
Pest and Disease Control
Be vigilant about pests and diseases. Inspect plants frequently and take immediate action if you notice any signs of infestation or illness. Use natural or recommended treatments to address these issues.
Cleaning
Keep the greenhouse clean to prevent the spread of diseases and pests. Remove plant debris, disinfect tools, and clean surfaces to maintain a healthy environment.
Seasonal Adjustments
Make seasonal adjustments to your greenhouse to accommodate changing weather conditions. This may include adding insulation during colder months or increasing ventilation during warmer periods.
Record Keeping
Maintain records of all maintenance activities, including what was done, when, and the results. This will help you track the performance of your greenhouse and make informed decisions for future care.
Follow these maintenance tips to keep your sunken greenhouse thriving. Regular care and quick issue resolution ensure a bountiful harvest yearly.
FAQs About DIY Sunken Greenhouse
Discover everything you need to know about DIY sunken greenhouses with our FAQs, from construction tips to maintenance advice and more.
A DIY sunken greenhouse, also known as a Walipini, is a structure built into the ground to take advantage of the earth’s natural insulation. It’s designed to build a stable environment for year-round plant growth, regardless of external weather conditions. The earth’s consistent temperature helps to keep the greenhouse warm in winter and cool in summer.
The main benefits of a sunken greenhouse are energy efficiency and extended growing seasons. By being partially or fully buried in the ground, these greenhouses require less heating in the winter and less cooling in the summer, leading to significant energy savings. They also protect plants from extreme weather, allowing gardeners to grow a variety of plants throughout the year.
You can grow almost anything in a sunken greenhouse that you would in a traditional one. However, they are particularly well-suited for vegetables, herbs, and flowers that benefit from the more stable temperatures. Some people also use them to grow exotic plants that wouldn’t survive in the local outdoor climate.
The cost of building a sunken greenhouse can vary widely based on size, materials, and whether you do the work yourself or hire professionals. Generally, it can range from a few hundred to several thousand dollars. Doing the work yourself and using recycled materials can help keep costs down.
The type of soil in your location is a crucial factor to consider before building a sunken greenhouse. Different soils have different properties that can affect the stability and efficiency of your structure. For instance:
Clay soils are great at holding water but can be heavy and may collapse if not engineered properly.
Sandy soils offer good drainage but might require additional support for stability.
Loam and silt soils are generally ideal as they provide a balance of drainage and stability.
It's important to assess your soil type and consider any necessary construction techniques, such as back-filling or wall-building, to ensure a safe and durable greenhouse.
Lessons Learned and Future Prospects
By building this DIY sunken greenhouse, I managed to extend my growing season and improve crop quality. Check out the detailed plans and start benefiting from a stable, growing environment today. Trust me, these steps will help you build an effective greenhouse.


