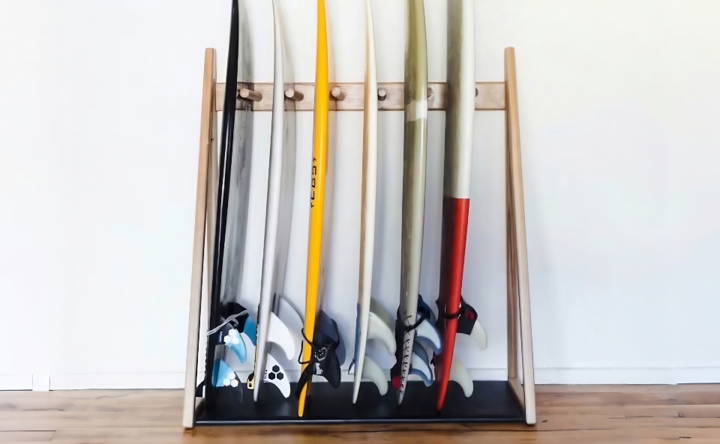
Building your own DIY surfboard rack was one of my most rewarding projects. I had multiple surfboards scattered around, making a mess in my garage. One day, I decided to organize everything by making a custom rack. This not only saved space but also protected my boards. With simple materials, I managed to construct a sturdy and reliable rack.
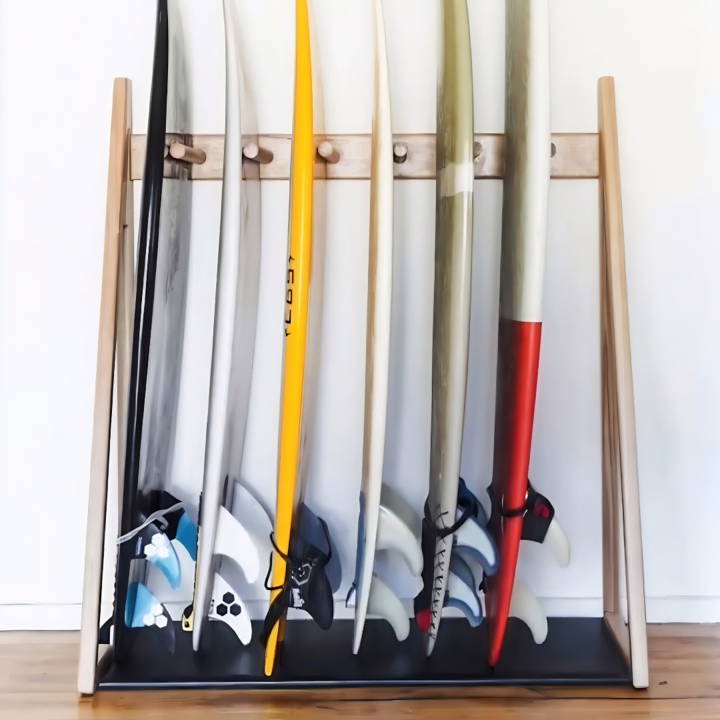
If you have surfboards lying around, consider this quick and practical solution. Building a surfboard rack is simple and doesn't require professional skills. All you need is basic tools, some wood, and a few hours of your time.
I'm sharing my experience and steps in this guide to help you get started with functional and tidy space for your surfboards.
Gathering the Materials
Discover why each material is essential for your project in "gathering the materials"—a detailed guide to ensure you have everything you need.
Why Each Material Is Needed:
- Scrap Hardwood: Acts as the sturdy mainframe, ensuring your rack isn't just a temporary fixture.
- Old Floorboards: Used for the back rails, contributing to the rack's overall structural integrity.
- Plywood and Yoga Mat: These make up the base, with the yoga mat providing a soft cushion for the surfboards.
- Hardwood Dowel: For the pegs, ensuring they're strong enough to hold the surfboards without faltering.
I sourced most of these materials from leftovers in my workshop, emphasizing the project's sustainability aspect. The idea of repurposing and giving new life to unused materials was particularly exciting.
Step by Step Instructions
Learn how to build a DIY surfboard rack with our easy, step-by-step instructions. Perfect for keeping your boards organized and damage-free.
Cutting and Preparing the Pieces
First, I cut all the pieces to the required lengths. The process was somewhat meditative, each measure and cut bringing me closer to the envisioned end product. For the base, I closely followed the dimensions from the tutorial, ensuring the yoga mat was snugly stapled, making a soft resting place for the boards.
Assembling the Frame
Opting for a two-triangle frame added a touch of complexity, requiring precise angle cuts. I used a circular saw for this, feeling a mix of excitement and concentration with each cut. The routing of the edges to achieve that sleek, rounded finish tested my patience but was ultimately rewarding.
Joining and Finishing Touches
Gluing and screwing the triangles together was a straightforward task, but I took extra care to ensure everything was flush and square. This was crucial for the aesthetic coherence of the rack. Sanding down to a 120-grit finish, I was reminded of the importance of attention to detail—not just for the look but for the smoothness to the touch.
Attaching the Back Rail and Pegs
Marking out the peg holes was a meticulous process. I chose a 35mm drill bit for this, aiming for a snug fit for the dowel pegs. Each peg was cut to 360mm, a length that seemed proportionate and functional. Gluing and screwing them from the back was a bit tricky, but a square helped ensure they were perfectly aligned.
The Final Assembly
Coming to the end, attaching the base to the frame, then adding the back rail, was immensely satisfying. The project was now a tangible object, a functional piece of artistry that reflected both the guide I'd followed and my craftsmanship.
Sealing and Finishing
I opted for a satin finish hard wax oil, seeking to enhance rather than obscure the natural beauty of the wood. Applying the sealant, I was aware of the transformation taking place, not just in the wood's appearance but in its longevity and durability.
This project highlighted the rewards of patience, precision, and perseverance. The surfboard rack was not just functional but a testament to the value of DIY, enhancing my skills and creativity.
Tips for Fellow DIYers:
- Patience is Key: Don't rush the cuts or assembly. Enjoy the process, and you'll appreciate the final product even more.
- Precision Matters: Measure twice, cut once, and always aim for perfection in alignment.
- Be Open to Learning: Each mistake is a learning opportunity. Embrace them, and you'll emerge more skilled and confident.
- Have Fun: Remember, DIY projects are not just about the end product but about the joy of making.
Customization Ideas for Your DIY Surfboard Rack
Making a surfboard rack that matches your personal style and fits perfectly into your space is a rewarding DIY project. Here are some customization ideas to help you design a surfboard rack that's as unique as your surfboard:
Choose Your Material Wisely:
- Wood: A classic choice that offers warmth and can be stained or painted to match your decor.
- PVC Pipes: Lightweight and easy to work with, PVC can be painted to suit any color scheme.
- Metal: Durable and sturdy, metal can be powder-coated for a sleek look.
Paint and Finish:
- Color: Select a color that complements your room. Bright colors can add a fun touch, while neutral tones can blend seamlessly.
- Finish: Use a waterproof sealant for wood to protect it from moisture. For metal, a rust-resistant coating is essential.
Design Elements:
- Shape: Experiment with different shapes for the rack arms. Curved or angular designs can add visual interest.
- Decor: Add decals, stencils, or even rope wrapping to give your rack a nautical vibe.
Functionality:
- Adjustability: Consider making the arms of the rack adjustable to accommodate different board sizes.
- Padding: Use foam padding to protect your surfboard from scratches and dings.
Space-Saving Features:
- Foldable Design: If space is limited, build a rack that can fold against the wall when not in use.
- Multi-Level: Build a multi-tier rack to store several boards vertically, saving floor space.
Personal Touches:
- Engravings: Carve your name, a favorite quote, or a simple design into the wood for a personalized touch.
- Accessories: Add hooks or shelves to the rack for storing wetsuits, leashes, and other gear.
Build a surfboard rack that's functional and reflects your style. Keep the design simple and prioritize what's important—be it appearance, functionality, or ease of use.
Advanced Techniques for Crafting Your DIY Surfboard Rack
When you're ready to take your DIY skills to the next level, advanced techniques can help you build a surfboard rack that's both functional and a standout piece in your home. Here's how to elevate your project:
Incorporate Adjustable Elements:
- Sliding Arms: Install sliding arms that can be moved to fit different board widths. This allows for a versatile rack that can hold various types of surfboards.
- Rotating Bases: For freestanding racks, consider a rotating base that lets you easily access boards from any angle.
Use Specialty Joinery:
- Dovetail Joints: These strong, interlocking joints add a professional touch and enhance the durability of your rack.
- Mortise and Tenon: This classic woodworking joint is perfect for making a sturdy, long-lasting structure.
Add Modular Features:
- Interchangeable Parts: Design your rack with modular sections that can be rearranged or expanded as needed.
- Removable Panels: Build panels that can be added or removed to adjust the rack's capacity.
Enhance Stability:
- Cross-Bracing: Add cross-bracing to wall-mounted racks for extra stability, ensuring your surfboards stay securely in place.
- Weight Distribution: Plan the rack's design to evenly distribute the weight of the boards, preventing tipping or warping.
Optimize Space:
- Vertical Stacking: Build upwards with a tiered design that maximizes vertical space, ideal for smaller areas.
- Collapsible Design: Implement a fold-down mechanism for easy storage when the rack is not in use.
Focus on Aesthetics:
- Fine Finishes: Apply high-quality stains or varnishes to bring out the natural beauty of the wood.
- Decorative Inlays: Use contrasting woods or materials to build inlays for a touch of elegance.
Implement Smart Storage:
- Built-In Compartments: Add compartments for storing wax, fins, and other surf accessories.
- Tool-Free Assembly: Design the rack so it can be assembled without tools, using cleverly designed slots and tabs.
Master these techniques to build a strong, versatile surfboard rack that showcases your craftsmanship.
Troubleshooting Common Issues with DIY Surfboard Racks
When building a DIY surfboard rack, you might encounter a few hiccups along the way. Here's a straightforward guide to solving some common problems:
The Rack is Unstable
- Solution: Check the base for levelness and ensure all connections are tight. Add additional support brackets if necessary.
The Surfboard Doesn't Fit
- Solution: Measure your surfboard's width and length. Adjust the rack's arms or spacing to accommodate these dimensions.
The Rack is Damaging the Surfboard
- Solution: Apply soft padding like foam or rubber where the surfboard rests on the rack. This will prevent scratches and dents.
The Rack is Too Bulky
- Solution: Consider a minimalist design. Use thinner materials and streamline the number of components.
Difficulty in Mounting the Rack
- Solution: Use a stud finder to locate solid anchor points in the wall. If you're unsure, seek help from a knowledgeable friend or a professional.
Wood is Splitting
- Solution: Pre-drill holes to prevent wood from splitting when inserting screws. Choose the correct screw size for the thickness of the wood.
The Rack Looks Unfinished
- Solution: Sand the wood thoroughly before applying paint or stain. Finish with a clear sealant for a polished look.
Rust Formation on Metal Parts
- Solution: Use stainless steel or galvanized metal components. Apply a rust-inhibitor spray for extra protection.
The Rack Takes Up Too Much Space
- Solution: Design a foldable or detachable rack that can be stored away when not in use.
Tools Required Are Not Available
- Solution: Opt for designs that require minimal tools. Alternatively, rent or borrow tools from local shops or friends.
Addressing these issues will ensure that your DIY surfboard rack is secure and suitable for your needs.
FAQs About DIY Surfboard Rack
Discover essential faqs about DIY surfboard racks: building tips, material choices, cost estimates, and safety guidelines. Perfect for surf enthusiasts!
It’s important to protect your surfboard from scratches and dings. Use rubber or foam padding on the areas of the rack where the surfboard will rest. Additionally, if you’re building a wall-mounted rack, consider placing a carpet or mat on the floor below to catch any dripping water.
Yes, there are various designs suitable for small spaces. Wall-mounted racks are popular for their space-saving qualities. If you prefer not to drill into walls, a freestanding rack might be a better option as it can be moved easily. For those with very limited space, a ceiling rack could be the perfect solution to keep your surfboards out of the way.
If you’re looking to transport your surfboard by bicycle, there are DIY racks designed specifically for this purpose. These racks attach to the side of the bike and allow you to carry your surfboard to and from the beach safely.
Stability is key for a surfboard rack. If you’re building a freestanding rack, make sure the base is wide and heavy enough to prevent tipping. For wall-mounted racks, secure them to wall studs, not just drywall, to ensure they can support the weight of the surfboards. Always test the rack with a gentle push to ensure it doesn’t wobble or tip before placing your surfboard on it.
Customizing your surfboard rack can be both fun and functional. Consider painting or staining the wood to match your room's decor. Add hooks for wetsuits and towels or shelves for wax and other accessories. For a personal touch, you can also add decals or engravings that reflect your love for surfing or the sea.
Final Thoughts
Building your own DIY surfboard rack is satisfying and very practical. You'll enjoy the organization and care it'll bring to your surfboards, just as I did. Get started today and see how easy it is to make your space neat!


