Making a DIY table runner was a rewarding experience for me. I decided to give my dining table a fresh look. I found some fabric I liked and gathered my sewing kit. I started by measuring the table to ensure the runner would fit perfectly. This step was crucial because an accurate measurement means a polished final product.
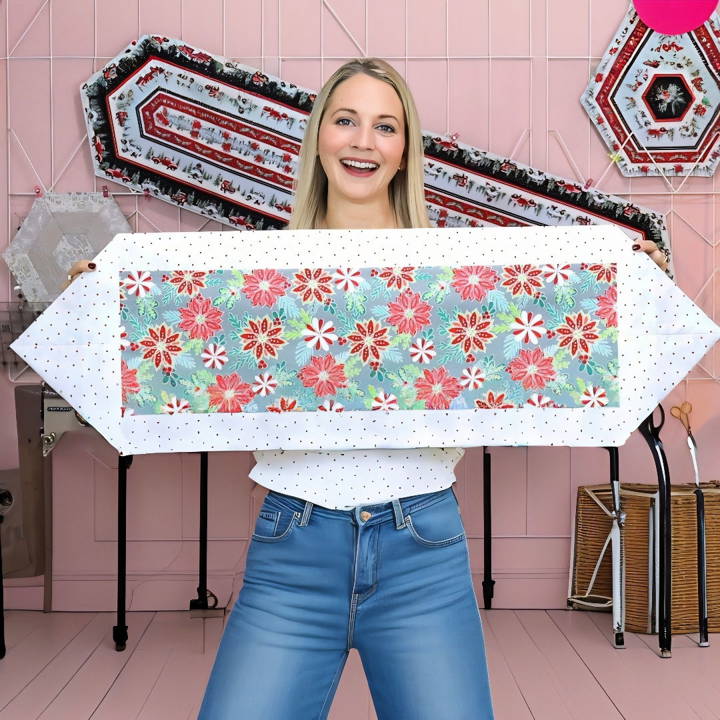
Following a pattern, I cut the fabric and then sewed the edges carefully. Each stitch brought the project closer to completion. Finally, I pressed the runner with an iron to give it a smooth finish. Seeing my finished table runner made me proud. These steps will help you make a beautiful piece for your home.
Get started with these simple steps, and you will enjoy making your own DIY table runner. The process is fun and satisfying.
Materials Needed:
Discover why two coordinating fabrics are essential for your project. Learn the key materials needed to achieve stunning results.
1. Two Coordinating Fabrics:
- Border Fabric: You will need a half-yard piece. Choose a fabric that complements your dining area's color scheme.
- Center Piece Fabric: A quarter-yard piece is sufficient. This piece will be the focal point, so select something striking or with a pattern you love.
Why These Materials are Essential:
The choice of two different fabrics allows for a creative and customized look. The border fabric frames the centerpiece, enhancing its visual appeal. Opting for coordinating fabrics ensures the final product looks cohesive and professionally made.
Step by Step Instructions
Learn how to make a gorgeous DIY table runner with our step-by-step instructions. From fabric prep to final touches, craft your perfect table decor.
1. Preparing the Fabric:
My first task involved trimming the fabrics to the correct sizes - the center piece to nine inches high and the border fabric to eighteen inches high. Ensuring accuracy in this step is crucial for the proportions of the table runner.
2. Sewing the Pieces Together:
After pressing the fabrics to remove any wrinkles, I laid the border fabric right side up and placed the center fabric right side down on top of it, aligning one edge. Sewing a quarter-inch seam along this edge was straightforward. I repeated this process on the opposite edge. By doing so, the border fabric enveloped the center fabric from both sides.
3. Pressing the Seams:
The pressing stage was more pivotal than I anticipated. Initially, I planned to press the seams towards the outer edges. However, since my border fabric was white, I opted to press them open. This decision prevented any show-through of the center fabric and resulted in a neater appearance.
4. Trimming and Turning:
Trimming the selvage edges after turning the project right side out was satisfying. Aligning the ruler and making those crisp corners felt like bringing order to chaos. This step significantly impacted the final look, proving that small details matter.
5. Sewing the Ends:
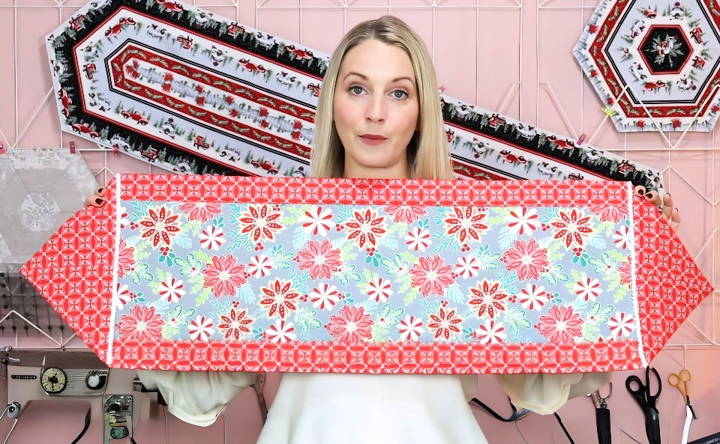
Folding the table runner in half and sewing across both ends was an interesting moment. It's where the runner began to take its final shape. Clipping the corners before turning the points right side out was a tip I found particularly useful for achieving sharp points.
6. The Final Touches:
Pressing the edges for a crisp finish was the last step before sewing the final seams. I opted to add a personalized touch by incorporating a lace trim into the folded corners before securing them with a seam. This embellishment step offered an opportunity to customize the table runner further, fitting the aesthetic of my home perfectly.
Personal Insights and Tips:
- Choosing the Right Fabrics: Spend some time selecting fabrics that not only coordinate well but also match the overall feel of your dining space. It makes the table runner look like a natural fit.
- Pressing Matters: Never underestimate the power of a well-pressed seam. It's the difference between a homemade and a professionally made look.
- Custom Embellishments: Adding simple embellishments like lace or ribbons can elevate the final product, making it uniquely yours. Don't shy away from experimenting.
Customization Tips for DIY Table Runners
Making a DIY table runner is not just about crafting something functional; it's about expressing your personal style and adding a unique touch to your home decor. Here are some tips to help you customize your table runner:
- Choose Your Theme: Start by deciding on a theme that reflects your personality or the occasion. Whether it's rustic, modern, seasonal, or holiday-themed, let your table runner tell a story.
- Selecting Fabrics: Pick fabrics that complement your theme. For a festive look, go for bright colors or metallics. If you're aiming for elegance, consider lace or silk. Cotton and linen are great for everyday use.
- Adding Personal Touches: Personalize your table runner by incorporating elements that are special to you. This could be a family monogram, a favorite quote, or patterns that have personal significance.
- Play with Textures: Mix and match different textures to add depth and interest. Combine smooth and rough fabrics, or add embellishments like beads or sequins for a tactile experience.
- Consider the Edges: The edges of your table runner can dramatically change its look. Fringes, pom-poms, or a scalloped edge can add a playful touch, while a simple hem might suit a more minimalist aesthetic.
- Functional Details: Think about adding pockets at the ends of your runner to hold cutlery or napkins, or loops to secure it to the table.
- Experiment with Length: Don't be afraid to play with the length of your runner. A longer runner can be elegant and dramatic, while a shorter one can be quaint and charming.
- Reversible Options: For versatility, make your table runner reversible. Choose coordinating fabrics for each side to switch up the look with ease.
The beauty of a DIY project is that there are no strict rules. Have fun with it, and make a table runner that you'll be proud to display!
Design Inspiration for DIY Table Runners
When it comes to designing a DIY table runner, the possibilities are endless. This section will provide you with a wealth of inspiration to help you make a table runner that not only looks great but also resonates with your personal style or the occasion you're celebrating. Here's how to get started:
- Seasonal Themes: Reflect the time of year on your table. Use light, floral patterns for spring, bright colors for summer, warm tones for autumn, and cozy textures for winter.
- Celebrations and Holidays: For holidays, think about motifs that match the occasion—pumpkins for Halloween, stars for Christmas, or hearts for Valentine's Day.
- Color Palettes: Choose colors that complement your dining room decor. Neutral colors can provide a subtle elegance, while a pop of color can make a bold statement.
- Patterns and Prints: Experiment with different patterns like stripes, polka dots, or paisley. If you're feeling adventurous, mix patterns carefully to make a unique look.
- Cultural Influences: Draw inspiration from different cultures. For example, a Moroccan-themed runner might feature intricate geometric patterns, while a Japanese-inspired one could showcase minimalistic designs.
- Nature-Inspired: Bring the outdoors in with a nature-themed runner. Think leaf patterns, floral designs, or even a seascape for a coastal vibe.
- Personal Interests: Let your hobbies or interests inspire your design. If you love music, incorporate musical notes; if you're a book lover, script or literary quotes could be your go-to.
- Texture Play: Don't forget about texture. Combining different materials like burlap with silk or cotton with lace can add an interesting dimension to your table runner.
- Modern vs. Traditional: Decide whether you want a modern look with clean lines and abstract designs or a traditional style with classic patterns and detailed embroidery.
Draw from these design ideas to craft a table runner that beautifully complements your table and reflects your style, making a joyful and enhanced home ambiance.
Upcycling Ideas for DIY Table Runners
Upcycling is a fantastic way to breathe new life into materials that might otherwise be discarded. When it comes to DIY table runners, upcycling not only adds a unique touch to your decor but also promotes sustainability. Here are some ideas to get you started:
- Old Jeans: Transform your worn-out denim into a chic and durable table runner. Cut the jeans into strips and weave them together or use the seams for a textured look.
- Vintage Scarves: Vintage scarves can be repurposed into a beautiful, bohemian-style table runner. Stitch them together end-to-end, and you have a colorful, patterned centerpiece for your table.
- Linen Napkins: If you have a collection of mismatched linen napkins, sew them together to make an eclectic table runner. The different colors and patterns will add charm to your setting.
- Canvas Drop Cloths: Canvas drop cloths from your last painting project can make a great rustic table runner. Paint or stencil designs onto the canvas for a custom look.
- Old T-Shirts: Soft and stretchy, old t-shirts can be cut into strips and braided or knotted to form a casual, comfy table runner.
- Burlap Sacks: Burlap sacks, often used for coffee beans or rice, can be repurposed into a table runner with a natural, rustic vibe. Just trim to size and hem the edges.
- Curtains: Outdated or spare curtains can be given a new purpose as a table runner. Choose a section with an appealing pattern or texture, and adjust the width to fit your table.
- Maps: For a travel-themed table runner, use old maps. They're especially great for a bon voyage party or to spark conversations about adventures.
- Sheet Music: If you're a music enthusiast, sheet music can be laminated and pieced together to make a melodious table runner that's sure to be a conversation starter.
- Book Pages: For book lovers, pages from damaged or duplicate books can be arranged and laminated to form a literary-themed table runner.
Upcycling in your DIY project makes unique, personal items and supports sustainability. Every piece tells a story and adds character to your table.
FAQs About DIY Table Runner
Discover answers in FAQs about DIY table runners. Learn how to choose fabric, measure dimensions, and craft your own table runner with ease!
Measure the length and width of your table. A good rule of thumb is to add 12 inches to the length for a nice overhang. The width is typically one-third of the table’s width. Remember to add extra for seam allowances if you’re sewing.
Yes, you can make a no-sew table runner using fusible tape or fabric glue to bond the edges. This is a great option if you want to avoid sewing or don't have access to a sewing machine.
Cotton and linen are popular choices because they’re easy to work with and washable. Home decor fabrics are also a good option for a more durable runner. Avoid thick upholstery fabrics as they can be difficult to handle and may not lay flat on the table.
Most fabric table runners can be machine washed on a gentle cycle and air-dried. If you've used special materials or decorations, consider hand washing or spot cleaning. Always check the care instructions for your specific fabric.
To personalize your table runner, you can add decorative elements such as lace, ribbon, or tassels. You can sew these on or attach them with fabric glue for a no-sew option. For a festive touch, consider using sequins or beads. Just make sure to choose decorations that complement your fabric and the overall theme of your table setting.
Final Thoughts:
Wrapping up, following this DIY table runner ensures you can make a beautiful piece for your home. Making your own table runner is enjoyable and rewarding. These easy steps will help you personalize your space. Start crafting today with these guidelines and enhance your dining table effortlessly.


