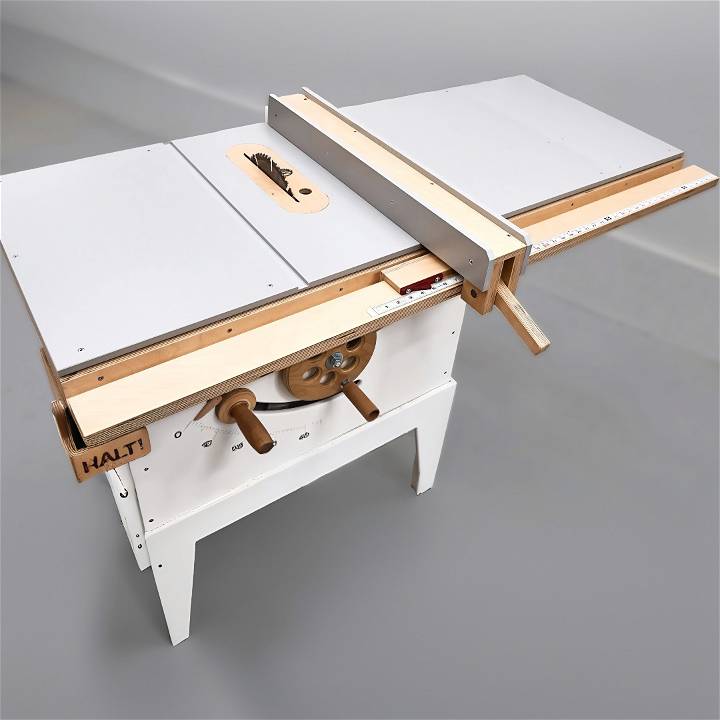
Embarking on the journey to build my very own DIY table saw fence was a decision driven by necessity and fueled by a keen interest in woodworking. After stumbling upon a comprehensive how-to video and plans online, I was inspired to take on the challenge, and what follows is a detailed recount of my experience, peppered with valuable insights and practical advice.
Why Build Your Own Table Saw Fence?
Before delving into the step-by-step process, it's crucial to understand the why. For me, the motivation was twofold: customization and cost-efficiency. A homemade fence offers the flexibility to tailor it to the specific needs of your projects and your saw, something off-the-shelf options may not always accommodate. Additionally, with the right materials and tools, building it yourself can be significantly less expensive than purchasing a commercial one.
Materials You'll Need
- Half-inch plywood: For the body of the fence and rail, offering a sturdy yet lightweight base.
- Pins and screws: For assembly, ensuring that all parts are securely fastened together.
- Aluminum sheet: For the rub plate, ensuring smooth operation.
- Wood glue: To bond the wooden parts securely.
- Plastic laminate (optional): For a slippery and durable surface on the sides of the fence.
- Tools: Such as a table saw, drill press, pin nailer, and clamps.
Each material was chosen for its role in ensuring the fence's durability and functionality. The plywood provides a strong but easily workable base, while the pins and screws hold everything tightly together. The aluminum sheet for the rub plate was a bit of a splurge but worth it for its wear resistance. Using wood glue ensured a strong bond between the plywood layers, and opting for plastic laminate on the sides gave the fence a smooth glide across the table saw.
The Building Process
Learn how to build your own DIY table saw fence with this step-by-step guide. From cutting the parts to attaching the rub plate, all you need to know.
Step 1: Cutting the Parts
After downloading and printing the plans, my first task was cutting out the parts from the plywood. Precision here is key, especially for the parts like the cam handle and mounting rail, which demand accuracy for the fence to function smoothly.
Step 2: Assembling the Mounting Rail
The mounting rail is a foundational component of the fence, and assembling it required attention to detail. Using pins helped align the three pieces of plywood correctly before securing them with screws. Ensuring they were perfectly aligned prevented any misalignment issues with the fence later on.
Step 3: Building the Fence Rail
Next came the fence rail, composed of two layers of half-inch plywood glued together. Here, keeping everything flat and straight while the glue dried was crucial. Any warp or twist in the rail could impact the fence's accuracy.
Step 4: Building the T-Fence
The T-fence was next, another critical component requiring precision. Gluing, pinning, and screwing the parts together needed careful alignment to ensure that the fence would be perfectly perpendicular to the table saw's surface.
Step 5: Attaching the Aluminum Rub Plate
The aluminum rub plate was added at the end of the T-fence. Its purpose is to interact with the cam handle, allowing the fence to lock securely in place along the rail. Adjusting the tightness of the screws here was a careful balancing act to allow just enough movement.
Step 6: Finishing Touches – Calibration and Adjustment
After assembling all the parts, the moment of truth arrived with calibration and adjustment. Ensuring the fence was square and parallel to the saw blade required patience and minor adjustments. I also attached plastic laminate to the sides for a smoother glide and marked the zero location for a measurement tape on the fence.
Design Considerations for a DIY Table Saw Fence
When designing a DIY table saw fence, it's important to focus on accuracy, stability, and ease of adjustment. These factors ensure that your fence not only improves the safety of your table saw but also enhances its functionality.
Accuracy
The accuracy of your fence is critical. It should be able to measure and lock down to the exact width you need for your cut. Here are some tips to ensure accuracy:
- Use a Reliable Measuring System: Consider installing a high-quality measuring tape or ruler on the fence. Make sure it's clearly visible and aligned with the blade.
- Check Squareness: Regularly check that the fence is square to the table saw top and the blade. Use a carpenter's square for this purpose.
Stability
A stable fence will not flex or move while cutting. To achieve this:
- Choose Robust Materials: Hardwoods, aluminum, or steel are great choices for a fence that needs to withstand the pressure of feeding materials.
- Secure Mounting: Ensure the fence is securely attached to the table saw with bolts and nuts. Avoid clamps that can shift during operation.
Ease of Adjustment
You'll often need to adjust the fence for different cuts. Here's how to make it easy:
- Simple Locking Mechanism: A cam or lever lock can make it quick and easy to secure the fence in place.
- Fine Adjustment Feature: Consider adding a micro-adjustment feature to dial in precise measurements.
By focusing on these design elements, you'll build a table saw fence that's not only reliable but also a pleasure to use.
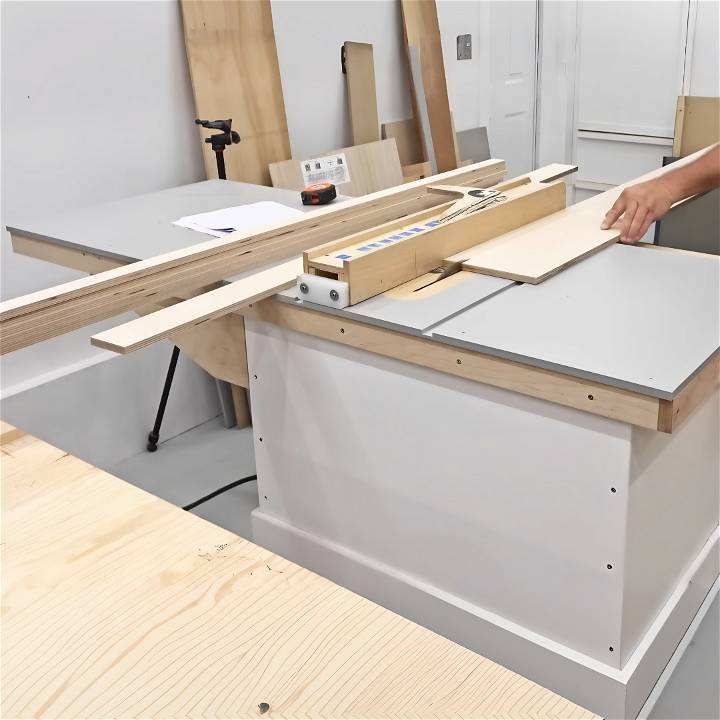
User Tips and Tricks for a DIY Table Saw Fence
Enhancing your DIY table saw fence with user tips and tricks can greatly improve its functionality and your woodworking experience. Here's a section dedicated to practical advice, written in a clear and accessible style.
Practical Tips for Enhanced Functionality
- Measure Twice, Cut Once: Always double-check your measurements before cutting. This age-old adage saves time and materials.
- Use Featherboards: Featherboards hold the wood against the fence securely, which is essential for consistent cuts and safety.
- Add a Sacrificial Fence: Attach a piece of scrap wood to your fence when making cuts that would otherwise damage your main fence.
Tricks for Improved Usability
- Build a Fence Extension: For cutting larger pieces, build an extension that can be attached to the end of your fence.
- Incorporate a T-Track: Adding a T-track to the top of your fence allows for the use of stop blocks and hold-downs, which can be very handy.
- Implement a Quick-Release Mechanism: A quick-release mechanism can make it easier to remove or adjust the fence without tools.
By incorporating these tips and tricks, you'll not only make your table saw fence more versatile but also increase the precision and safety of your cuts.
FAQs About DIY Table Saw Fences
Discover all the answers to common questions about DIY table saw fences - from how to build them to materials needed. Perfect guide for DIY enthusiasts!
What materials do I need to build a DIY table saw fence?
To build a sturdy and reliable table saw fence, you will need materials such as plywood or MDF for the body, aluminum or steel for the rails, screws, and bolts for assembly, and measuring tapes or rulers for accuracy. It's important to choose materials that are durable and can withstand the wear and tear of regular use.
How do I ensure my DIY table saw fence is accurate?
Accuracy is key for a table saw fence. Start by making sure your fence is perfectly square to the table saw blade and the table itself. Use a reliable measuring system attached to the fence, and always double-check your measurements before cutting. A fine adjustment feature can also help with precision.
Can I make a table saw fence that's easy to adjust?
Yes, you can design your fence with a simple locking mechanism, like a cam or lever lock, which allows for quick and easy adjustments. Additionally, a micro-adjustment feature can be included to fine-tune the fence's position for precise cuts.
What safety features should I include in my DIY table saw fence?
Safety should be your top priority. Include a clear and easy-to-read measuring system to avoid mistakes. A solid locking mechanism will prevent the fence from moving during cuts. Also, consider adding a push stick holder to your fence to keep your hands at a safe distance from the blade.
How do I maintain my DIY table saw fence?
Regular maintenance will keep your fence in top condition. Clean it regularly to prevent sawdust buildup, which can affect accuracy. Check all bolts and screws periodically to ensure they're tight. If your fence has any metal parts, protect them from rust with appropriate lubricants.
Conclusion
Making my own table saw fence was a rewarding and enlightening project. It gave me a deeper understanding of tool precision and customization. Patience, precision, and quality materials are key for this project. This has inspired me to take on more woodworking projects with confidence.
Finally, taping the measurement and block is crucial. The tape ensures precise cuts, while the block keeps the fence slightly elevated for smooth movement. I hope my experience motivates you to start your own woodworking projects with confidence and vision.


